Install Ansible on Ubuntu 20.04 and run ansible-playbook

  1. create user ID and sudo rules
    create ID ansible on all Linux:
    sudo adduser ansible
    echo "ansible ALL=(ALL) NOPASSWD:ALL" | sudo tee /etc/sudoers.d/ansible
  2. generate SSH key and copy to client servers:
    ssh-keygen
    ssh-copy-id ansible@192.168.0.143
    ssh-copy-id ansible@192.168.0.61
  3. install ansible:
    sudo apt update
    sudo apt install ansible
  4. add client servers:
    sudo vi /etc/ansible/hosts
    [servers]
    server1 ansible_host=192.168.0.143
    server2 ansible_host=192.168.0.61
  5. verify ansible hosts and run playbook
    sudo ansible-inventory –list -y
    mkdir ~/ansible-demo
    create few ansible-playbook in ~/ansible-demo:

    
    ansible@ubunu2004:~/ansible-demo$ cat install-apt.yml
    ---
    - hosts: all
    become: yes
    tasks:
    - name: Install packages
    apt:
      name:
      - ntpdate
      - nmap
      state: latest
      cache_valid_time: 3600
    ansible@ubunu2004:~/ansible-demo$ cat linux-echo.yml
    ---
    - hosts: all
    become: yes
    tasks:
    - name: Echo the Date to a tmp file
    shell: echo  "`date`"> /tmp/date
    - name: Echo String to a tmp file
    shell: echo  "Techexpert.tips is a greate website" > /tmp/techexpert
run the playbook:
```bash
ansible@ubunu2004:~/ansible-demo$ ansible-playbook install-apt.yml

PLAY [all] ***************************************************************************************************************************************************************************************************

TASK [Gathering Facts] ***************************************************************************************************************************************************************************************
ok: [server1]
ok: [server2]

TASK [Install packages] **************************************************************************************************************************************************************************************
changed: [server1]
changed: [server2]

PLAY RECAP ***************************************************************************************************************************************************************************************************
server1                    : ok=2    changed=1    unreachable=0    failed=0    skipped=0    rescued=0    ignored=0
server2                    : ok=2    changed=1    unreachable=0    failed=0    skipped=0    rescued=0    ignored=0

Ansible Playbook Example – Reading a Variable from the Command-line
This Ansible playbook example named linux-scan.yml will install the Nmap package.
It will read the IP addres from the IP_VAR variable and use NMAP to scan this host.

---
- hosts: all
  become: yes
  tasks:
  - name: Install packages
    apt:
      name:
      - nmap
      state: latest
      cache_valid_time: 3600
  - name: Scan host using nmap
    shell: nmap "{{ ip_var }}"
    register: out

  - debug: var=out.stdout_lines

To run this Ansible playbook, use the following command:
ansible-playbook --extra-vars ip_var=192.168.0.143 linux-scan.yml

DEPLOY AN APPLICATION TO JBOSS WITH MAVEN

  1. sudo apt install maven

  2. git clone https://github.com/jboss-developer/jboss-eap-quickstarts.git

  3. edit pom.xml for ~/jboss-eap-quickstarts/helloworld project
    cd ~/jboss-eap-quickstarts/helloworld
    add below lines into pom.xml:

    <build>
     <pluginManagement><!-- lock down plugins versions to avoid using Maven defaults (may be moved to parent pom) -->
      <plugins>
            <plugin>
                <groupId>org.wildfly.plugins</groupId>
                <artifactId>wildfly-maven-plugin</artifactId>
                <version>2.1.0.Beta1</version>
                <configuration>
                    <hostname>localhost</hostname>
                    <port>9990</port>
                    <username>admin</username>
                    <password>pas8word@</password>
                </configuration>
            </plugin>
      </plugins>
     </pluginManagement>
    </build>
  4. run mvn package to generate helloworld.war

  5. mvn wildfly:deploy
    (mvn wildfly:undeploy to undeploy it)
    ….
    [INFO] — wildfly-maven-plugin:2.1.0.Beta1:deploy (default-cli) @ helloworld —
    [INFO] JBoss Threads version 2.3.3.Final
    [INFO] JBoss Remoting version 5.0.12.Final
    [INFO] XNIO version 3.7.2.Final
    [INFO] XNIO NIO Implementation Version 3.7.2.Final
    [INFO] ELY00001: WildFly Elytron version 1.9.1.Final
    [INFO] ————————————————————————
    [INFO] BUILD SUCCESS
    [INFO] ————————————————————————
    [INFO] Total time: 23.553 s
    [INFO] Finished at: 2020-06-26T09:51:01-04:00
    [INFO] ————————————————————————
    you can verify from your jboss console
    http://192.168.0.43:9990/console/index.html, the app has been deployed.
    or you can open helloworld app directly:
    http://192.168.0.43:8090/helloworld/HelloWorld

    check full package in https://github.com/zhuby1973/python/tree/master/maven_jboss

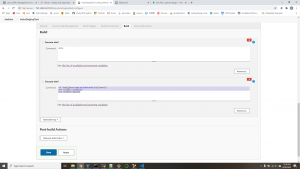
you can also create a freestyle job AutoDeployTest in Jenkins:
choose exec shell in Build:
cd /tmp/jboss-eap-quickstarts/helloworld
mvn wildfly:undeploy
mvn wildfly:deploy

REF:
https://maven.apache.org/guides/getting-started/maven-in-five-minutes.html
https://github.com/jboss-developer/jboss-eap-quickstarts.git
https://github.com/jbossas/jboss-as-maven-plugin.git

Install and Configure WildFly (JBoss7) App Server on Ubuntu 20.04

Step 1: Install OpenJDK
sudo apt install openjdk-8-jdk
Step 2: Setup WildFly User
sudo groupadd -r wildfly
sudo useradd -r -g wildfly -d /opt/wildfly -s /sbin/nologin wildfly
Step 3: Download and Configure WildFly
cd /tmp
wget https://download.jboss.org/wildfly/20.0.0.Final/wildfly-20.0.0.Final.tar.gz
tar xvf wildfly-20.0.0.Final.tar.gz
sudo mkdir /opt/wildfly
sudo mv wildfly-20.0.0.Final/ /opt/wildfly
sudo chown -RH wildfly: /opt/wildfly
Step 4: create WildFly service
sudo mkdir -p /etc/wildfly
sudo cp /opt/wildfly/docs/contrib/scripts/systemd/wildfly.conf /etc/wildfly/
sudo cp /opt/wildfly/docs/contrib/scripts/systemd/launch.sh /opt/wildfly/bin/
sudo sh -c ‘chmod +x /opt/wildfly/bin/
.sh’
sudo cp /opt/wildfly/docs/contrib/scripts/systemd/wildfly.service /etc/systemd/system/
sudo systemctl enable wildfly.service
sudo systemctl stop/start/status wildfly.service
undefined
run the commands below to create a user account that will connect and manage the app server web console:
sudo /opt/wildfly/bin/add-user.sh

step 5: enable admin console remote login
Out of the box, the server console is restricted to the local server only… If you’d like to connect from a remote location, Open it’s configuration file by running the commands below:
edit /etc/wildfly/wildfly.conf as below:

# The configuration you want to run
WILDFLY_CONFIG=standalone.xml
# The mode you want to run
WILDFLY_MODE=standalone
# The address to bind to
WILDFLY_BIND=0.0.0.0
#WildFly Console bind 
WILDFLY_CONSOLE_BIND=0.0.0.0

edit /opt/wildfly/bin/launch.sh as below:

#!/bin/bash
if [ "x$WILDFLY_HOME" = "x" ]; then
    WILDFLY_HOME="/opt/wildfly"
fi
if [[ "$1" == "domain" ]]; then
    $WILDFLY_HOME/bin/domain.sh -c $2 -b $3 -bmanagement $4
else
    $WILDFLY_HOME/bin/standalone.sh -c $2 -b $3 -bmanagement $4
fi

edit /etc/systemd/system/wildfly.service as below:

[Unit]
Description=The WildFly Application Server
After=syslog.target network.target
Before=httpd.service

[Service]
Environment=LAUNCH_JBOSS_IN_BACKGROUND=1
EnvironmentFile=-/etc/wildfly/wildfly.conf
User=wildfly
LimitNOFILE=102642
PIDFile=/var/run/wildfly/wildfly.pid
ExecStart=/opt/wildfly/bin/launch.sh $WILDFLY_MODE $WILDFLY_CONFIG $WILDFLY_BIND $WILDFLY_CONSOLE_BIND
StandardOutput=null

[Install]
WantedBy=multi-user.target

sudo systemctl daemon-reload
sudo systemctl restart wildfly.service
That’s it! You can now access the admin console remotely…
http://192.168.0.43:9990/console/index.html
undefined

install jenkins_2.235.1 on ubuntu20

  1. sudo apt install openjdk-8-jdk
  2. wget -q -O – https://pkg.jenkins.io/debian-stable/jenkins.io.key | sudo apt-key add –
  3. sudo sh -c ‘echo deb http://pkg.jenkins.io/debian-stable binary/ > /etc/apt/sources.list.d/jenkins.list’
  4. sudo apt update
  5. sudo apt install jenkins
  6. sudo ufw allow 8080
  7. (jenkins_url)/restart – Forces a restart without waiting for builds to complete.

Setting Up Jenkins
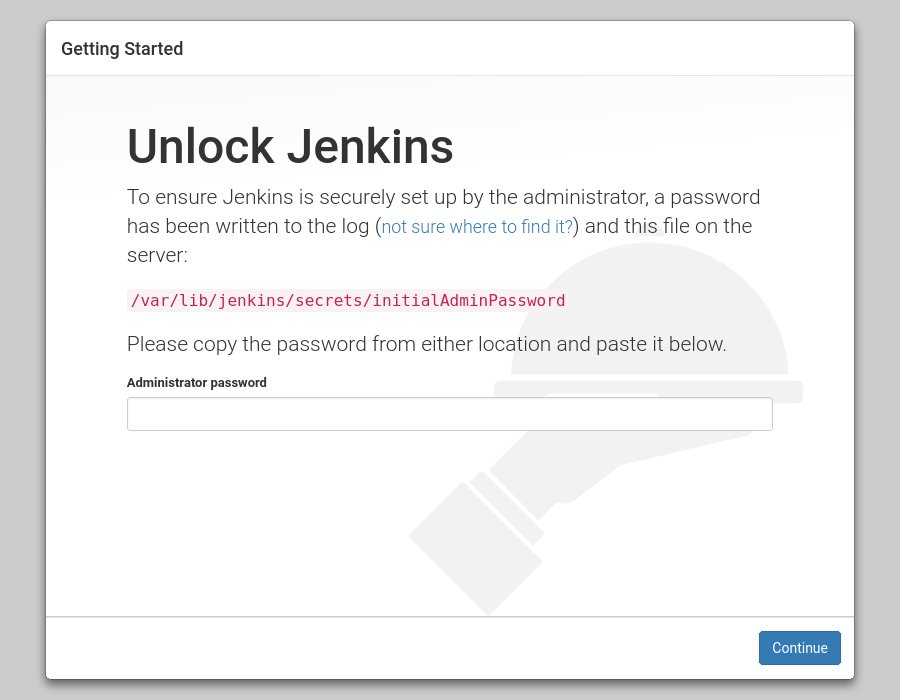
To set up your new Jenkins installation, open your browser, type your domain or IP address followed by port 8080, http://your_ip_or_domain:8080 and screen similar to the following will be displayed:
undefined
Use the following command to print the password on your terminal:
sudo cat /var/lib/jenkins/secrets/initialAdminPassword
Copy the password from your terminal, paste it into the Administrator password field and click Continue.
undefined
follow the page to setup admin user and url, then you can logon your Jenkins:
http://192.168.0.43:8080/

install SaltStack on Ubuntu20

On Salt Master Server

  1. Run the following command to import the SaltStack repository key:
    wget -O – https://repo.saltstack.com/py3/ubuntu/20.04/amd64/latest/SALTSTACK-GPG-KEY.pub | sudo apt-key add –
  2. edit /etc/apt/sources.list.d/saltstack.list:
    deb [arch=amd64] http://repo.saltstack.com/py3/ubuntu/20.04/amd64/latest focal main
  3. Run sudo apt-get update
  4. Install the salt-master and other Salt components:
    apt -y install salt-api salt-cloud salt-master salt-ssh salt-syndic
  5. vi /etc/salt/master
    interface: 192.168.0.43 (Salt Master Server IP)
  6. systemctl restart salt-master.service
  7. root@ubunu2004:~# salt-key -F master
    Local Keys:
    master.pem: 12:0f:ba:d1:d3:cd:5c:e5:52:62:34:cd:ee:b6:51:d7:f1:30:59:79:57:fe:3f:9b:b7:79:f4:1a:42:f8:3b:bc
    master.pub: a8:87:3f:ea:f3:cd:b8:4d:6b:b9:45:d7:b2:7f:77:94:bc:a1:81:66:8e:06:46:38:77:82:65:7d:58:f6:cb:97
  8. open the FireWall
    ufw allow proto tcp from any to any port 4505,4506

on Salt Minion server

  1. do same step1-3 as master server
  2. apt -y install salt-minion
  3. edit /etc/hosts:
    192.168.0.43 saltmaster salt
  4. edit /etc/salt/minion to add master_finger(same as we generated master.pub):
    master_finger: ‘a8:87:3f:ea:f3:cd:b8:4d:6b:b9:45:d7:b2:7f:77:94:bc:a1:81:66:8e:06:46:38:77:82:65:7d:58:f6:cb:97’
  5. systemctl restart salt-minion
  6. you can run below commands to debug if there is any issues:
    salt-minion -l debug
    salt-call -l debug state.apply

    List and accept key on master server

    using the following command:
    root@ubunu2004:/etc/salt# salt-key -L
    Accepted Keys:
    Denied Keys:
    Unaccepted Keys:
    ubuntumac-minion01
    Rejected Keys:
    root@ubunu2004:/etc/salt# salt-key -A
    The following keys are going to be accepted:
    Unaccepted Keys:
    ubuntumac-minion01
    Proceed? [n/Y] y
    Key for minion ubuntumac-minion01 accepted.

    Verify the Salt commands

    root@ubunu2004:/etc/salt# salt ubuntumac-minion01 test.ping
    ubuntumac-minion01:
    True
    root@ubunu2004:/etc/salt# salt ‘‘ test.version
    ubuntumac-minion01:
    3001
    root@ubunu2004:/etc/salt# salt ‘
    ‘ disk.usage
    root@ubunu2004:/etc/salt# salt ‘*’ cmd.run ‘ls -l /etc’
    root@ubunu2004:/etc/salt# mkdir -p /srv/salt/nginx/
    root@ubunu2004:/etc/salt# touch /srv/salt/vimrc
    we have file_roots defined in /etc/salt/master:

    file_roots:
    base:
    - /srv/salt

    root@ubunu2004:/etc/salt# vi /srv/salt/nginx/init.sls

    
    nginx:
    pkg.installed: []
    service.running:
    - require:
      - pkg: nginx
root@ubunu2004:/srv/salt# salt '*' state.apply nginx

verify on ubuntumac-minion01:
root@ubuntumac:/etc/salt# which nginx
/usr/sbin/nginx

another example to distribute a shell script:
```bash
install-cleanup-script:
 file:
 - managed
 - source: salt://cleanup-directories.sh
 - name: /usr/local/bin/cleanup-directories.sh
 - user: root
 - group: root
 - mode: 754

/var/www/vhost/production.website.com:
 file.directory:
   - user: root
   - group: root
   - mode: 755
   - makedirs: true

A more detailed example showing how to create a series of databases and users to access them using variables and "for" loops:

{% set DATABASE_PASS = 'our-db-password' %}
{% for DB in ['keystone','nova','cinder','glance','heat','neutron'] %}
{{ DB }}:
mysql_database:
 - present
 mysql_grants.present:
 - grant: all privileges
 - database: {{ DB }}.*
 - user: {{ DB }}
 - host: localhost
 mysql_user.present:
 - host: localhost
 - password: {{ DATABASE_PASS }}
 - connection_charset: utf8
{% endfor %}

https://repo.saltstack.com/#ubuntu
https://docs.saltstack.com/en/master/topics/tutorials/walkthrough.html
https://docs.saltstack.com/en/latest/topics/troubleshooting/minion.html

3 methods create a new database using SQLAlchemy

1. create_db.py

import sqlalchemy
from urllib import parse
engine = sqlalchemy.create_engine('mysql://zhuby:%s@192.168.0.43' % parse.unquote_plus('somIUpass#98'))
engine.execute("CREATE DATABASE TESTDB") #create db
engine.execute("USE TESTDB") # select new db

2. create_db2.py

import sqlalchemy
from urllib import parse
from sqlalchemy_utils import database_exists, create_database

engine = sqlalchemy.create_engine('mysql://zhuby:%s@192.168.0.43/EmployeeDB3' % parse.unquote_plus('somIUpass#98'))

if not database_exists(engine.url):
    create_database(engine.url)

print(database_exists(engine.url))

3. create_db3.py

from sqlalchemy import create_engine
user = 'zhuby'
password = 'somIUpass#98'
host = '192.168.0.43'
port = '3306'
db = 'NEWDB2'
# This engine just used to query for list of databases
mysql_engine = create_engine('mysql://{0}:{1}@{2}:{3}'.format(user, password, host, port))
# Query for existing databases
mysql_engine.execute("CREATE DATABASE IF NOT EXISTS {0} ".format(db))
# Go ahead and use this engine
db_engine = create_engine('mysql://{0}:{1}@{2}:{3}/{4}'.format(user, password, host, port, db))

python connect to MQServer

  1. we need install mqsdk and mqclient before install pymqi
    sudo apt install ./ibmmq-sdk_9.1.5.0_amd64.deb
    sudo apt install ./ibmmq-client_9.1.5.0_amd64.deb
    pip install pymqi
    export LD_LIBRARY_PATH=/opt/mqm/lib64:$LD_LIBRARY_PATH

  2. create qmgr, channel and LISTENER on MQ server
    https://www.ibm.com/support/knowledgecenter/SSFKSJ_7.5.0/com.ibm.mq.ins.doc/q009310_.htm
    https://dsuch.github.io/pymqi/examples.html
    create a user ID on the server that is not in the mqm group.
    useradd testid
    passwd testid
    su – mqm

    mqm@ubunu2004:~$ crtmqm QUEUE.MANAGER.1
    mqm@ubunu2004:~$ strmqm QUEUE.MANAGER.1
    mqm@ubunu2004:~$ runmqsc QUEUE.MANAGER.1
    5724-H72 (C) Copyright IBM Corp. 1994, 2020.
    Starting MQSC for queue manager QUEUE.MANAGER.1.
    AMQ8521I: Command completion and history unavailable.
    DEFINE QLOCAL (QUEUE1)
     1 : DEFINE QLOCAL (QUEUE1)
    AMQ8006I: IBM MQ queue created.
    SET AUTHREC PROFILE(QUEUE1) OBJTYPE(QUEUE) PRINCIPAL('testid') AUTHADD(PUT,GET)
     2 : SET AUTHREC PROFILE(QUEUE1) OBJTYPE(QUEUE) PRINCIPAL('testid') AUTHADD(PUT,GET)
    AMQ8862I: IBM MQ authority record set.
    SET AUTHREC OBJTYPE(QMGR) PRINCIPAL('testid') AUTHADD(CONNECT)
     3 : SET AUTHREC OBJTYPE(QMGR) PRINCIPAL('testid') AUTHADD(CONNECT)
    AMQ8862I: IBM MQ authority record set.
    DEFINE CHANNEL (CHANNEL1) CHLTYPE (SVRCONN) TRPTYPE (TCP)
     4 : DEFINE CHANNEL (CHANNEL1) CHLTYPE (SVRCONN) TRPTYPE (TCP)
    AMQ8014I: IBM MQ channel created.
    SET CHLAUTH(CHANNEL1) TYPE(ADDRESSMAP) ADDRESS('192.168.0.43') MCAUSER('testid')
     5 : SET CHLAUTH(CHANNEL1) TYPE(ADDRESSMAP) ADDRESS('192.168.0.43') MCAUSER('testid')
    AMQ8877I: IBM MQ channel authentication record set.
    DEFINE LISTENER (LISTENER1) TRPTYPE (TCP) CONTROL (QMGR) PORT (1415)
     6 : DEFINE LISTENER (LISTENER1) TRPTYPE (TCP) CONTROL (QMGR) PORT (1415)
    AMQ8626I: IBM MQ listener created.
    START LISTENER (LISTENER1)
     7 : START LISTENER (LISTENER1)
    AMQ8021I: Request to start IBM MQ listener accepted.
  3. test_mq.py

    import pymqi
    queue_manager = "QUEUE.MANAGER.1"
    channel = "CHANNEL1"
    host = "192.168.0.43"
    port = "1415"
    queue_name = 'QUEUE1'
    message = 'Hello from Python!'
    conn_info = "%s(%s)" % (host, port)
    user = 'testid'
    password = 'password'
    qmgr = pymqi.connect(queue_manager, channel, conn_info, user, password)
    queue = pymqi.Queue(qmgr, queue_name)
    queue.put(message)
    queue.close()
    qmgr.disconnect()

    (base) ubuntu@ubunu2004:~$ python test_mq.py
    then you can verify it with amqsget:

    mqm@ubunu2004:/opt/mqm/samp/bin$ ./amqsget QUEUE1 QUEUE.MANAGER.1
    Sample AMQSGET0 start
    message <Hello from Python!>
    no more messages
    Sample AMQSGET0 end

install IBM MQ 9.1 on Ubuntu

  1. download IBM_MQ_9.1.5_UBUNTU_X86-64.tar.gz from IBM site and unzip it to /tmp
  2. create mqm user and group on Ubuntu:
    root@ubunu2004:/usr/lib# useradd mqm -m -s /bin/bash
    root@ubunu2004:/usr/lib# id mqm
    uid=1001(mqm) gid=1001(mqm) groups=1001(mqm)
  3. create filesystem/dir for MQ
    mkdir /var/mqm
    mkdir -p /var/mqm/errors
    mkdir -p /var/mqm/trace
    mkdir -p /var/mqm/qmgrs
    mkdir -p /var/mqm/log
    chown -R mqm:mqm /var/mqm
  4. make sure Linux already installed libgcc_s.so and libstdc++.so.6
  5. update threads-max and nofile setting for system and users
    echo 32768 > /proc/sys/kernel/threads-max
    ulimit -n 10240
    or add below lines into /etc/security/limits.conf for nofile limit:

    * soft     nproc          65535
    * hard     nproc          65535
    * soft     nofile         65535
    * hard     nofile         65535
    root soft     nproc          65535
    root hard     nproc          65535
    root soft     nofile         65535
    root hard     nofile         65535
  6. start installation with root:
    cd /tmp/MQServer/
    ./mqlicense.sh -text_only
    apt install ./ibmmq-runtime_9.1.5.0_amd64.deb
    apt install ./ibmmq-gskit_9.1.5.0_amd64.deb
    apt install ./ibmmq-server_9.1.5.0_amd64.deb

    apt install ./ibmmq-jre_9.1.5.0_amd64.deb
    apt install ./ibmmq-java_9.1.5.0_amd64.deb
    apt install ./ibmmq-explorer_9.1.5.0_amd64.deb
    apt install ./ibmmq-samples_9.1.5.0_amd64.deb
    …..
    you can install other packages if you want, but we need at least runtime, gskit and server for a MQ env.
  7. create and start qmgr with mqm ID
    su – mqm
    cd /opt/mqm/bin
    ./crtmqm -q -d MY.DEFAULT.XMIT.QUEUE -u SYSTEM.DEAD.LETTER.QUEUE SATURN.QUEUE.MANAGER
    ./strmqm SATURN.QUEUE.MANAGER
    ./endmqm SATURN.QUEUE.MANAGER
    ./dspmq -m SATURN.QUEUE.MANAGER
    mqm@ubunu2004:/opt/mqm/bin$ ./dspmq -m SATURN.QUEUE.MANAGER
    QMNAME(SATURN.QUEUE.MANAGER) STATUS(Running)
    mqm@ubunu2004:/opt/mqm/bin$ ./dltmqm qmgr1
    IBM MQ queue manager ‘qmgr1’ deleted.
  8. verify the installation with command
    you can setup your default mqm env first:
    mqm@ubunu2004:/opt/mqm/bin$ source /opt/mqm/bin/setmqenv -s
    then create a new qmgr and putmsg/getmsg:
    crtmqm QMA
    strmqm QMA
    mqm@ubunu2004:~$ runmqsc QMA
    5724-H72 (C) Copyright IBM Corp. 1994, 2020.
    Starting MQSC for queue manager QMA.
    AMQ8521I: Command completion and history unavailable.

DEFINE QLOCAL (QUEUE1)
1 : DEFINE QLOCAL (QUEUE1)
AMQ8006I: IBM MQ queue created.
DEFINE CHANNEL(channel_test) CHLTYPE(CLNTCONN) CONNAME(192.168.0.43)
3 : DEFINE CHANNEL(channel_test) CHLTYPE(CLNTCONN) CONNAME(192.168.0.43)
AMQ8014I: IBM MQ channel created.
DEFINE LISTENER(LISTENER.1414.TCP) TRPTYPE(TCP) PORT(1414)
4 : DEFINE LISTENER(LISTENER.1414.TCP) TRPTYPE(TCP) PORT(1414)
AMQ8626I: IBM MQ listener created.
START LISTENER(LISTENER.1414.TCP)
5 : START LISTENER(LISTENER.1414.TCP)
AMQ8021I: Request to start IBM MQ listener accepted.

end
2 : end
One MQSC command read.
No commands have a syntax error.
All valid MQSC commands were processed.

mqm@ubunu2004:~$ cd /opt/mqm/samp/bin

mqm@ubunu2004:/opt/mqm/samp/bin$ ./amqsput QUEUE1 QMA
Sample AMQSPUT0 start
target queue is QUEUE1
this is my test msg.
hi

Sample AMQSPUT0 end
mqm@ubunu2004:/opt/mqm/samp/bin$ ./amqsget QUEUE1 QMA
Sample AMQSGET0 start
message <this is my test msg.>
message <hi>

no more messages
Sample AMQSGET0 end

Using Flask-Script

from flask import Flask
from flask_sqlalchemy import SQLAlchemy
from flask_script import Manager
from flask_migrate import Migrate, MigrateCommand
from urllib import parse
app = Flask(__name__)
app.config['SQLALCHEMY_DATABASE_URI'] = 'mysql+pymysql://zhuby:%s@192.168.0.43/EmployeeDB' % parse.unquote_plus('somIUpass#98')

db = SQLAlchemy(app)
migrate = Migrate(app, db)

manager = Manager(app)
manager.add_command('db', MigrateCommand)

class User(db.Model):
    id = db.Column(db.Integer, primary_key=True)
    name = db.Column(db.String(128))

if __name__ == '__main__':
    manager.run()

Assuming the above script is stored in a file named manage.py, all the database migration commands can be accessed by running the script:

$ python manage.py db init
$ python manage.py db migrate
$ python manage.py db upgrade
$ python manage.py db --help

SQLAlchemy connect to MySQL when password contains special characters

When DB user password contains special characters, we can make the connection string as:
from urllib import parse
from sqlalchemy.engine import create_engine
engine = create_engine(‘postgres://user:%s@host/database’ % parse.unquote_plus(‘badpass’))
Here is an example hello.py:

import os
from flask import Flask, render_template, session, redirect, url_for, flash
from flask_bootstrap import Bootstrap
from flask_moment import Moment
from flask_wtf import FlaskForm
from wtforms import StringField, SubmitField
from wtforms.validators import DataRequired
from flask_sqlalchemy import SQLAlchemy
from urllib import parse
basedir = os.path.abspath(os.path.dirname(__file__))

app = Flask(__name__)

app.config['SQLALCHEMY_DATABASE_URI'] = 'mysql+pymysql://zhuby:%s@192.168.0.43/EmployeeDB' % parse.unquote_plus('somIUpass#98')
app.config['SQLALCHEMY_TRACK_MODIFICATIONS'] = False


bootstrap = Bootstrap(app)
moment = Moment(app)
db = SQLAlchemy(app)


class Role(db.Model):
    __tablename__ = 'roles'
    id = db.Column(db.Integer, primary_key=True)
    name = db.Column(db.String(64), unique=True)
    users = db.relationship('User', backref='role')

    def __repr__(self):
        return '<Role %r>' % self.name


class User(db.Model):
    __tablename__ = 'users'
    id = db.Column(db.Integer, primary_key=True)
    username = db.Column(db.String(64), unique=True, index=True)
    role_id = db.Column(db.Integer, db.ForeignKey('roles.id'))

    def __repr__(self):
        return '<User %r>' % self.username


class NameForm(FlaskForm):
    name = StringField('What is your name?', validators=[DataRequired()])
    submit = SubmitField('Submit')


@app.errorhandler(404)
def page_not_found(e):
    return render_template('404.html'), 404


@app.errorhandler(500)
def internal_server_error(e):
    return render_template('500.html'), 500


@app.route('/', methods=['GET', 'POST'])
def index():
    form = NameForm()
    if form.validate_on_submit():
        old_name = session.get('name')
        if old_name is not None and old_name != form.name.data:
            flash('Looks like you have changed your name!')
        session['name'] = form.name.data
        return redirect(url_for('index'))
    return render_template('index.html', form=form, name=session.get('name'))
verify the code with python commands:
(venv) C:\Users\zhuby\flasky>python
Python 3.8.3 (tags/v3.8.3:6f8c832, May 13 2020, 22:37:02) [MSC v.1924 64 bit (AMD64)] on win32
Type "help", "copyright", "credits" or "license" for more information.
>>> from hello import db
>>> db.create_all()
C:\Users\zhuby\python\flask_db_api\venv\lib\site-packages\pymysql\cursors.py:170: Warning: (3719, "'utf8' is currently an alias for the character set UTF8MB3, but will be an alias for UTF8MB4 in a future release. Please consider using UTF8MB4 in order to be unambiguous.")
  result = self._query(query)
>>> from hello import Role, User
>>> admin_role = Role(name='Admin')
>>> mod_role = Role(name='Moderator')
>>> user_role = Role(name='User')
>>> user_john = User(username='john', role=admin_role)
>>> user_susan = User(username='susan', role=user_role)
>>> db.session.add(admin_role)
>>> db.session.add(mod_role)
>>> db.session.add(user_role)
>>> db.session.add(user_john)
>>> db.session.add(user_susan)
>>> db.session.commit()
>>> print(admin_role.id)
1
>>> print(user_role.id)
3
>>> Role.query.all()
[<Role 'Admin'>, <Role 'Moderator'>, <Role 'User'>]
>>> User.query.all()
[<User 'john'>, <User 'susan'>]
>>> User.query.filter_by(role=user_role).all()
[<User 'susan'>]