Webcam Face Detection with OpenCV & Python3

import cv2
import sys
facecascade = cv2.CascadeClassifier('haarcascade_frontalface_default.xml')
video_capture = cv2.VideoCapture(0)

while True:
    # Capture frame-by-frame
    ret, frame = video_capture.read()
    gray = cv2.cvtColor(frame, cv2.COLOR_BGR2GRAY)
    faces = facecascade.detectMultiScale(
        gray,
        scaleFactor=1.1,
        minNeighbors=5,
        minSize=(30, 30),
        flags=cv2.CASCADE_SCALE_IMAGE
    )

    # Draw a rectangle around the faces
    for (x, y, w, h) in faces:
        cv2.rectangle(frame, (x, y), (x+w, y+h), (0, 255, 0), 2)
        crop_face = frame[y:y + h, x:x + w]
    # save faces
        cv2.imwrite(str(x) + '_' + str(y) + '_face.jpg', crop_face)
    # Display the resulting frame
    cv2.imshow('Video', frame)

    if cv2.waitKey(1) & 0xFF == ord('q'):
        break

# When everything is done, release the capture
video_capture.release()
cv2.destroyAllWindows()

Run it with python sample.py, it will popup your webcam window and do face detection, you can type “q” to quit.

.

Photo Face Detection with OpenCV & Python3

  1. install opencv
    pip install opencv-python
  2. Face detection using Haar cascades is a machine learning based approach where a cascade function is trained with a set of input data. OpenCV already contains many pre-trained classifiers for face, eyes, smiles, etc.. Today we will be using the face classifier. You can experiment with other classifiers as well.
    You need to download the trained classifier XML file (haarcascade_frontalface_default.xml), which is available in OpenCv’s GitHub repository. Save it to your working location.
  3. download logo.jpg from internet

4. python3 code to detect faces in image

import cv2
# Load the cascade
#face_cascade = cv2.CascadeClassifier('haarcascade_frontalface_default.xml')
face_cascade = cv2.CascadeClassifier(cv2.data.haarcascades + "haarcascade_frontalface_default.xml")
# Read the input image
img = cv2.imread('logo.jpg')
# Convert into grayscale
gray = cv2.cvtColor(img, cv2.COLOR_BGR2GRAY)
# Detect faces
faces = face_cascade.detectMultiScale(gray, 1.1, 4)
# Draw rectangle around the faces
for (x, y, w, h) in faces:
    cv2.rectangle(img, (x, y), (x+w, y+h), (255, 0, 0), 2)
    crop_face = img[y:y + h, x:x + w]
    # save faces
    cv2.imwrite(str(x) + '_' + str(y) + '_face.jpg', crop_face)
# Display the output
cv2.imshow('img', img)
cv2.imshow("imgcropped", crop_face)
cv2.waitKey()

5. run it with pythoh cv2_sample.py, you will find faces detected and cropped faces saved:

Serve Flask app with apache and wsgi on Ubuntu 20

  1. install Apache and WSGI
    sudo apt install apache2 libapache2-mod-wsgi-py3 python3-pip python3-virtualenv
    sudo pip3 install flask (skip this if you are planning to setup venv)
  2. enable mod_wsgi
    sudo a2enmod wsgi
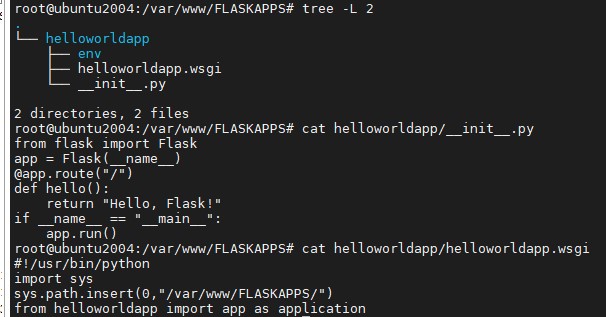
  3. create files as below (the __init__.py and wsgi file are mandatory)

4. create apache wsgi conf file /etc/apache2/sites-available/flaskhelloworldsite.com.conf
and enable it: $ sudo a2ensite flaskhelloworldsite.com.conf

<VirtualHost *:80>
    ServerAdmin webmaster@flaskhelloworldsite.com
    ServerName 192.168.0.51
    ServerAlias flaskhelloworldsite.com
    ErrorLog /var/www/flaskhelloworldsite.com/logs/error.log
    CustomLog /var/www/flaskhelloworldsite.com/logs/access.log combined

    WSGIDaemonProcess helloworldapp user=www-data group=www-data threads=5
    WSGIProcessGroup helloworldapp
    WSGIScriptAlias / /var/www/FLASKAPPS/helloworldapp/helloworldapp.wsgi
    <Directory /var/www/FLASKAPPS/helloworldapp>
        Order allow,deny
        Allow from all
    </Directory>
</VirtualHost>

5. create log directory
$ sudo mkdir -p /var/www/flaskhelloworldsite.com/logs
$ sudo chown -R www-data:www-data flaskhelloworldsite.com

6. restart apache and verify the app
systemctl restart apache2
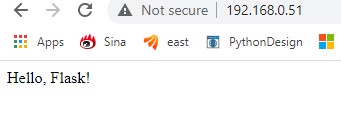
then you can open http://192.168.0.51/

NOTE: if you want use python virtual env, we can setup venv in /var/www/FLASKAPPS:
virtualenv venv
source venv/bin/activate
pip install flask

then update WSGIDaemonProcess in /etc/apache2/sites-available/flaskhelloworldsite.com.conf with python-home:
WSGIDaemonProcess helloworldapp user=www-data group=www-data threads=5 python-home=/var/www/FLASKAPPS/venv

How to Uninstall a Program on Windows 10 from Command Prompt

  1. right click Command Prompt and select“Run as Administrator”. At the prompt, type the following command: wmic
  2. in wmic prompt, you can use below command to list apps you installed:
    product get name
  3. command to uninstall, don’t forget to confirm with Y:
    product where name=”program name” call uninstall
wmic:root\cli>product where name="Oracle VM VirtualBox 6.1.10" call uninstall
Execute (\\HANS-T430\ROOT\CIMV2:Win32_Product.IdentifyingNumber="{0359AF05-E674-4ED4-B9FB-B77918617667}",Name="Oracle VM VirtualBox 6.1.10",Vendor="Oracle Corporation",Version="6.1.10")->Uninstall() (Y/N/?)? Y
Method execution successful.
Out Parameters:
instance of __PARAMETERS
{
        ReturnValue = 1618;
};

NOTE: we can use PowerShell command to remove Win10 built-in apps, use GameServices as example:
Get-AppxPackage -AllUsers Microsoft.XboxGamingOverlay | Remove-AppxPackage
ref: https://www.majorgeeks.com/content/page/remove_windows_10_apps_using_powershell.html

flask_sqlalchemy insert or update record

  1. create hello.py with class User(db.Model)
from flask import Flask
from flask_sqlalchemy import SQLAlchemy
app = Flask(__name__)
 
app.config['SQLALCHEMY_DATABASE_URI'] = 'sqlite:///users.sqlite3'
app.config['SECRET_KEY'] = "op23413kjkjljlksjfaksjfdlksajfkjlkjlkjk"
app.config['SQLALCHEMY_TRACK_MODIFICATIONS'] = False
db = SQLAlchemy(app)
 
class User(db.Model):
    __tablename__ = 'users'
    username = db.Column(db.String(64), primary_key=True)
    passwd = db.Column(db.String(64))
    def __repr__(self):
        return '<User %r>' % self.username
 
if __name__ == "__main__":
        db.create_all()
        app.run("0.0.0.0", 8090, debug=True)

2. test hello.py with python3 shell

zhub2@apache-vm1:~ $ python3
>>> from hello import db
>>> db.create_all()
>>> from hello import User
### INSERT NEW User
>>> user_john = User(username='john', passwd='carlos23')
>>> db.session.add(user_john)
>>> db.session.commit()
### LIST ALL User
>>> User.query.all()
[<User 'john'>]
### UPDATE User WHERE username='john'
>>> user_john = User.query.filter_by(username='john').first()
>>> user_john.passwd='test123'
>>> db.session.add(user_john)
>>> db.session.commit()

How to create Azure infra with Terraform

  1. Create an Azure service principal using the Azure CLI
PS /home/linda> az ad sp create-for-rbac --role="Contributor" --scopes="/subscriptions/528e05db-6ee0-43a6-9f5a-10cf3fac9f1c"
Creating 'Contributor' role assignment under scope '/subscriptions/528e05db-6ee0-43a6-9f5a-10cf3fac9f1c'
  Retrying role assignment creation: 1/36
The output includes credentials that you must protect. Be sure that you do not include these credentials in your code or check the credentials into your source control. For more information, see https://aka.ms/azadsp-cli
{
  "appId": "bb933f07-1544-4acf-9e6b",
  "displayName": "azure-cli-2021-02-01-15-53-30",
  "name": "http://azure-cli-2021-02-01-15-53-30",
  "password": "Cc84DM4qAHJrwEb1.",
  "tenant": "a9b214e8-0697-4c29-886f-e89844c78dbd"
}

2. Login using an Azure service principal
az login –service-principal -u “***” -p “***” –tenant “***”

3. Set the current Azure subscription
az account show
az account list –query “[].{name:name, subscriptionId:id}”
az account set –subscription=””

4. Create a Terraform configuration file

# Configure the Microsoft Azure Provider
# client_id="appId" and client_secret = "password"  when you create service principal
provider "azurerm" {
        subscription_id = "528e05db-6ee0-43a6-9f5a-10cf3fac9f1c"
        client_id = "bb933f07-1544-4acf-9e6b"
        client_secret = "Cc84DM4qAHJrwEb1."
        tenant_id = "a9b214e8-0697-4c29-886f-e89844c78dbd"
        features {}
}

# Create a resource group if it doesn't exist
resource "azurerm_resource_group" "myterraformgroup" {
    name     = "myResourceGroup"
    location = "eastus"

    tags = {
        environment = "Terraform Demo"
    }
}

5. Create and apply a Terraform execution plan
terraform init
terraform plan -out terraform_plan.tfplan
terraform apply “terraform_plan.tfplan”

PS /home/linda> terraform plan -out terraform_plan.tfplan

An execution plan has been generated and is shown below.
Resource actions are indicated with the following symbols:
  + create

Terraform will perform the following actions:

  # azurerm_resource_group.myterraformgroup will be created
  + resource "azurerm_resource_group" "myterraformgroup" {
      + id       = (known after apply)
      + location = "eastus"
      + name     = "myResourceGroup"
      + tags     = {
          + "environment" = "Terraform Demo"
        }
    }

Plan: 1 to add, 0 to change, 0 to destroy.

------------------------------------------------------------------------

This plan was saved to: terraform_plan.tfplan

To perform exactly these actions, run the following command to apply:
    terraform apply "terraform_plan.tfplan"

PS /home/linda> terraform apply "terraform_plan.tfplan"
azurerm_resource_group.myterraformgroup: Creating...
azurerm_resource_group.myterraformgroup: Creation complete after 1s [id=/subscriptions/528e05db-6ee0-43a6-9f5a-10cf3fac9f1c/resourceGroups/myResourceGroup]

Apply complete! Resources: 1 added, 0 changed, 0 destroyed.

ref: https://docs.microsoft.com/en-us/azure/developer/terraform/get-started-cloud-shell