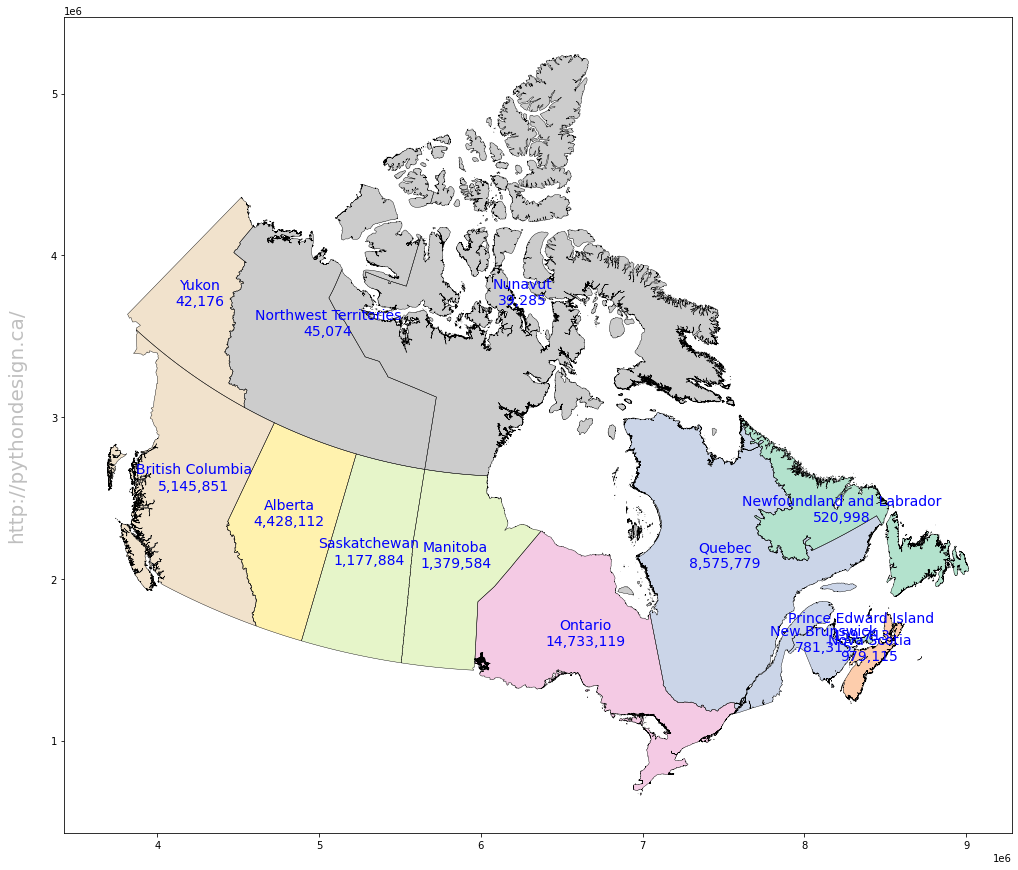
create Nightingale Rose Chart with pyecharts

  1. install python library
    pip3 install pyecharts
    pip3 install xlrd
  2. download excel data ca.xls from https://github.com/zhuby1973/geopandas
  3. write the code
import pandas as pd
from pyecharts.charts import Pie
from pyecharts import options as opts
# load data
df = pd.read_excel("ca.xls")
v = df['Province'].values.tolist()
d = df['cases'].values.tolist()
# set color
color_series = ['#FAE927','#E9E416','#C9DA36','#9ECB3C','#6DBC49',
                '#37B44E','#3DBA78','#14ADCF','#209AC9','#1E91CA',
                '#2C6BA0','#2B55A1','#2D3D8E','#44388E','#6A368B'
                '#7D3990','#A63F98','#C31C88','#D52178','#D5225B',
                '#D02C2A','#D44C2D','#F57A34','#FA8F2F','#D99D21',
                '#CF7B25','#CF7B25','#CF7B25']

pie1 = Pie(init_opts=opts.InitOpts(width='1350px', height='750px'))
pie1.set_colors(color_series)

pie1.add("", [list(z) for z in zip(v, d)],
        radius=["30%", "135%"],
        center=["50%", "65%"],
        rosetype="area"
        )
pie1.set_global_opts(title_opts=opts.TitleOpts(title='rose'),
                     legend_opts=opts.LegendOpts(is_show=False),
                     toolbox_opts=opts.ToolboxOpts())
pie1.set_series_opts(label_opts=opts.LabelOpts(is_show=True, position="inside", font_size=12,
                                               formatter="{b}:{c}δΎ‹", font_style="italic",
                                               font_weight="bold", font_family="Microsoft YaHei"
                                               ),
                     )
# generate html file
pie1.render("rose.html")

Create a Canada population map in Python using GeoPandas and Matplotlib

Step 1: Install required Python libraries

pip install descartes
pip install geopandas
pip install matplotlib
pip install numpy
pip install pandas

Step 2: Download Canada population and shapefile
you can search and Download Canada shapefile from Statistics Canada or pull it from Github(https://github.com/zhuby1973/geopandas.git)

the shapefile include 3 files, we need save it in same folder:
lpr_000b16a_e.dbf
lpr_000b16a_e.shp
lpr_000b16a_e.shx

Step 3: Begin to code

import pandas as pd
import numpy as np
import geopandas as gpd
import matplotlib.pyplot as plt

#load Canada shapefile
fp = "lpr_000b16a_e.shp"
map_df = gpd.read_file(fp)

#load Canada population csv file
province = pd.read_csv("1710000901-eng.csv", sep=",")

# join the geodataframe with the csv dataframe
merged = map_df.merge(province, how='left', left_on="PRENAME", right_on="Geography")
merged=merged.rename(index=str, columns={"PRENAME":"PRENAME", "geometry":"geometry", "Q4 2020":"population"})

# add province name and populations on map
fig = plt.figure(1, figsize=(25,15)) 
ax = fig.add_subplot()
merged.apply(lambda x: ax.annotate(text=x.PRENAME + "\n" + str(x.population), xy=x.geometry.centroid.coords[0], ha='center', fontsize=14, color='blue'), axis=1);
merged.boundary.plot(ax=ax, color='Black', linewidth=.4)
merged.plot(ax=ax, cmap='Pastel2', figsize=(12, 12))
ax.text(-0.05, 0.5, 'http://pythondesign.ca/', transform=ax.transAxes,
        fontsize=20, color='gray', alpha=0.5,
        ha='center', va='center', rotation='90')

Step 4: Execute the code to generate the map

Inspired by:
1. https://health-infobase.canada.ca/covid-19/dashboard/
2. https://jcutrer.com/python/learn-geopandas-plotting-usmaps

need fix the overlapping annotations later.

generate artistic or animated QR-Code with python MyQR

  1. pip install myqr
  2. generate common qr-code
from MyQR import myqr
myqr.run(
    words='https://www.ibm.com',
)

3. generate colorized artistic qr-code with your own png picture

from MyQR import myqr
myqr.run(
words='https://www.ibm.com',
picture='C:\Users\zhuby\panda.png',
colorized=True,
)

4. generate animated qr-code

from MyQR import myqr
myqr.run(
    words='https://www.ibm.com',
    version=5,  
    level='H', 
    picture='C:\\Users\\zhuby\\cat.gif',  
    colorized=True, 
    contrast=1.0, 
    brightness=1.0, 
    save_name='cat_qrcode.gif', #format could be .jpg .png .bmp .gif
    save_dir='C:\\Users\\zhuby',
)

asynchronous execute python app with ThreadPoolExecutor

we can launch parallel tasks with python concurrent.futures to double the speed.
here is the original code with one thread one_thread.py:

import flask
import json
import time

app = flask.Flask(__name__)

def read_file():
	time.sleep(0.1)
	return "file result"
	
def read_db():
	time.sleep(0.2)
	return "db result"
	
def read_api():
	time.sleep(0.3)
	return "api result"
	
@app.route("/")
def index():
	result_file = read_file()
	result_db = read_db()
	result_api = read_api()
	
	return json.dumps({
		"result_file": result_file,
		"result_db": result_db,
		"result_api": result_api,
	})
	
if __name__ == "__main__":
	app.run(host='0.0.0.0')

and another one multiple_threads.py

import flask
import json
import time
from concurrent.futures import ThreadPoolExecutor

app = flask.Flask(__name__)
pool = ThreadPoolExecutor()

def read_file():
	time.sleep(0.1)
	return "file result"
	
def read_db():
	time.sleep(0.2)
	return "db result"
	
def read_api():
	time.sleep(0.3)
	return "api result"
	
@app.route("/")
def index():
	result_file = pool.submit(read_file)
	result_db = pool.submit(read_db)
	result_api = pool.submit(read_api)
	
	return json.dumps({
		"result_file": result_file.result(),
		"result_db": result_db.result(),
		"result_api": result_api.result(),
	})
	
if __name__ == "__main__":
	app.run(host='0.0.0.0')

run curl command to compare the real time spend:

output from one_thread.py:
ubuntu@ubuntu2020:~$ time curl http://192.168.0.171:5000
{"result_file": "file result", "result_db": "db result", "result_api": "api result"}
real    0m0.629s
user    0m0.009s
sys     0m0.013s

output from multiple_threads.py:
ubuntu@ubuntu2020:~$ time curl http://192.168.0.171:5000
{"result_file": "file result", "result_db": "db result", "result_api": "api result"}
real    0m0.328s
user    0m0.014s
sys     0m0.010s

the real time is dropped from 629ms to 328ms with multiple threads!


generate python API testing code with postman

  1. Register on https://www.zipcodeapi.com/API to get your Application Key: 8bq9sfKQBKuI5mWg3JKFKsDdGOLaqoWXZQ6MayM3ApbQSKJ6AjmRjhxiNuRzSgki

  2. run GET on postman
    https://www.zipcodeapi.com/rest/8bq9sfKQBKuI5mWg3JKFKsDdGOLaqoWXZQ6MayM3ApbQSKJ6AjmRjhxiNuRzSgki/info.json/10095/degrees

    then click code and select python, you will get python code with requests:

  3. copy the python code into postman_api.py

    import requests
    url = "https://www.zipcodeapi.com/rest/8bq9sfKQBKuI5mWg3JKFKsDdGOLaqoWXZQ6MayM3ApbQSKJ6AjmRjhxiNuRzSgki/info.json/10095/degrees"
    payload={}
    headers = {}
    response = requests.request("GET", url, headers=headers, data=payload)
    print(response.text)
  4. run postman_api.py to verify

    C:\Users\zhuby>postman_api.py
    {"zip_code":"10095","lat":40.710028,"lng":-73.990053,"city":"New York","state":"NY","timezone":{"timezone_identifier":"America\/New_York","timezone_abbr":"EST","utc_offset_sec":-18000,"is_dst":"F"},"acceptable_city_names":[],"area_codes":[212,646,917]}

use MS playwright-python for testing automation

https://github.com/microsoft/playwright-python

  1. install playwright-python
    pip3 install playwright

  2. install webkit
    python -m playwright install

  3. generate code
    python -m playwright codegen –target python -o mytest.py -b webkit https://portal.azure.com/#home
    Login Azure and do some operations in the WebKit window, then close it, you will get mytest.py generated in same directory, uploaded mine to github:
    https://github.com/zhuby1973/azure/blob/main/mytest.py

  4. python mytest.py

Create one executable file for a Flask app with PyInstaller

  1. pip3 install pyinstaller

  2. we have a sample flask app server.py

    from flask import Flask
    server = Flask(__name__)
    @server.route("/")
    def hello():
        return "Hello World!"
    if __name__ == "__main__":
    server.run(host='0.0.0.0')
  3. pyinstaller -F server.py
    it will create a executable file server in ./dist

  4. verify the executable file

    root@labvm:~/python_docker/src/dist# ./server
    * Serving Flask app "server" (lazy loading)
    * Environment: production
    WARNING: This is a development server. Do not use it in a production deployment.
    Use a production WSGI server instead.
    * Debug mode: off
    * Running on http://0.0.0.0:5000/ (Press CTRL+C to quit)

if you have static and templates folder and other py files, you can run command like:
pyinstaller -F -i BreezePython.ico --add-data="HttpServer\static;HttpServer\static" --add-data="HttpServer\templates;Httpserver\templates" --add-data="settings.py;." manage.py

Deploy Docker images to Azure Kubernetes Service cluster

  1. create userAKSCluster
    az aks create \
    –resource-group teamResources \
    –name userAKSCluster \
    –location eastus \
    –enable-addons monitoring,kube-dashboard \
    –node-count 1 \
    –attach-acr registryjrm1796 \
    –generate-ssh-keys \
    –enable-managed-identity \
    –enable-cluster-autoscaler \
    –min-count 1 \
    –max-count 2

  2. another way to create and attach to acr
    az login
    az group create –name HansResourceGroup –location eastus
    az aks create –resource-group HansResourceGroup –name myAKSCluster –node-count 1 –enable-addons monitoring –generate-ssh-keys
    az aks get-credentials –resource-group HansResourceGroup –name myAKSCluster
    az aks update -n myAKSCluster -g HansResourceGroup –attach-acr registryjrm1796
    az acr repository list –name registryjrm1796 –output table
    az acr repository show-tags –name registryjrm1796 –repository user-java –output table
    az acr list –resource-group teamResources –query "[].{acrLoginServer:loginServer}" –output table

  3. Connect to the cluster
    az aks get-credentials –resource-group teamResources –name userAKSCluster
    kubectl get nodes

  4. Deploy azure-vote sample app to AKSCluster
    root@labvm:~/azure-voting-app-redis/azure-vote# kubectl apply -f https://raw.githubusercontent.com/zhuby1973/azure/main/azure-vote.yaml
    deployment.apps/azure-vote-back created
    service/azure-vote-back created
    deployment.apps/azure-vote-front created
    service/azure-vote-front created

  5. Test the application
    root@labvm:~/azure-voting-app-redis/azure-vote# kubectl get service azure-vote-front –watch
    NAME TYPE CLUSTER-IP EXTERNAL-IP PORT(S) AGE
    azure-vote-front LoadBalancer 10.0.183.193 20.75.153.18 80:32384/TCP 25s
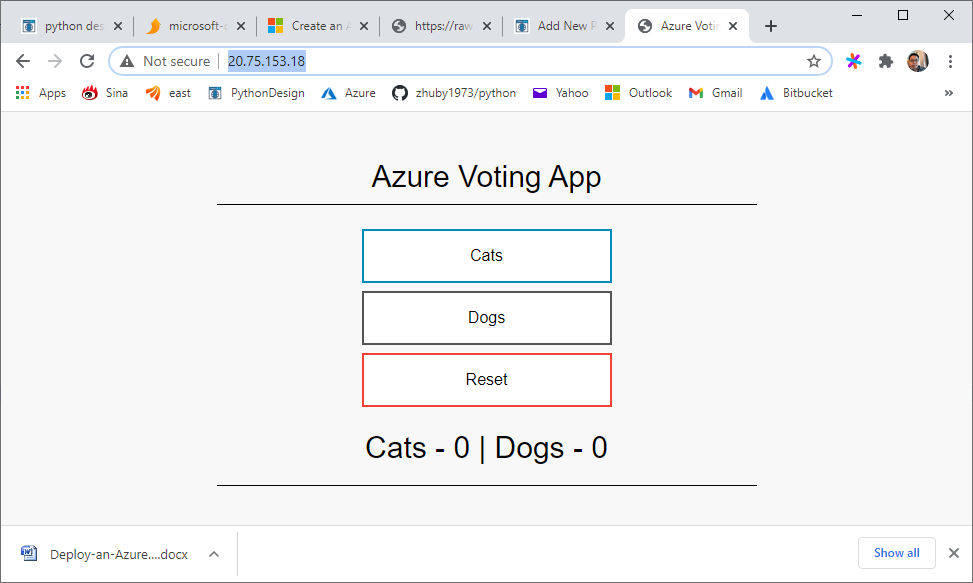
    you can verify it on http://20.75.153.18/

    you can read the sample code on https://github.com/Azure-Samples/azure-voting-app-redis

NOTE commands to push docker images to acr, use user-java image as example:
az login
az acr login –name registryjrm1796
docker tag user-java registryjrm1796.azurecr.io/user-java:latest
docker push registryjrm1796.azurecr.io/user-java
then you should be able to find user-java in Container registries/registryjrm1796/Repositories on https://portal.azure.com/