How to create a Jenkins pipeline job for git/mvn/docker build?

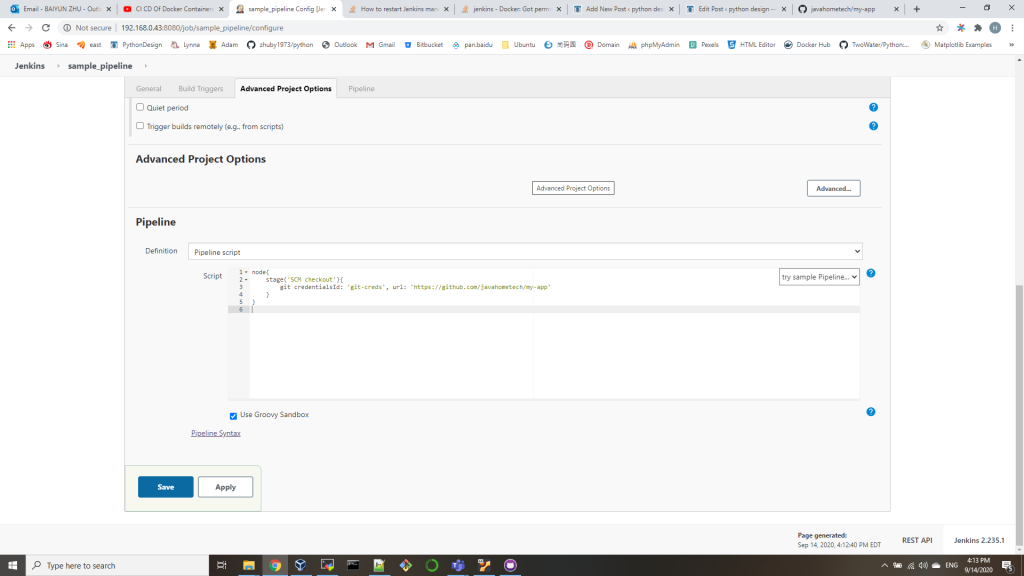
  1. we can create a simple sample_pipeline job on Jenkins with all default, just one stage in “Pipeline script”

you can setup your GIT account in http://192.168.0.43:8080/job/sample_pipeline/pipeline-syntax/

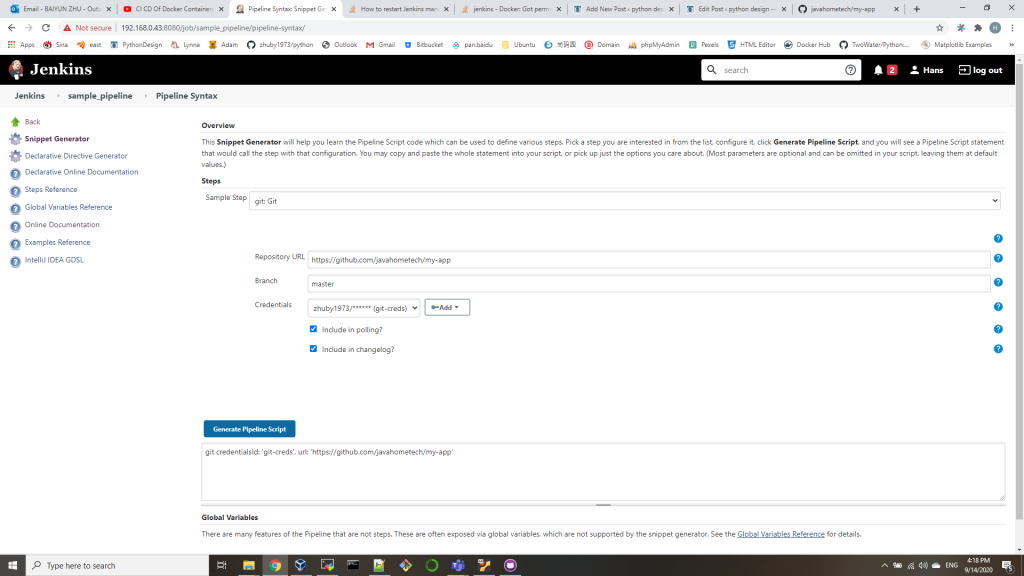
you should be able to run this job without any issue and clone the git repository to your Jenkins VM.
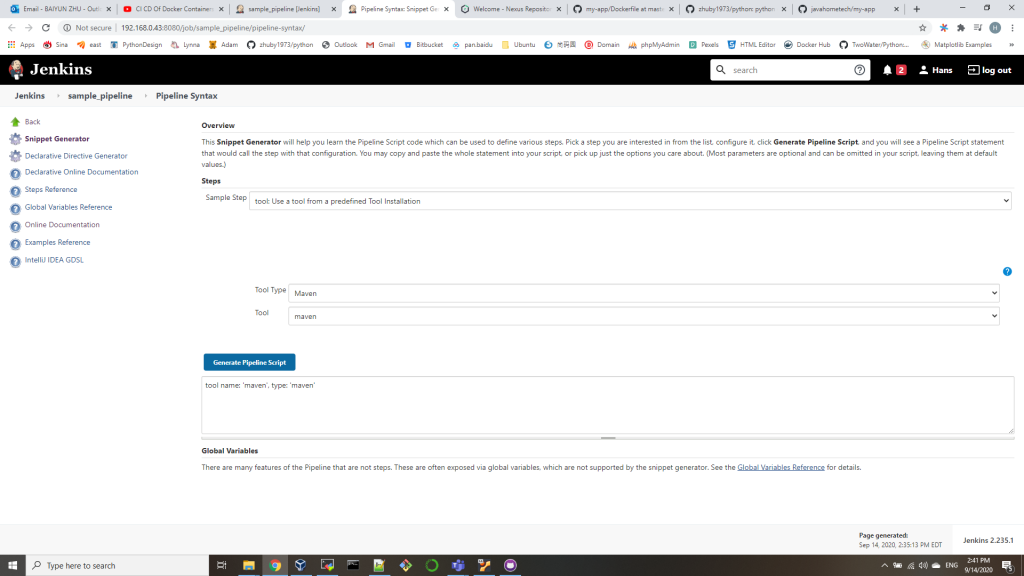
2. we add one more step for mvn Package to generate the war file from cloned source code in /src

node{
	stage('SCM checkout'){
		git credentialsId: 'git-creds', url: 'https://github.com/javahometech/my-app'
	}
	stage('Mvn Package'){
		def mvnHome = tool name: 'maven', type: 'maven'
		def mvnCMD = "${mvnHome}/bin/mvn"
		sh "${mvnCMD} clean package"
	}
}

run this job, you will get war generated successfully in ./target
3. add 3rd step to build a Docker image:

node{
	stage('SCM checkout'){
		git credentialsId: 'git-creds', url: 'https://github.com/javahometech/my-app'
	}
	stage('Mvn Package'){
		def mvnHome = tool name: 'maven', type: 'maven'
		def mvnCMD = "${mvnHome}/bin/mvn"
		sh "${mvnCMD} clean package"
	}
	stage('Build Docker Image'){
		sh 'docker build -t zhuby1973/myapp:2.0 .'
	}
}

(base) ubuntu@ubunu2004:/var/lib/jenkins/workspace/sample_pipeline$ cat Dockerfile
FROM tomcat:8
# Take the war and copy to webapps of tomcat
COPY target/*.war /usr/local/tomcat/webapps/myweb.war

if you got docker permission error, please fix it with below 3 steps:

1. sudo chmod 664 /var/run/docker.sock
2. sudo usermod -a -G docker jenkins
3. sudo /etc/init.d/jenkins restart

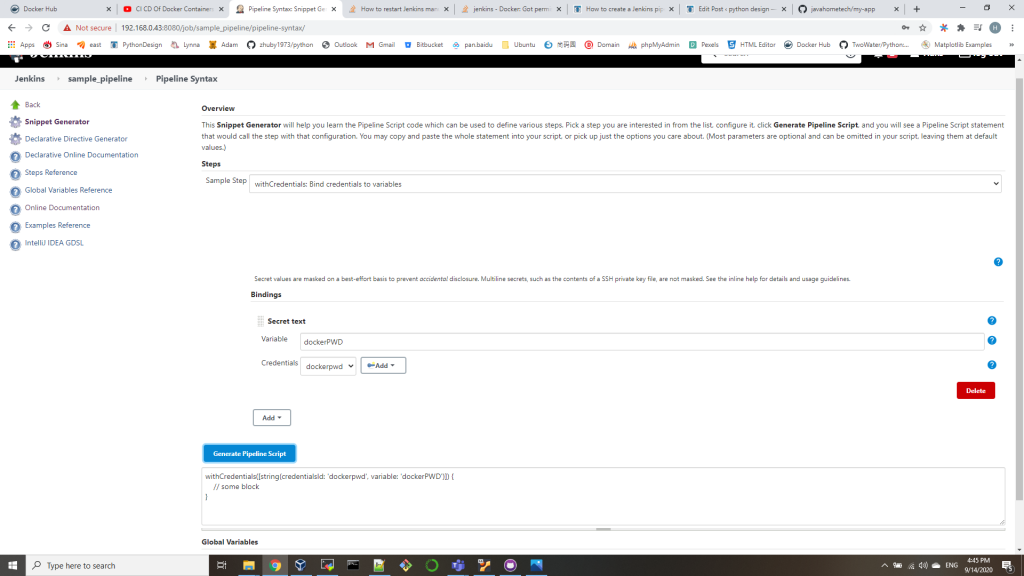
4. push to DockerHub withCredentials

5. deploy the image on DEV server
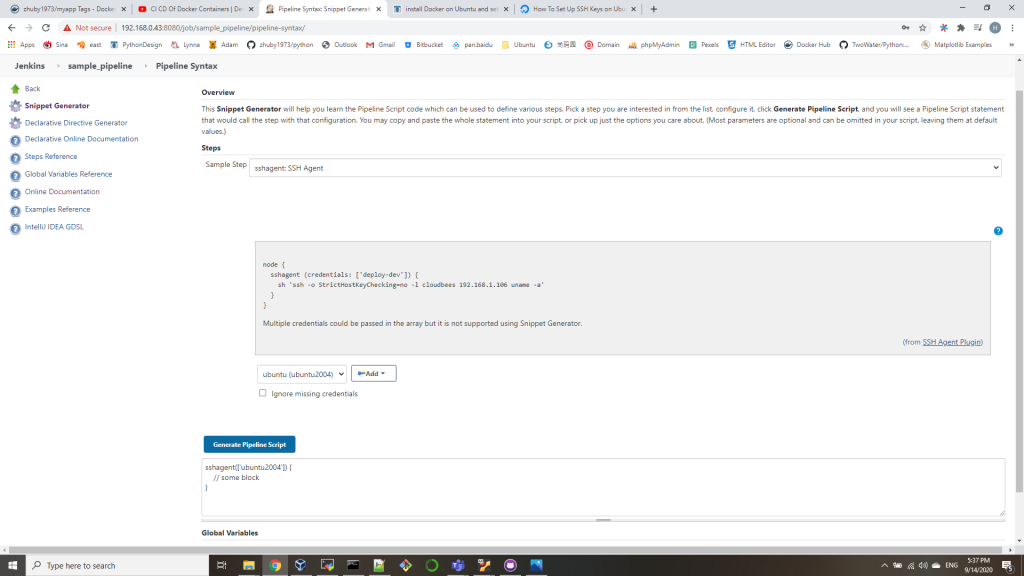
we will run ssh-keygen on Jenkins VM to get a pair of SSH key, add the public key into DEV server .ssh/authorized_keys, make sure you can logon without credential.

node{
	stage('SCM checkout'){
		git credentialsId: 'git-creds', url: 'https://github.com/javahometech/my-app'
	}
	stage('Mvn Package'){
		def mvnHome = tool name: 'maven', type: 'maven'
		def mvnCMD = "${mvnHome}/bin/mvn"
		sh "${mvnCMD} clean package"
	}
	stage('Build Docker Image'){
		sh 'docker build -t zhuby1973/myapp:2.0 .'
	}
	stage('Push Docker Image'){
		withCredentials([string(credentialsId: 'dockerpwd', variable: 'dockerPWD')]) {
			sh "docker login -u zhuby1973 -p ${dockerPWD}"
		}
		sh 'docker push zhuby1973/myapp:2.0'
	}
	stage('Run Container on DEV Server') {
		def dockerRun = 'sudo docker run -p 8080:8080 -d --name myapp zhuby1973/myapp:2.0'
		sshagent(['ubuntu2004']) {
			sh "ssh -o StrictHostKeyChecking=no ubuntu@192.168.0.165 ${dockerRun}"
		}
	}
}

you can verify the image running on DEV server and also the app url:
http://192.168.0.165:8080/myweb/

ubuntu@ubuntu2020:~/.ssh$ sudo docker ps
CONTAINER ID IMAGE COMMAND CREATED STATUS PORTS NAMES
f85fe7882cc1 zhuby1973/myapp:2.0 “catalina.sh run” 12 seconds ago Up 9 seconds 0.0.0.0:8080->8080/tcp myapp

How To Install Nexus3 on Ubuntu20.04

sudo apt install openjdk-8-jdk
sudo mkdir /app && cd /app
sudo wget -O nexus.tar.gz https://download.sonatype.com/nexus/3/latest-unix.tar.gz
sudo tar -xvf nexus.tar.gz
sudo mv nexus-3* nexus
sudo adduser nexus
sudo chown -R nexus:nexus /app/nexus
sudo chown -R nexus:nexus /app/sonatype-work
sudo vi  /app/nexus/bin/nexus.rc
Uncomment run_as_user parameter and set it as following:
run_as_user="nexus"

check the default configuration in /app/nexus/bin/nexus.vmoptions

sudo vi /etc/systemd/system/nexus.service
Add the following contents to the unit file.

[Unit]
Description=nexus service
After=network.target
[Service]
Type=forking
LimitNOFILE=65536
User=nexus
Group=nexus
ExecStart=/app/nexus/bin/nexus start
ExecStop=/app/nexus/bin/nexus stop
User=nexus
Restart=on-abort
[Install]
WantedBy=multi-user.target

sudo systemctl start nexus
(sudo systemctl stop nexus)
verify nexus process and port started without any issue:
ps -ef|grep nexus
netstat -an|grep 8081
open nexus http://localhost:8081 with admin and password from /app/sonatype-work/nexus3/admin.password
you can create raw or maven type repositories, for raw type repository, you can upload/download with command:
curl -v -u admin:pas8word --upload-file license.txt http://192.168.0.43:8081/repository/its/
wget http://192.168.0.43:8081/repository/its/az104-11-vm-parameters.json --user=admin --password=pas8word
wget http://192.168.0.43:8081/repository/amcb/amcb/1/1/1-1.json --user=admin --password=pas8word

create Azure VM and virtualNetworks with Template

In the toolbar of the Cloud Shell pane, click the Upload/Download files icon, in the drop-down menu, click Upload and upload the files az104-06-vms-template.json, and az104-06-vm-parameters.json into the Cloud Shell home directory.

{
    "$schema": "https://schema.management.azure.com/schemas/2015-01-01/deploymentTemplate.json#",
    "contentVersion": "1.0.0.0",
    "parameters": {
      "vmSize": {
        "type": "string",
        "defaultValue": "Standard_D2s_v3",
        "metadata": {
          "description": "Virtual machine size"
        }
      },
      "nameSuffix": {
        "type": "string",
        "allowedValues": [
          "0",
          "1",
          "2"
        ],
        "metadata": {
          "description": "Naming suffix"
        }
      },
      "adminUsername": {
        "type": "string",
        "metadata": {
          "description": "Admin username"
        }
      },
      "adminPassword": {
        "type": "securestring",
        "metadata": {
          "description": "Admin password"
        }
      }
    },
  "variables": {
    "vmName": "[concat('az104-05-vm',parameters('nameSuffix'))]",
    "nicName": "[concat('az104-05-nic',parameters('nameSuffix'))]",
    "virtualNetworkName": "[concat('az104-05-vnet',parameters('nameSuffix'))]",
    "publicIPAddressName": "[concat('az104-05-pip',parameters('nameSuffix'))]",
    "nsgName": "[concat('az104-05-nsg',parameters('nameSuffix'))]",
    "vnetIpPrefix": "[concat('10.5',parameters('nameSuffix'),'.0.0/22')]", 
    "subnetIpPrefix": "[concat('10.5',parameters('nameSuffix'),'.0.0/24')]", 
    "subnetName": "subnet0",
    "subnetRef": "[resourceId('Microsoft.Network/virtualNetworks/subnets', variables('virtualNetworkName'), variables('subnetName'))]",
    "computeApiVersion": "2018-06-01",
    "networkApiVersion": "2018-08-01"
  },
    "resources": [
        {
            "name": "[variables('vmName')]",
            "type": "Microsoft.Compute/virtualMachines",
            "apiVersion": "[variables('computeApiVersion')]",
            "location": "[resourceGroup().location]",
            "dependsOn": [
                "[variables('nicName')]"
            ],
            "properties": {
                "osProfile": {
                    "computerName": "[variables('vmName')]",
                    "adminUsername": "[parameters('adminUsername')]",
                    "adminPassword": "[parameters('adminPassword')]",
                    "windowsConfiguration": {
                        "provisionVmAgent": "true"
                    }
                },
                "hardwareProfile": {
                    "vmSize": "[parameters('vmSize')]"
                },
                "storageProfile": {
                    "imageReference": {
                        "publisher": "MicrosoftWindowsServer",
                        "offer": "WindowsServer",
                        "sku": "2019-Datacenter",
                        "version": "latest"
                    },
                    "osDisk": {
                        "createOption": "fromImage"
                    },
                    "dataDisks": []
                },
                "networkProfile": {
                    "networkInterfaces": [
                        {
                            "properties": {
                                "primary": true
                            },
                            "id": "[resourceId('Microsoft.Network/networkInterfaces', variables('nicName'))]"
                        }
                    ]
                }
            }
        },
        {
            "type": "Microsoft.Network/virtualNetworks",
            "name": "[variables('virtualNetworkName')]",
            "apiVersion": "[variables('networkApiVersion')]",
            "location": "[resourceGroup().location]",
            "comments": "Virtual Network",
            "properties": {
                "addressSpace": {
                    "addressPrefixes": [
                        "[variables('vnetIpPrefix')]"
                    ]
                },
                "subnets": [
                    {
                        "name": "[variables('subnetName')]",
                        "properties": {
                            "addressPrefix": "[variables('subnetIpPrefix')]"
                        }
                    }
                ]
            }
        },
        {
            "name": "[variables('nicName')]",
            "type": "Microsoft.Network/networkInterfaces",
            "apiVersion": "[variables('networkApiVersion')]",
            "location": "[resourceGroup().location]",
            "comments": "Primary NIC",
            "dependsOn": [
                "[variables('publicIpAddressName')]",
                "[variables('nsgName')]",
                "[variables('virtualNetworkName')]"
            ],
            "properties": {
                "ipConfigurations": [
                    {
                        "name": "ipconfig1",
                        "properties": {
                            "subnet": {
                                "id": "[variables('subnetRef')]"
                            },
                            "privateIPAllocationMethod": "Dynamic",
                            "publicIpAddress": {
                                "id": "[resourceId('Microsoft.Network/publicIpAddresses', variables('publicIpAddressName'))]"
                            }
                        }
                    }
                ],
                "networkSecurityGroup": {
                    "id": "[resourceId('Microsoft.Network/networkSecurityGroups', variables('nsgName'))]"
                }
            }
        },
        {
            "name": "[variables('publicIpAddressName')]",
            "type": "Microsoft.Network/publicIpAddresses",
            "apiVersion": "[variables('networkApiVersion')]",
            "location": "[resourceGroup().location]",
            "comments": "Public IP for Primary NIC",
            "properties": {
                "publicIpAllocationMethod": "Dynamic"
            }
        },
        {
            "name": "[variables('nsgName')]",
            "type": "Microsoft.Network/networkSecurityGroups",
            "apiVersion": "[variables('networkApiVersion')]",
            "location": "[resourceGroup().location]",
            "comments": "Network Security Group (NSG) for Primary NIC",
            "properties": {
                "securityRules": [
                    {
                        "name": "default-allow-rdp",
                        "properties": {
                            "priority": 1000,
                            "sourceAddressPrefix": "*",
                            "protocol": "Tcp",
                            "destinationPortRange": "3389",
                            "access": "Allow",
                            "direction": "Inbound",
                            "sourcePortRange": "*",
                            "destinationAddressPrefix": "*"
                        }
                    }
                ]
            }
        }
    ],
    "outputs": {}
}
{
    "$schema": "https://schema.management.azure.com/schemas/2015-01-01/deploymentParameters.json#",
    "contentVersion": "1.0.0.0",
    "parameters": {
        "vmSize": {
            "value": "Standard_D2s_v3"
        },
        "adminUsername": {
            "value": "Student"
        },
        "adminPassword": {
            "value": "Pa55w.rd1234"
        }
    }
}
From the Cloud Shell pane, run the following to create the first resource group that will be hosting the first virtual network and the pair of virtual machines:
$location = 'West US'
$rgName = 'My-RG01' 
New-AzResourceGroup -Name $rgName -Location $location

From the Cloud Shell pane, run the following to create the first virtual network and deploy a pair of virtual machines into it by using the template and parameter files you uploaded:
New-AzResourceGroupDeployment `
  -ResourceGroupName $rgName `
  -TemplateFile $HOME/az104-06-vms-template.json `
  -TemplateParameterFile $HOME/az104-06-vm-parameters.json `
  -AsJob