Create a Python app in Azure App Service on Linux

make sure you have python3 and Azure CLI installed on Windows:

C:\Users\zhuby>python --version
Python 3.8.3
C:\Users\zhuby>az --version
azure-cli                         2.12.0

Then sign in to Azure through the CLI: az login
Clone the sample code, setup venv and deploy to local/Azure:

C:\Users\zhuby>git clone https://github.com/Azure-Samples/python-docs-hello-world
C:\Users\zhuby>cd python-docs-hello-world
C:\Users\zhuby\python-docs-hello-world>python -m venv venv
C:\Users\zhuby\python-docs-hello-world>venv\Scripts\activate.bat
(venv) C:\Users\zhuby\python-docs-hello-world>pip install -r requirements.txt
(venv) C:\Users\zhuby\python-docs-hello-world>flask run

(venv) C:\Users\zhuby\python-docs-hello-world>az webapp up --sku F1 -n python0508
The webapp 'python0508' doesn't exist
Creating Resource group 'zhuby1973_rg_Linux_centralus' ...
Resource group creation complete
Creating AppServicePlan 'zhuby1973_asp_Linux_centralus_0' ...
Creating webapp 'python0508' ...
Configuring default logging for the app, if not already enabled
Creating zip with contents of dir C:\Users\zhuby\python-docs-hello-world ...
Getting scm site credentials for zip deployment
Starting zip deployment. This operation can take a while to complete ...
Deployment endpoint responded with status code 202
You can launch the app at http://python0508.azurewebsites.net
{
  "URL": "http://python0508.azurewebsites.net",
  "appserviceplan": "zhuby1973_asp_Linux_centralus_0",
  "location": "centralus",
  "name": "python0508",
  "os": "Linux",
  "resourcegroup": "zhuby1973_rg_Linux_centralus",
  "runtime_version": "python|3.7",
  "runtime_version_detected": "-",
  "sku": "FREE",
  "src_path": "C:\\Users\\zhuby\\python-docs-hello-world"
}

you can redeploy updates, edit the app.py with below:

def hello():
    print("Handling request to home page.")
    return "Hello, Azure!"

Redeploy the app using the az webapp up command again! you will get update the webpage.
To stream logs, run the az webapp log tail command.

create Navigation bar in Flask web application

  1. we will start from simple app.py, base.html and index.html first:
app.py:
from flask import Flask, redirect, render_template, request, session, url_for
app = Flask(__name__)
@app.route("/")
def home():
        return render_template("index.html")
if __name__ == "__main__":
        app.run("0.0.0.0", 5000, debug=True)

base.html:
<!doctype html>
<html>
    <head>
        <title>Home page</title>
    </head>
    <body>
        <h1>Hans webpage</h1>
		{% block content %}{% endblock %}
    </body>
</html>

index.html:
{% extends "base.html" %}
{% block content %}
<h1>Test</h1>
{% endblock %}

2. go to https://getbootstrap.com/docs/4.3/getting-started/introduction/ copy CSS and JS into base.html

CSS:
<link rel="stylesheet" href="https://stackpath.bootstrapcdn.com/bootstrap/4.3.1/css/bootstrap.min.css" integrity="sha384-ggOyR0iXCbMQv3Xipma34MD+dH/1fQ784/j6cY/iJTQUOhcWr7x9JvoRxT2MZw1T" crossorigin="anonymous">
JS:
<script src="https://code.jquery.com/jquery-3.3.1.slim.min.js" integrity="sha384-q8i/X+965DzO0rT7abK41JStQIAqVgRVzpbzo5smXKp4YfRvH+8abtTE1Pi6jizo" crossorigin="anonymous"></script>
<script src="https://cdnjs.cloudflare.com/ajax/libs/popper.js/1.14.7/umd/popper.min.js" integrity="sha384-UO2eT0CpHqdSJQ6hJty5KVphtPhzWj9WO1clHTMGa3JDZwrnQq4sF86dIHNDz0W1" crossorigin="anonymous"></script>
<script src="https://stackpath.bootstrapcdn.com/bootstrap/4.3.1/js/bootstrap.min.js" integrity="sha384-JjSmVgyd0p3pXB1rRibZUAYoIIy6OrQ6VrjIEaFf/nJGzIxFDsf4x0xIM+B07jRM" crossorigin="anonymous"></script>


3. go to https://getbootstrap.com/docs/4.3/components/navbar/ to pick one style and copy the code into base.html:

<!doctype html>
<html>
    <head>
        <link rel="stylesheet" href="https://stackpath.bootstrapcdn.com/bootstrap/4.3.1/css/bootstrap.min.css" integrity="sha384-ggOyR0iXCbMQv3Xipma34MD+dH/1fQ784/j6cY/iJTQUOhcWr7x9JvoRxT2MZw1T" crossorigin="anonymous">
        <title>Home page</title>
    </head>
    <body>
                <nav class="navbar navbar-expand-lg navbar-light bg-light">
                  <a class="navbar-brand" href="#">MW Tools</a>
                  <button class="navbar-toggler" type="button" data-toggle="collapse" data-target="#navbarNav" aria-controls="navbarNav" aria-expanded="false" aria-label="Toggle navigation">
                        <span class="navbar-toggler-icon"></span>
                  </button>
                  <div class="collapse navbar-collapse" id="navbarNav">
                        <ul class="navbar-nav">
                          <li class="nav-item active">
                                <a class="nav-link" href="#">Home <span class="sr-only">(current)</span></a>
                          </li>
                          <li class="nav-item">
                                <a class="nav-link" href="#">Features</a>
                          </li>
                          <li class="nav-item">
                                <a class="nav-link" href="#">Pricing</a>
                          </li>
                        </ul>
                  </div>
                </nav>
        {% block content %}{% endblock %}
        <script src="https://code.jquery.com/jquery-3.3.1.slim.min.js" integrity="sha384-q8i/X+965DzO0rT7abK41JStQIAqVgRVzpbzo5smXKp4YfRvH+8abtTE1Pi6jizo" crossorigin="anonymous"></script>
        <script src="https://cdnjs.cloudflare.com/ajax/libs/popper.js/1.14.7/umd/popper.min.js" integrity="sha384-UO2eT0CpHqdSJQ6hJty5KVphtPhzWj9WO1clHTMGa3JDZwrnQq4sF86dIHNDz0W1" crossorigin="anonymous"></script>
        <script src="https://stackpath.bootstrapcdn.com/bootstrap/4.3.1/js/bootstrap.min.js" integrity="sha384-JjSmVgyd0p3pXB1rRibZUAYoIIy6OrQ6VrjIEaFf/nJGzIxFDsf4x0xIM+B07jRM" crossorigin="anonymous"></script>
    </body>
</html>

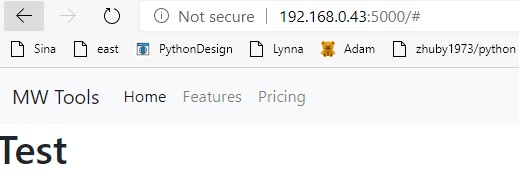
4. start app.py, you will get your web app:

remote manage VM with Flask web application

We will use waitress as WSGI to serve the Flask web application, to start it with:
waitress-serve –port=8080 main:app
(in our case, we have main.py with app = Flask(name) inside)
Or you can edit main.py, so it can run with waitress directly, only need two changes:
1. add from waitress import serve at beginning
2. update the last line to serve(app, host=’0.0.0.0′, port=8080)
Here is main.py:

from flask import Flask, redirect, render_template, request, session, url_for
import subprocess
app = Flask(__name__)
def api(cmd):
    p = subprocess.Popen(cmd, shell=True, stdout=subprocess.PIPE,
    stderr=subprocess.PIPE, universal_newlines=True)
    stdout, stderr = p.communicate()
    return stdout
@app.route("/", methods = ["POST", "GET"])
def login():
    if request.method == "POST":
        user = request.form["name"]
        return redirect(url_for("success", name=user))
    else:
        return render_template("login.html")
 
@app.route("/success", methods = ["POST", "GET"])
def success():
    ip_addr = request.form.get('ip_addr')
    cmd = request.form.get('name')
    print(cmd)
    full_cmd = "/home/zhuby/sshpass -p my_password ssh " + ip_addr + " -o ConnectTimeout=2 -o StrictHostKeyChecking=no -o LogLevel=Error " + cmd
    print(full_cmd)
    return render_template("success.html", subprocess_output=api(full_cmd))
 
if __name__ == "__main__":
    app.run("0.0.0.0", 8080)

and login.html:

html>
   <body>
      <form action="{{ url_for('success') }}" method="post">
         <p>Enter the external hostname or IP:</p>
         <p><input type = "text" name = "ip_addr" /></p>
         <p>Enter Command:</p>
         <p><input type = "text" name = "name" /></p>
         <p><input type = "submit" value = "submit" /></p>
      </form>
   </body>
</html>

and success.html

<html>
    <body>
        {% block content %}
         <pre>{{ subprocess_output }}</pre>
        {% endblock %}
    </body>
</html>

How to setup Jenkins pipeline upload to nexus?

  1. Install “Nexus Artifact Uploader” and “Pipeline Utility Steps” Plugins
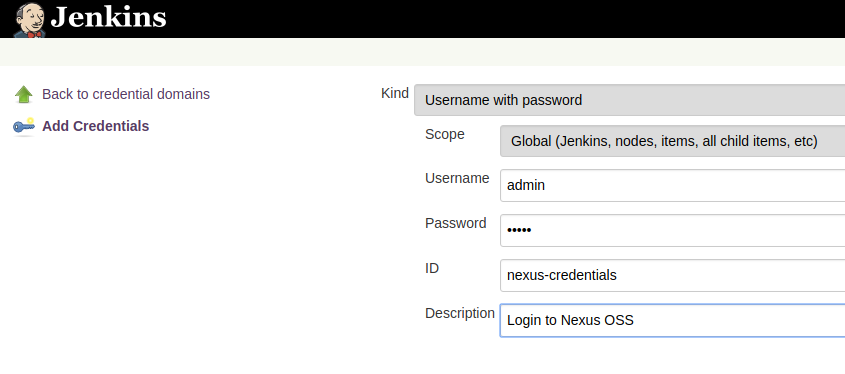
  2. Create Valid Jenkins Credentials to Authenticate To Nexus OSS
    In this step, we should add a Jenkins Crendential of kind “Username with password” with a valid login to our Nexus instance and let’s give it an Id of “nexus-credentials.”
    Go to: http://localhost:8080/credentials/

3. Set Up Maven as A Managed Tool, in our case, name is “maven”
4. Publishing Artifacts Using Jenkins Pipelines

pipeline {
    agent {
        label "master"
    }
    tools {
        // Note: this should match with the tool name configured in your jenkins instance (JENKINS_URL/configureTools/)
        maven "maven"
    }
    environment {
        // This can be nexus3 or nexus2
        NEXUS_VERSION = "nexus3"
        // This can be http or https
        NEXUS_PROTOCOL = "http"
        // Where your Nexus is running
        NEXUS_URL = "192.168.0.43:8081"
        // Repository where we will upload the artifact
        NEXUS_REPOSITORY = "maven-snapshots"
        // Jenkins credential id to authenticate to Nexus OSS
        NEXUS_CREDENTIAL_ID = "nexus-credentials"
    }
    stages {
        stage("clone code") {
            steps {
                script {
                    // Let's clone the source
                    git 'https://github.com/zhuby1973/myapp.git';
                }
            }
        }
        stage("mvn build") {
            steps {
                script {
                    // If you are using Windows then you should use "bat" step
                    // Since unit testing is out of the scope we skip them
                    sh "mvn package -DskipTests=true"
                }
            }
        }
        stage("publish to nexus") {
            steps {
                script {
                    // Read POM xml file using 'readMavenPom' step , this step 'readMavenPom' is included in: https://plugins.jenkins.io/pipeline-utility-steps
                    pom = readMavenPom file: "pom.xml";
                    // Find built artifact under target folder
                    filesByGlob = findFiles(glob: "target/*.${pom.packaging}");
                    // Print some info from the artifact found
                    echo "${filesByGlob[0].name} ${filesByGlob[0].path} ${filesByGlob[0].directory} ${filesByGlob[0].length} ${filesByGlob[0].lastModified}"
                    // Extract the path from the File found
                    artifactPath = filesByGlob[0].path;
                    // Assign to a boolean response verifying If the artifact name exists
                    artifactExists = fileExists artifactPath;
                    if(artifactExists) {
                        echo "*** File: ${artifactPath}, group: ${pom.groupId}, packaging: ${pom.packaging}, version ${pom.version}";
                        nexusArtifactUploader(
                            nexusVersion: NEXUS_VERSION,
                            protocol: NEXUS_PROTOCOL,
                            nexusUrl: NEXUS_URL,
                            groupId: pom.groupId,
                            version: pom.version,
                            repository: NEXUS_REPOSITORY,
                            credentialsId: NEXUS_CREDENTIAL_ID,
                            artifacts: [
                                // Artifact generated such as .jar, .ear and .war files.
                                [artifactId: pom.artifactId,
                                classifier: '',
                                file: artifactPath,
                                type: pom.packaging],
                                // Lets upload the pom.xml file for additional information for Transitive dependencies
                                [artifactId: pom.artifactId,
                                classifier: '',
                                file: "pom.xml",
                                type: "pom"]
                            ]
                        );
                    } else {
                        error "*** File: ${artifactPath}, could not be found";
                    }
                }
            }
        }
    }
}
(base) ubuntu@ubunu2004:/tmp/myapp$ cat pom.xml
<project xmlns="http://maven.apache.org/POM/4.0.0" xmlns:xsi="http://www.w3.org/2001/XMLSchema-instance"
        xsi:schemaLocation="http://maven.apache.org/POM/4.0.0 http://maven.apache.org/maven-v4_0_0.xsd">
        <modelVersion>4.0.0</modelVersion>
        <groupId>in.javahome</groupId>
        <artifactId>myweb</artifactId>
        <packaging>war</packaging>
        <version>0.0.9-SNAPSHOT</version>
        <name>my-app</name>
        <url>http://maven.apache.org</url>

        <dependencies>
                <dependency>
                    <groupId>org.apache.poi</groupId>
                    <artifactId>poi</artifactId>
                    <version>3.7</version>
                </dependency>

                <dependency>
                        <groupId>javax.servlet</groupId>
                        <artifactId>javax.servlet-api</artifactId>
                        <version>3.0.1</version>
                        <!-- <scope>provided</scope> -->
                </dependency>
                <dependency>
                        <groupId>junit</groupId>
                        <artifactId>junit</artifactId>
                        <version>3.8.1</version>
                        <scope>test</scope>
                </dependency>

        </dependencies>
        <distributionManagement>
                 <snapshotRepository>
                    <id>nexus</id>
                    <url>http://192.168.0.43:8081/repository/maven-snapshots/</url>
                 </snapshotRepository>

                <repository>
                    <id>nexus</id>
                    <url>http://192.168.0.43:8081/repository/maven-releases/</url>
                </repository>
        </distributionManagement>

<build>
    <plugins>
        <plugin>
            <groupId>org.apache.maven.plugins</groupId>
            <artifactId>maven-compiler-plugin</artifactId>
            <version>3.6.1</version>
            <configuration>
                <source>1.7</source>
                <target>1.7</target>
            </configuration>
        </plugin>
        <plugin>
            <groupId>org.apache.maven.plugins</groupId>
            <artifactId>maven-surefire-plugin</artifactId>
            <version>2.19</version>
        </plugin>
    </plugins>
</build>

</project>

NOTE: if you failed to upload, then you can try to manually upload, you may got error:
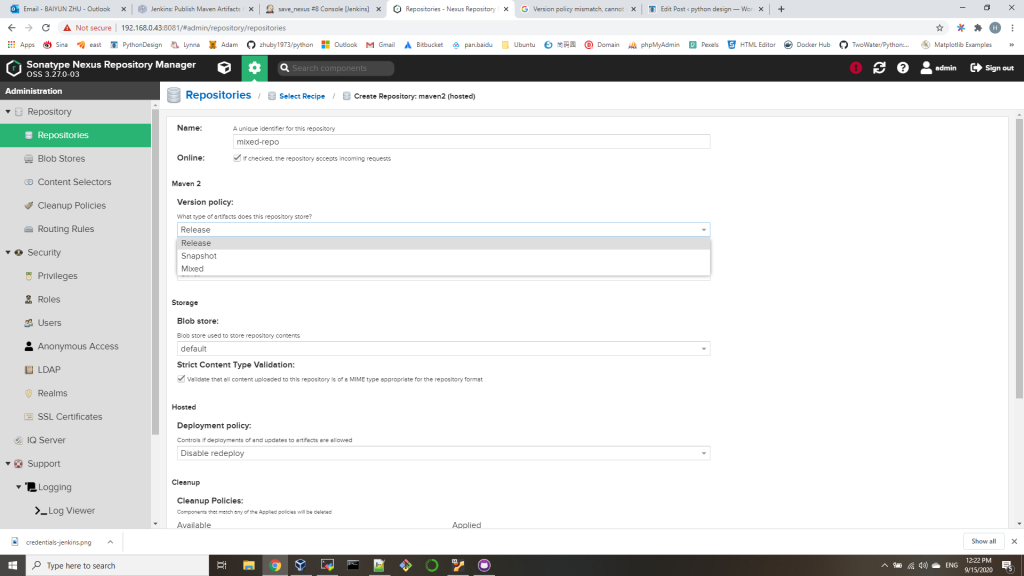
Version policy mismatch, cannot upload SNAPSHOT content to RELEASE repositories…
which means you are trying to upload SNAPSHOT content to RELEASE repositories, you can delete the repositories, and recreate it with Mixed in “Version Policy”

How to create Jenkins job for git/maven/nexus upload

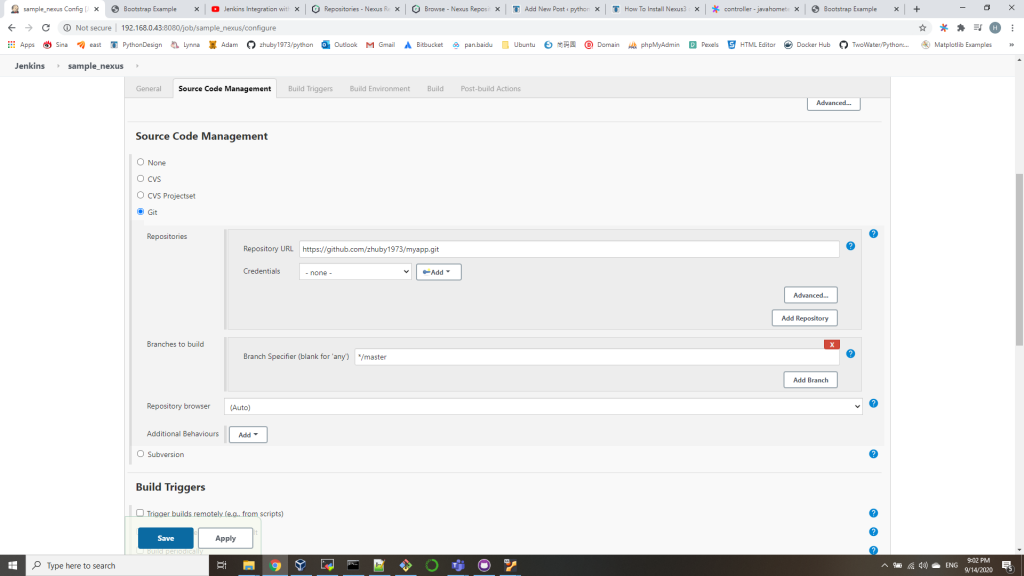
  1. create a freestyle job sample_nexus, use https://github.com/zhuby1973/myapp.git as SCM

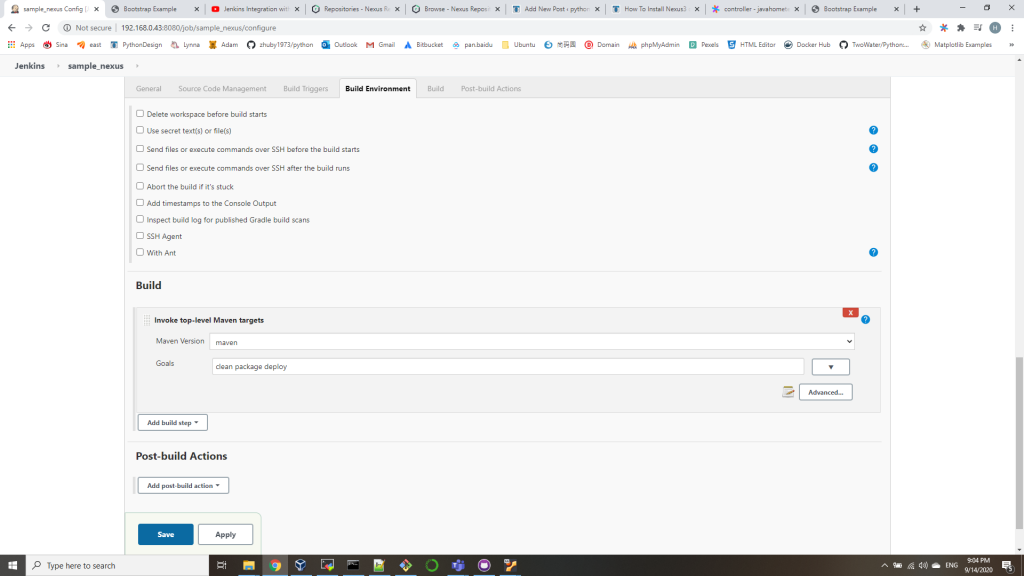
2. in Build section, select “Invoke top-level Maven targets” with Goals: clean package deploy

3. vi /etc/maven/settings.xml, add admin id for nexus:

    <server>
      <id>deployment</id>
      <username>admin</username>
      <password>pas8word</password>
    </server>

4. update pom.xml in GIT and commit the changes

from:
        <distributionManagement>
                 <snapshotRepository>
                    <id>nexus</id>
                    <url>http://172.31.15.236:8081/repository/maven-snapshots/</url>
                 </snapshotRepository>

                <repository>
                    <id>nexus</id>
                    <url>http://172.31.15.236:8081/repository/maven-releases/</url>
                </repository>
        </distributionManagement>

to:
        <distributionManagement>
                 <snapshotRepository>
                    <id>deployment</id>
                    <url>http://192.168.0.43:8081/repository/maven-snapshots/</url>
                 </snapshotRepository>

                <repository>
                    <id>deployment</id>
                    <url>http://192.168.0.43:8081/repository/maven-releases/</url>
                </repository>
        </distributionManagement>

5. run the job, you will get output:

...............................
Uploaded to deployment: http://192.168.0.43:8081/repository/maven-snapshots/in/javahome/myweb/0.0.7-SNAPSHOT/myweb-0.0.7-20200915.005745-1.war (1.6 MB at 248 kB/s)
Uploading to deployment: http://192.168.0.43:8081/repository/maven-snapshots/in/javahome/myweb/0.0.7-SNAPSHOT/myweb-0.0.7-20200915.005745-1.pom
Progress (1): 1.8 kB
                    
Uploaded to deployment: http://192.168.0.43:8081/repository/maven-snapshots/in/javahome/myweb/0.0.7-SNAPSHOT/myweb-0.0.7-20200915.005745-1.pom (1.8 kB at 583 B/s)
Downloading from deployment: http://192.168.0.43:8081/repository/maven-snapshots/in/javahome/myweb/maven-metadata.xml
Uploading to deployment: http://192.168.0.43:8081/repository/maven-snapshots/in/javahome/myweb/0.0.7-SNAPSHOT/maven-metadata.xml
Progress (1): 766 B
                   
Uploaded to deployment: http://192.168.0.43:8081/repository/maven-snapshots/in/javahome/myweb/0.0.7-SNAPSHOT/maven-metadata.xml (766 B at 339 B/s)
Uploading to deployment: http://192.168.0.43:8081/repository/maven-snapshots/in/javahome/myweb/maven-metadata.xml
Progress (1): 276 B
                   
Uploaded to deployment: http://192.168.0.43:8081/repository/maven-snapshots/in/javahome/myweb/maven-metadata.xml (276 B at 17 B/s)
[INFO] ------------------------------------------------------------------------
[INFO] BUILD SUCCESS
[INFO] ------------------------------------------------------------------------
[INFO] Total time:  01:00 min
[INFO] Finished at: 2020-09-14T20:58:13-04:00
[INFO] ------------------------------------------------------------------------
Finished: SUCCESS

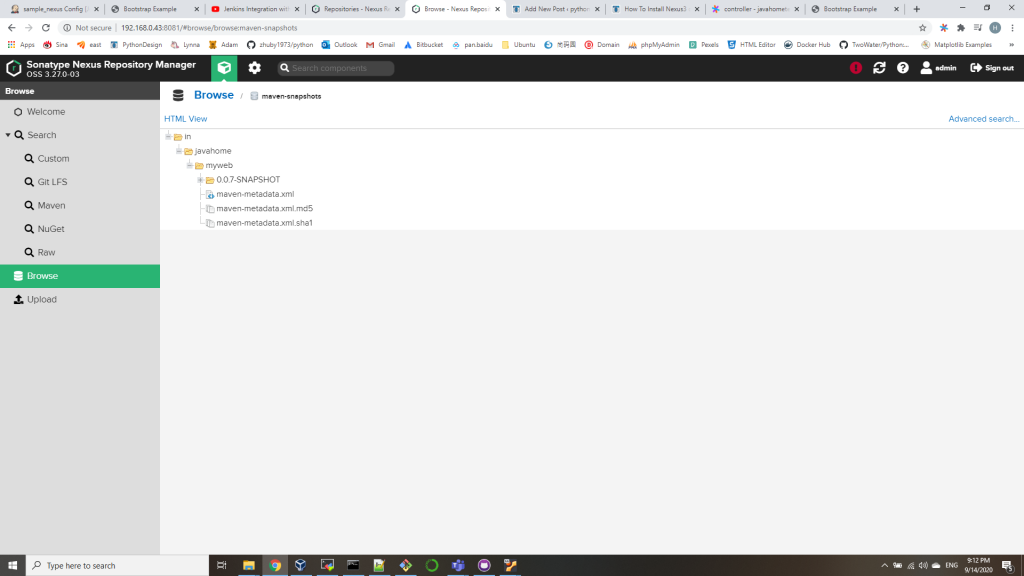
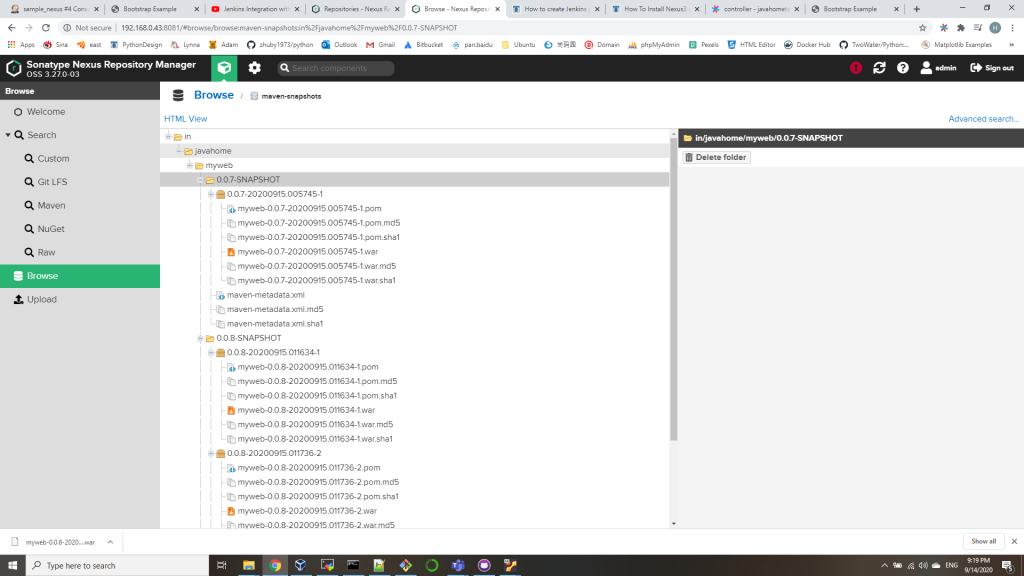
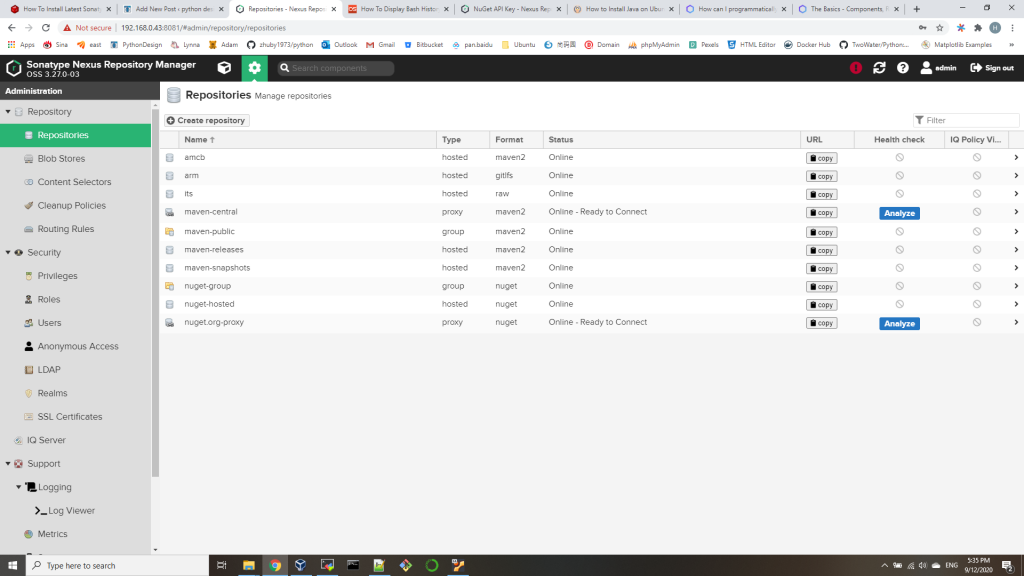
check on Nexus, you can find the war file has been uploaded:

6. you can update version number in pom.xml to upload again

        <groupId>in.javahome</groupId>
        <artifactId>myweb</artifactId>
        <packaging>war</packaging>
        <version>0.0.8-SNAPSHOT</version>
        <name>my-app</name>

How to create a Jenkins pipeline job for git/mvn/docker build?

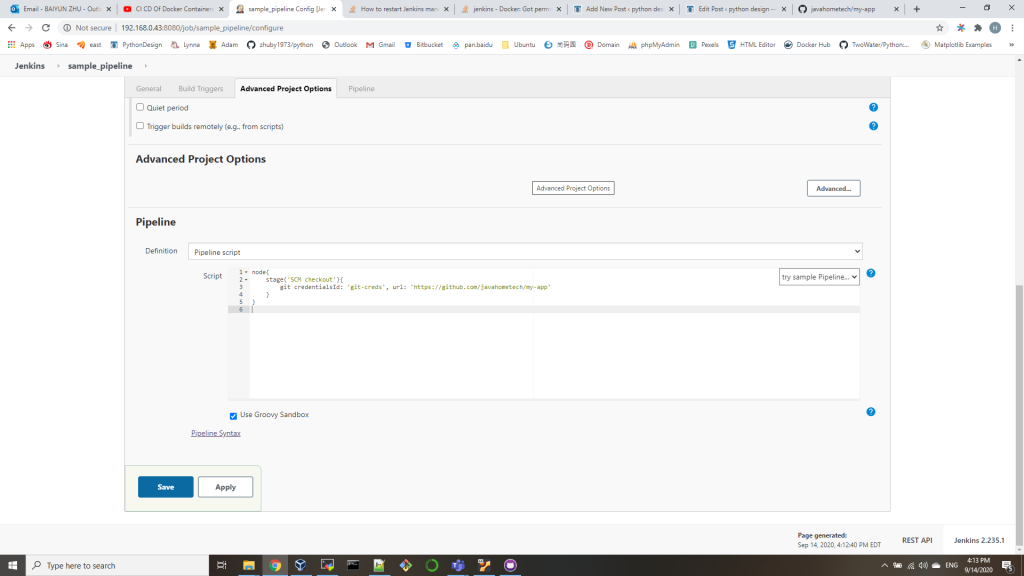
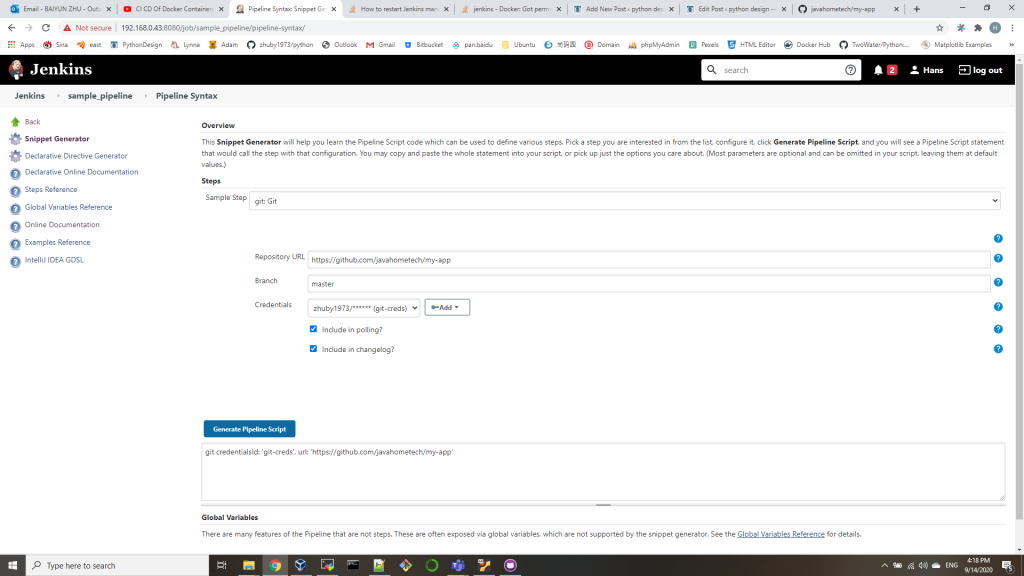
  1. we can create a simple sample_pipeline job on Jenkins with all default, just one stage in “Pipeline script”

you can setup your GIT account in http://192.168.0.43:8080/job/sample_pipeline/pipeline-syntax/

you should be able to run this job without any issue and clone the git repository to your Jenkins VM.
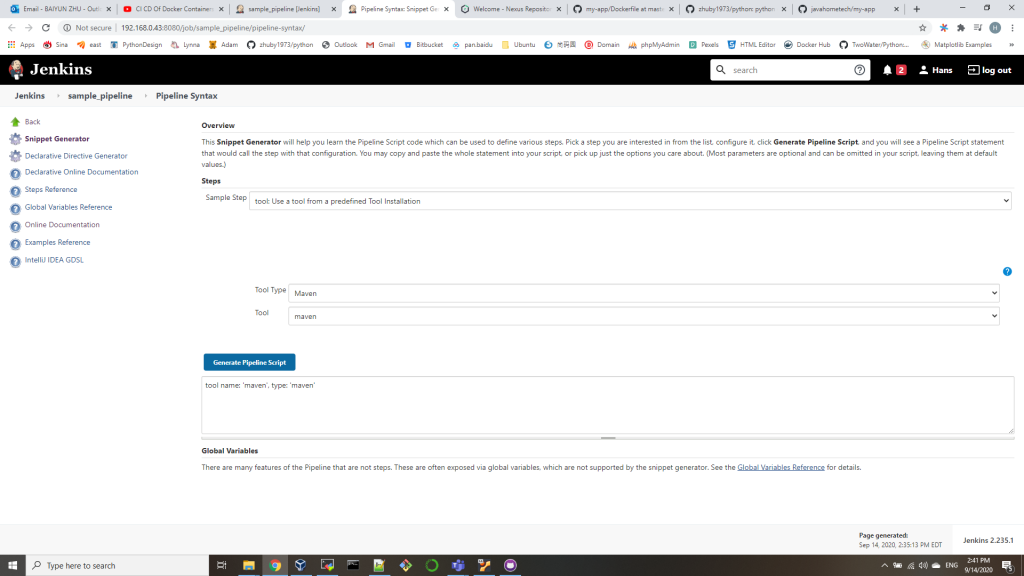
2. we add one more step for mvn Package to generate the war file from cloned source code in /src

node{
	stage('SCM checkout'){
		git credentialsId: 'git-creds', url: 'https://github.com/javahometech/my-app'
	}
	stage('Mvn Package'){
		def mvnHome = tool name: 'maven', type: 'maven'
		def mvnCMD = "${mvnHome}/bin/mvn"
		sh "${mvnCMD} clean package"
	}
}

run this job, you will get war generated successfully in ./target
3. add 3rd step to build a Docker image:

node{
	stage('SCM checkout'){
		git credentialsId: 'git-creds', url: 'https://github.com/javahometech/my-app'
	}
	stage('Mvn Package'){
		def mvnHome = tool name: 'maven', type: 'maven'
		def mvnCMD = "${mvnHome}/bin/mvn"
		sh "${mvnCMD} clean package"
	}
	stage('Build Docker Image'){
		sh 'docker build -t zhuby1973/myapp:2.0 .'
	}
}

(base) ubuntu@ubunu2004:/var/lib/jenkins/workspace/sample_pipeline$ cat Dockerfile
FROM tomcat:8
# Take the war and copy to webapps of tomcat
COPY target/*.war /usr/local/tomcat/webapps/myweb.war

if you got docker permission error, please fix it with below 3 steps:

1. sudo chmod 664 /var/run/docker.sock
2. sudo usermod -a -G docker jenkins
3. sudo /etc/init.d/jenkins restart

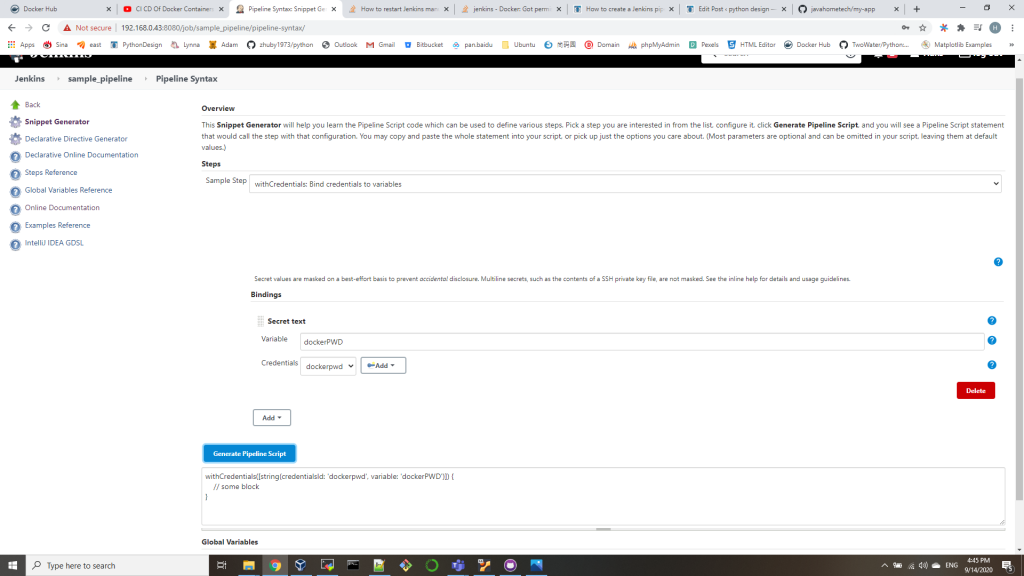
4. push to DockerHub withCredentials

5. deploy the image on DEV server
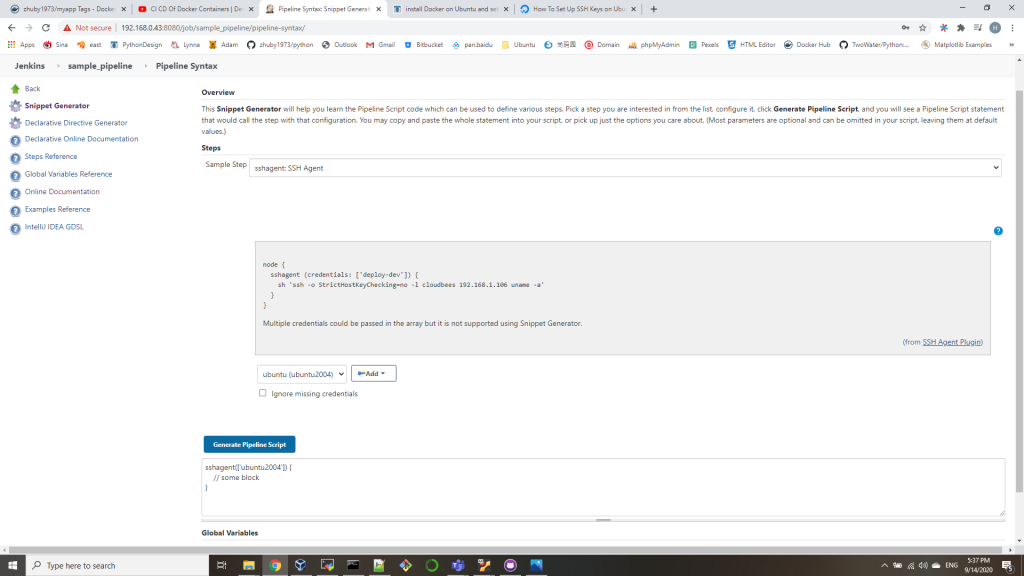
we will run ssh-keygen on Jenkins VM to get a pair of SSH key, add the public key into DEV server .ssh/authorized_keys, make sure you can logon without credential.

node{
	stage('SCM checkout'){
		git credentialsId: 'git-creds', url: 'https://github.com/javahometech/my-app'
	}
	stage('Mvn Package'){
		def mvnHome = tool name: 'maven', type: 'maven'
		def mvnCMD = "${mvnHome}/bin/mvn"
		sh "${mvnCMD} clean package"
	}
	stage('Build Docker Image'){
		sh 'docker build -t zhuby1973/myapp:2.0 .'
	}
	stage('Push Docker Image'){
		withCredentials([string(credentialsId: 'dockerpwd', variable: 'dockerPWD')]) {
			sh "docker login -u zhuby1973 -p ${dockerPWD}"
		}
		sh 'docker push zhuby1973/myapp:2.0'
	}
	stage('Run Container on DEV Server') {
		def dockerRun = 'sudo docker run -p 8080:8080 -d --name myapp zhuby1973/myapp:2.0'
		sshagent(['ubuntu2004']) {
			sh "ssh -o StrictHostKeyChecking=no ubuntu@192.168.0.165 ${dockerRun}"
		}
	}
}

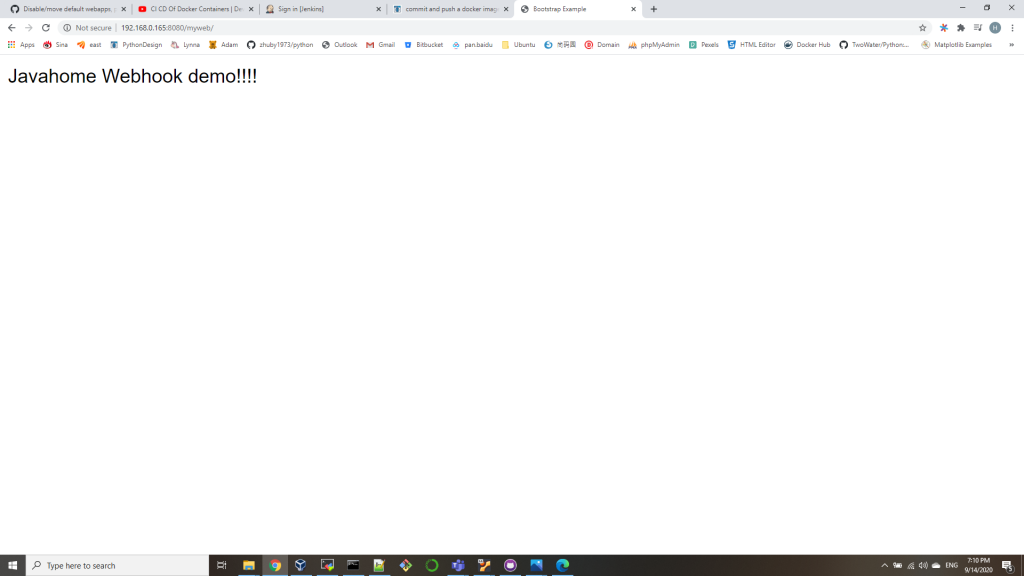
you can verify the image running on DEV server and also the app url:
http://192.168.0.165:8080/myweb/

ubuntu@ubuntu2020:~/.ssh$ sudo docker ps
CONTAINER ID IMAGE COMMAND CREATED STATUS PORTS NAMES
f85fe7882cc1 zhuby1973/myapp:2.0 “catalina.sh run” 12 seconds ago Up 9 seconds 0.0.0.0:8080->8080/tcp myapp

How To Install Nexus3 on Ubuntu20.04

sudo apt install openjdk-8-jdk
sudo mkdir /app && cd /app
sudo wget -O nexus.tar.gz https://download.sonatype.com/nexus/3/latest-unix.tar.gz
sudo tar -xvf nexus.tar.gz
sudo mv nexus-3* nexus
sudo adduser nexus
sudo chown -R nexus:nexus /app/nexus
sudo chown -R nexus:nexus /app/sonatype-work
sudo vi  /app/nexus/bin/nexus.rc
Uncomment run_as_user parameter and set it as following:
run_as_user="nexus"

check the default configuration in /app/nexus/bin/nexus.vmoptions

sudo vi /etc/systemd/system/nexus.service
Add the following contents to the unit file.

[Unit]
Description=nexus service
After=network.target
[Service]
Type=forking
LimitNOFILE=65536
User=nexus
Group=nexus
ExecStart=/app/nexus/bin/nexus start
ExecStop=/app/nexus/bin/nexus stop
User=nexus
Restart=on-abort
[Install]
WantedBy=multi-user.target

sudo systemctl start nexus
(sudo systemctl stop nexus)
verify nexus process and port started without any issue:
ps -ef|grep nexus
netstat -an|grep 8081
open nexus http://localhost:8081 with admin and password from /app/sonatype-work/nexus3/admin.password
you can create raw or maven type repositories, for raw type repository, you can upload/download with command:
curl -v -u admin:pas8word --upload-file license.txt http://192.168.0.43:8081/repository/its/
wget http://192.168.0.43:8081/repository/its/az104-11-vm-parameters.json --user=admin --password=pas8word
wget http://192.168.0.43:8081/repository/amcb/amcb/1/1/1-1.json --user=admin --password=pas8word

create Azure VM and virtualNetworks with Template

In the toolbar of the Cloud Shell pane, click the Upload/Download files icon, in the drop-down menu, click Upload and upload the files az104-06-vms-template.json, and az104-06-vm-parameters.json into the Cloud Shell home directory.

{
    "$schema": "https://schema.management.azure.com/schemas/2015-01-01/deploymentTemplate.json#",
    "contentVersion": "1.0.0.0",
    "parameters": {
      "vmSize": {
        "type": "string",
        "defaultValue": "Standard_D2s_v3",
        "metadata": {
          "description": "Virtual machine size"
        }
      },
      "nameSuffix": {
        "type": "string",
        "allowedValues": [
          "0",
          "1",
          "2"
        ],
        "metadata": {
          "description": "Naming suffix"
        }
      },
      "adminUsername": {
        "type": "string",
        "metadata": {
          "description": "Admin username"
        }
      },
      "adminPassword": {
        "type": "securestring",
        "metadata": {
          "description": "Admin password"
        }
      }
    },
  "variables": {
    "vmName": "[concat('az104-05-vm',parameters('nameSuffix'))]",
    "nicName": "[concat('az104-05-nic',parameters('nameSuffix'))]",
    "virtualNetworkName": "[concat('az104-05-vnet',parameters('nameSuffix'))]",
    "publicIPAddressName": "[concat('az104-05-pip',parameters('nameSuffix'))]",
    "nsgName": "[concat('az104-05-nsg',parameters('nameSuffix'))]",
    "vnetIpPrefix": "[concat('10.5',parameters('nameSuffix'),'.0.0/22')]", 
    "subnetIpPrefix": "[concat('10.5',parameters('nameSuffix'),'.0.0/24')]", 
    "subnetName": "subnet0",
    "subnetRef": "[resourceId('Microsoft.Network/virtualNetworks/subnets', variables('virtualNetworkName'), variables('subnetName'))]",
    "computeApiVersion": "2018-06-01",
    "networkApiVersion": "2018-08-01"
  },
    "resources": [
        {
            "name": "[variables('vmName')]",
            "type": "Microsoft.Compute/virtualMachines",
            "apiVersion": "[variables('computeApiVersion')]",
            "location": "[resourceGroup().location]",
            "dependsOn": [
                "[variables('nicName')]"
            ],
            "properties": {
                "osProfile": {
                    "computerName": "[variables('vmName')]",
                    "adminUsername": "[parameters('adminUsername')]",
                    "adminPassword": "[parameters('adminPassword')]",
                    "windowsConfiguration": {
                        "provisionVmAgent": "true"
                    }
                },
                "hardwareProfile": {
                    "vmSize": "[parameters('vmSize')]"
                },
                "storageProfile": {
                    "imageReference": {
                        "publisher": "MicrosoftWindowsServer",
                        "offer": "WindowsServer",
                        "sku": "2019-Datacenter",
                        "version": "latest"
                    },
                    "osDisk": {
                        "createOption": "fromImage"
                    },
                    "dataDisks": []
                },
                "networkProfile": {
                    "networkInterfaces": [
                        {
                            "properties": {
                                "primary": true
                            },
                            "id": "[resourceId('Microsoft.Network/networkInterfaces', variables('nicName'))]"
                        }
                    ]
                }
            }
        },
        {
            "type": "Microsoft.Network/virtualNetworks",
            "name": "[variables('virtualNetworkName')]",
            "apiVersion": "[variables('networkApiVersion')]",
            "location": "[resourceGroup().location]",
            "comments": "Virtual Network",
            "properties": {
                "addressSpace": {
                    "addressPrefixes": [
                        "[variables('vnetIpPrefix')]"
                    ]
                },
                "subnets": [
                    {
                        "name": "[variables('subnetName')]",
                        "properties": {
                            "addressPrefix": "[variables('subnetIpPrefix')]"
                        }
                    }
                ]
            }
        },
        {
            "name": "[variables('nicName')]",
            "type": "Microsoft.Network/networkInterfaces",
            "apiVersion": "[variables('networkApiVersion')]",
            "location": "[resourceGroup().location]",
            "comments": "Primary NIC",
            "dependsOn": [
                "[variables('publicIpAddressName')]",
                "[variables('nsgName')]",
                "[variables('virtualNetworkName')]"
            ],
            "properties": {
                "ipConfigurations": [
                    {
                        "name": "ipconfig1",
                        "properties": {
                            "subnet": {
                                "id": "[variables('subnetRef')]"
                            },
                            "privateIPAllocationMethod": "Dynamic",
                            "publicIpAddress": {
                                "id": "[resourceId('Microsoft.Network/publicIpAddresses', variables('publicIpAddressName'))]"
                            }
                        }
                    }
                ],
                "networkSecurityGroup": {
                    "id": "[resourceId('Microsoft.Network/networkSecurityGroups', variables('nsgName'))]"
                }
            }
        },
        {
            "name": "[variables('publicIpAddressName')]",
            "type": "Microsoft.Network/publicIpAddresses",
            "apiVersion": "[variables('networkApiVersion')]",
            "location": "[resourceGroup().location]",
            "comments": "Public IP for Primary NIC",
            "properties": {
                "publicIpAllocationMethod": "Dynamic"
            }
        },
        {
            "name": "[variables('nsgName')]",
            "type": "Microsoft.Network/networkSecurityGroups",
            "apiVersion": "[variables('networkApiVersion')]",
            "location": "[resourceGroup().location]",
            "comments": "Network Security Group (NSG) for Primary NIC",
            "properties": {
                "securityRules": [
                    {
                        "name": "default-allow-rdp",
                        "properties": {
                            "priority": 1000,
                            "sourceAddressPrefix": "*",
                            "protocol": "Tcp",
                            "destinationPortRange": "3389",
                            "access": "Allow",
                            "direction": "Inbound",
                            "sourcePortRange": "*",
                            "destinationAddressPrefix": "*"
                        }
                    }
                ]
            }
        }
    ],
    "outputs": {}
}
{
    "$schema": "https://schema.management.azure.com/schemas/2015-01-01/deploymentParameters.json#",
    "contentVersion": "1.0.0.0",
    "parameters": {
        "vmSize": {
            "value": "Standard_D2s_v3"
        },
        "adminUsername": {
            "value": "Student"
        },
        "adminPassword": {
            "value": "Pa55w.rd1234"
        }
    }
}
From the Cloud Shell pane, run the following to create the first resource group that will be hosting the first virtual network and the pair of virtual machines:
$location = 'West US'
$rgName = 'My-RG01' 
New-AzResourceGroup -Name $rgName -Location $location

From the Cloud Shell pane, run the following to create the first virtual network and deploy a pair of virtual machines into it by using the template and parameter files you uploaded:
New-AzResourceGroupDeployment `
  -ResourceGroupName $rgName `
  -TemplateFile $HOME/az104-06-vms-template.json `
  -TemplateParameterFile $HOME/az104-06-vm-parameters.json `
  -AsJob

remote logon with python Fabric

Fabric is a Python library and command-line tool for streamlining the use of SSH for application deployment or systems administration tasks.
Here is sample code linux_fabric.py:

from fabric import Connection
def main():
    c = Connection("ubuntu@ubunu2004", connect_kwargs={"password": "ubuntu"})
    c.put('stock_data.csv', '/tmp')
    #c.run('tar -C /opt/mydata -xzvf /opt/mydata/myfiles.tgz')
    with c.cd('/tmp'):
        c.run("git clone https://github.com/zhuby1973/python.git")
        
if __name__ == '__main__':
    main()
C:\Users\zhuby>linux_fabric.py
Cloning into 'python'...
Updating files: 100% (1843/1843), done.

verify from Linux VM:
(base) ubuntu@ubunu2004:/tmp$ ls -ltr
total 3140
-rw-rw-rw-  1 ubuntu  ubuntu       17 Aug 31 08:46 stock_data.csv
drwxrwxr-x 12 ubuntu  ubuntu     4096 Aug 31 08:47 python
(base) ubuntu@ubunu2004:/tmp$
# using SerialGroup for multiple VM operation
from fabric import SerialGroup as Group
pool = Group('web1', 'web2', 'web3', connect_kwargs={"password": "youpassword"} )
pool.put('myfiles.tgz', '/opt/mydata')
pool.run('tar -C /opt/mydata -xzvf /opt/mydata/myfiles.tgz')

or 
>>> from fabric import Connection
>>> for host in ('web1', 'web2', 'mac1'):
>>>     result = Connection(host).run('uname -s')
...     print("{}: {}".format(host, result.stdout.strip()))
...
web1: Linux
web2: Linux
mac1: Darwin