Web Scraping Reddit with Scrapy

1. install scrapy

you need install Microsoft Visual C++ 14.0 from https://visualstudio.microsoft.com/thank-you-downloading-visual-studio/?sku=BuildTools&rel=16, then pip install scrapy.

2. create scrapy project

C:\Users\zhuby\hans>scrapy startproject reddit
New Scrapy project ‘reddit’, using template directory ‘c:\python\lib\site-packages\scrapy\templates\project’, created in:
C:\Users\zhuby\hans\reddit

You can start your first spider with:
cd reddit
scrapy genspider example example.com

3. C:\Users\zhuby\hans\reddit\reddit\spiders>code redditspider.py

import scrapy

class RedditSpider(scrapy.Spider):
    name = "reddit"
    start_urls = ["https://www.reddit.com/r/cats"]

    def parse(self, response):
        links = response.xpath("//img/@src")
        html =""

        for link in links:
            url = link.get()
            if any(extension in url for extension in [".jpg", ".gif", ".png"]):
                html += """<a href="{url}"
                target="_blank">
                <img src="{url}" height="33%" width="33%">
                </a>""".format(url=url)

                with open("frontpage.html", "a") as page:
                    page.write(html)
                    page.close()

4. test the redditspider.py

C:\Users\zhuby\hans\reddit>scrapy crawl reddit
2020-06-08 16:14:25 [scrapy.utils.log] INFO: Scrapy 2.1.0 started (bot: reddit)
2020-06-08 16:14:25 [scrapy.utils.log] INFO: Versions: lxml 4.5.1.0, libxml2 2.9.5, cssselect 1.1.0, parsel 1.6.0, w3lib 1.22.0, Twisted 20.3.0, Python 3.8.3 (tags/v3.8.3:6f8c832, May 13 2020, 22:37:02) [MSC v.1924 64 bit (AMD64)], pyOpenSSL 19.1.0 (OpenSSL 1.1.1g 21 Apr 2020), cryptography 2.9.2, Platform Windows-10-10.0.19041-SP0
2020-06-08 16:14:25 [scrapy.utils.log] DEBUG: Using reactor: twisted.internet.selectreactor.SelectReactor
2020-06-08 16:14:25 [scrapy.crawler] INFO: Overridden settings:
{‘BOT_NAME’: ‘reddit’,
………………..
then you will get file:///C:/Users/zhuby/hans/reddit/frontpage.html

call openweathermap API with python3

1. Create an Account on https://home.openweathermap.org/ and create your API key, save it into config.ini:

[openweathermap]
api=7383374766289c804cbf5a68ac704491

2. create get_weather.py

import configparser
import requests
import sys

def get_api_key():
    config = configparser.ConfigParser()
    config.read('config.ini')
    return config['openweathermap']['api']

def get_weather(api_key, location):
    url = "https://api.openweathermap.org/data/2.5/weather?q={}&units=metric&appid={}".format(location, api_key)
    r = requests.get(url)
    return r.json()

def main():
    if len(sys.argv) != 2:
        exit("Usage: {} LOCATION".format(sys.argv[0]))
    location = sys.argv[1]

    api_key = get_api_key()
    weather = get_weather(api_key, location)

    print(weather['main']['temp'])
    print(weather)

if __name__ == '__main__':
    main()
  1. test code:
    C:\Users\zhuby\hans>python get_weather.py Toronto
    20.2
    {‘coord’: {‘lon’: -79.42, ‘lat’: 43.7}, ‘weather’: [{‘id’: 800, ‘main’: ‘Clear’, ‘description’: ‘clear sky’, ‘icon’: ’01d’}], ‘base’: ‘stations’, ‘main’: {‘temp’: 20.2, ‘feels_like’: 18.43, ‘temp_min’: 18, ‘temp_max’: 22.78, ‘pressure’: 1020, ‘humidity’: 52}, ‘visibility’: 14484, ‘wind’: {‘speed’: 2.6, ‘deg’: 100}, ‘clouds’: {‘all’: 1}, ‘dt’: 1591637542, ‘sys’: {‘type’: 1, ‘id’: 941, ‘country’: ‘CA’, ‘sunrise’: 1591608974, ‘sunset’: 1591664262}, ‘timezone’: -14400, ‘id’: 6167865, ‘name’: ‘Toronto’, ‘cod’: 200}

CRUD Operations in Python on MySQL

1. install MySQL on Ubuntu

sudo apt update
sudo apt install mysql-server
sudo mysql_secure_installation

Verify the installation:
sudo mysql
mysql> SELECT user,authentication_string,plugin,host FROM mysql.user;
mysql> ALTER USER ‘root’@’localhost’ IDENTIFIED WITH mysql_native_password BY ‘password’;
mysql> FLUSH PRIVILEGES;
mysql> exit
$ mysql -u root -p to test your login

2. ubuntu@ubunu2004:~$ pip3 install mysql-connector-python

create db.py to create db, table and records

import mysql.connector #Importing Connector package   
mysqldb=mysql.connector.connect(host="localhost",user="root",password="password")#established connection   
mycursor=mysqldb.cursor()#cursor() method create a cursor object  
mycursor.execute("create database dbpython")#Execute SQL Query to create a database    
mysqldb.close()#Connection Close  

#Create a table into dbpython database  
import mysql.connector  
mysqldb=mysql.connector.connect(host="localhost",user="root",password="password",database="dbpython")#established connection between your database   
mycursor=mysqldb.cursor()#cursor() method create a cursor object  
mycursor.execute("create table student(roll INT,name VARCHAR(255), marks INT)")#Execute SQL Query to create a table into your database  
mysqldb.close()#Connection Close  

import mysql.connector  
mysqldb=mysql.connector.connect(host="localhost",user="root",password="password",database="dbpython")#established connection between your database  
mycursor=mysqldb.cursor()#cursor() method create a cursor object    
try:  
   #Execute SQL Query to insert record  
   mycursor.execute("insert into student values(1,'Sarfaraj',80),(2,'Kumar',89),(3,'Sohan',90)")  
   mysqldb.commit() # Commit is used for your changes in the database  
   print('Record inserted successfully...')   
except:  
   # rollback used for if any error   
   mysqldb.rollback()  
mysqldb.close()#Connection Close  

ubuntu@ubunu2004:~$ python3 db.py
Record inserted successfully…
you can also check in MySQL:
mysql> show databases;
mysql> use dbpython;
mysql> show tables;
+——————–+
| Tables_in_dbpython |
+——————–+
| student |
+——————–+
1 row in set (0.00 sec)
mysql> select * from student;
+——+———-+——-+
| roll | name | marks |
+——+———-+——-+
| 1 | Sarfaraj | 80 |
| 2 | Kumar | 89 |
| 3 | Sohan | 90 |
+——+———-+——-+
3 rows in set (0.00 sec)

3. create update_record.py

import mysql.connector
mysqldb=mysql.connector.connect(host="localhost",user="root",password="password",database="dbpython")#established connection between your database
mycursor=mysqldb.cursor()#cursor() method create a cursor object
try:
   mycursor.execute("UPDATE student SET name='Ramu', marks=100 WHERE roll=1")#Execute SQL Query to update record
   mysqldb.commit() # Commit is used for your changes in the database
   print('Record updated successfully...')
except:
   # rollback used for if any error
   mysqldb.rollback()
mysqldb.close()#Connection Close

4. create delete_record.py

import mysql.connector
mysqldb=mysql.connector.connect(host="localhost",user="root",password="password",database="dbpython")#established connection between your database
mycursor=mysqldb.cursor()#cursor() method create a cursor object
try:
   mycursor.execute("DELETE FROM student WHERE roll=3")#Execute SQL Query to detete a record
   mysqldb.commit() # Commit is used for your changes in the database
   print('Record deteted successfully...')
except:
   # rollback used for if any error
   mysqldb.rollback()
mysqldb.close()#Connection Close

5. test the code with display_db.py

import mysql.connector
mysqldb=mysql.connector.connect(host="localhost",user="root",password="password",database="dbpython")#established connection between your database
mycursor=mysqldb.cursor()#cursor() method create a cursor object
try:
   mycursor.execute("select * from student")#Execute SQL Query to select all record
   result=mycursor.fetchall() #fetches all the rows in a result set
   for i in result:
      roll=i[0]
      name=i[1]
      marks=i[2]
      print(roll,name,marks)
except:
   print('Error:Unable to fetch data.')
mysqldb.close()#Connection Close

ubuntu@ubunu2004:~$ python3 display_db.py
1 Sarfaraj 80
2 Kumar 89
3 Sohan 90
ubuntu@ubunu2004:~$ python3 update.py
Record updated successfully…
ubuntu@ubunu2004:~$ python3 display_db.py
1 Ramu 100
2 Kumar 89
3 Sohan 90
ubuntu@ubunu2004:~$ python3 delete.py
Record deteted successfully…
ubuntu@ubunu2004:~$ python3 display_db.py
1 Ramu 100
2 Kumar 89

NOTE:

  1. if you cannot connect to MySQL from remote, you need update the binding port:
    sudo vi /etc/mysql/mysql.conf.d/mysqld.cnf
    from:
    bind-address = 127.0.0.1
    change to:
    bind-address = 0.0.0.0
    then restart MySQL
    sudo systemctl restart mysql.service
  2. if you got error msg:
    mysql.connector.errors.DatabaseError: 1130: Host ‘192.168.0.28’ is not allowed to connect to this MySQL server
    root is NOT allowed login from remote, you can create a new user and grant PRIVILEGES:
    mysql> CREATE USER ‘monty’@’%’ IDENTIFIED BY ‘somIUpass#98’;
    mysql> GRANT ALL PRIVILEGES ON . TO ‘monty’@’%’ WITH GRANT OPTION;
    then you can query from remote with this ID:
    C:\Users\zhuby\python_code>python display_db.py
    1 Ramu 100
    2 Kumar 89

Flask-RESTful API develop

We need install flask-restful first: pip install flask-restful. then develop api.py:

from flask import Flask
from flask_restful import reqparse, abort, Api, Resource

app = Flask(__name__)
api = Api(app)

TODOS = {
    'todo1': {'task': 'build an API'},
    'todo2': {'task': '?????'},
    'todo3': {'task': 'profit!'},
}


def abort_if_todo_doesnt_exist(todo_id):
    if todo_id not in TODOS:
        abort(404, message="Todo {} doesn't exist".format(todo_id))

parser = reqparse.RequestParser()
parser.add_argument('task')

# shows a single todo item and lets you delete a todo item
class Todo(Resource):
    def get(self, todo_id):
        abort_if_todo_doesnt_exist(todo_id)
        return TODOS[todo_id]

    def delete(self, todo_id):
        abort_if_todo_doesnt_exist(todo_id)
        del TODOS[todo_id]
        return '', 204

    def put(self, todo_id):
        args = parser.parse_args()
        task = {'task': args['task']}
        TODOS[todo_id] = task
        return task, 201


# TodoList
# shows a list of all todos, and lets you POST to add new tasks
class TodoList(Resource):
    def get(self):
        return TODOS

    def post(self):
        args = parser.parse_args()
        todo_id = int(max(TODOS.keys()).lstrip('todo')) + 1
        todo_id = 'todo%i' % todo_id
        TODOS[todo_id] = {'task': args['task']}
        return TODOS[todo_id], 201

##
## Actually setup the Api resource routing here
##
api.add_resource(TodoList, '/todos')
api.add_resource(Todo, '/todos/<todo_id>')


if __name__ == '__main__':
    app.run(debug=True)
$ python api.py 
* Running on http://127.0.0.1:5000/ * Restarting with reloader
GET the list
$ curl http://localhost:5000/todos 
GET a single task
$ curl http://localhost:5000/todos/todo3
DELETE a task
$ curl http://localhost:5000/todos/todo2 -X DELETE -v
Add a new task
$ curl http://localhost:5000/todos -d "task=something new" -X POST -v
Update a task
$ curl http://localhost:5000/todos/todo3 -d "task=something different" -X PUT -v
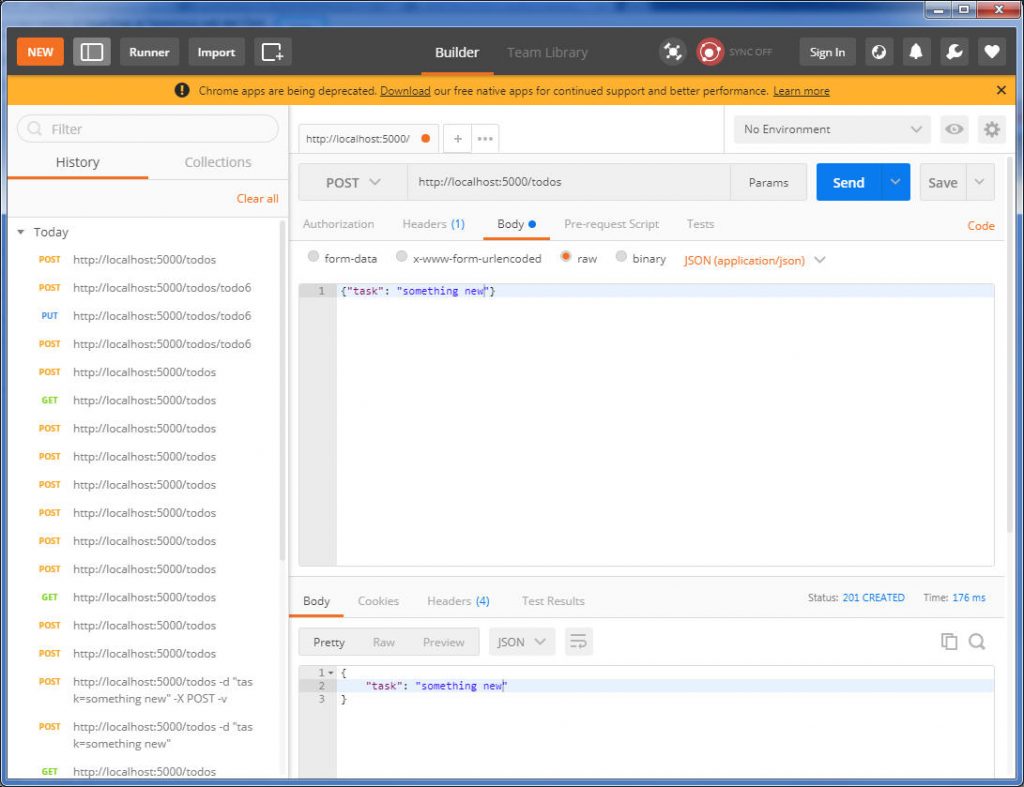
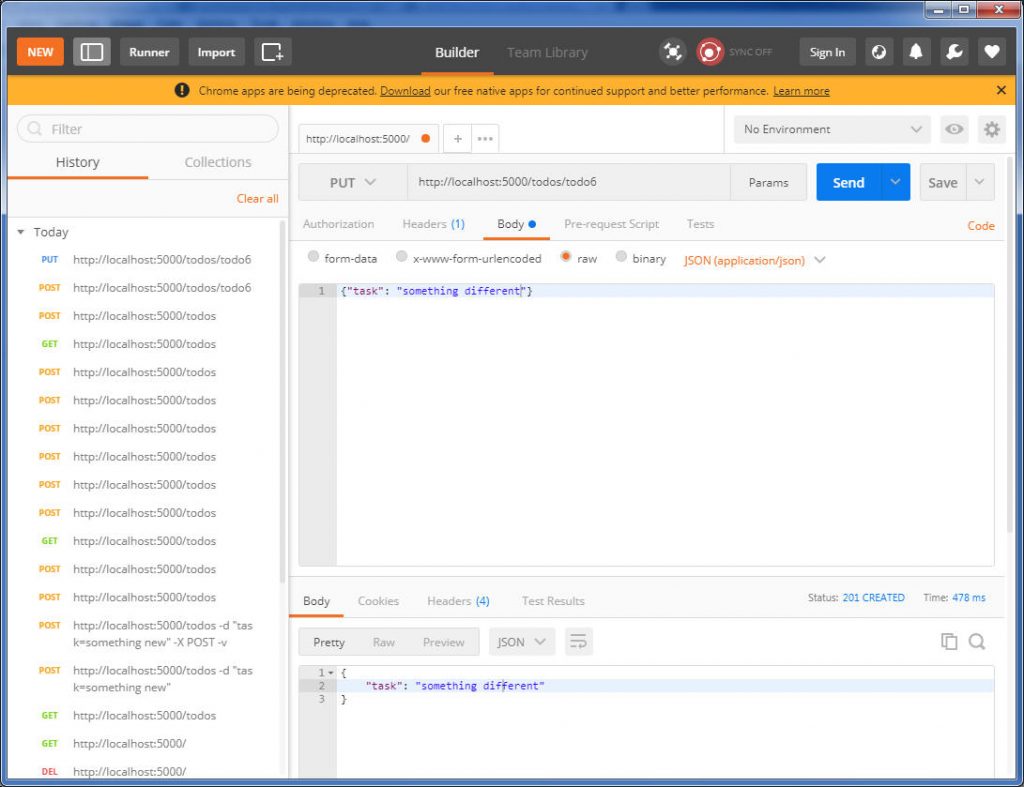
Or you can do same thing in Postman, POST to add new task and PUT to update a task.

7 Great Utility Libraries for Data Visualization With JavaScript

JavaScript runs the web. You can use it in a browser, you can use it on a server, and you can use it for mobile applications.
Today’s ecosystem is full of great libraries and frameworks helping engineers build powerful, user-centric applications for any platform.
Data visualization has been one of the hottest topics in the world right now, even before the Covid-19 pandemic. Companies sit on massive amounts of data and need to find ways to analyze, interpret, and visualize that data.
Whether you’re a data scientist or a programmer that has to deal with data visualization, here are seven great JavaScript frameworks to help you create stunning solutions.

  1. D3
    https://github.com/d3/d3
    D3 currently has 90,000 stars on GitHub, making it one of the most popular JavaScript libraries available. It’s an amazing library for visualizing data with JavaScript using web standards (SVG, Canvas, HTML). It combines powerful interaction and visualization techniques to manipulate the DOM with a data-driven approach.
    It allows for binding arbitrary data to the DOM and then applying transformations to the document.
    Key features are:
    Full capabilities of web standards
    Extremely fast and supports large datasets
    Official and community-developed modules available
  2. three.js
    https://github.com/mrdoob/three.js
    three.js is another great JavaScript library for data visualization that currently has about 60,000 GitHub stars. It wants to create an easy-to-use, simple, and lightweight 3D library with a default WebGL renderer.
    Key features are:
    Default WebGL renderer
    Supports renderer for Canvas 2D, SVG, and CSS3D
    Good documentation
  3. Chart.js

Chart.js is a simple but flexible JavaScript-charting library for designers and developers that has about 50,000 stars on GitHub at the moment. It has great documentation, and it’s pretty easy to get started.
Key features:
Mixed chart types
Out-of-the-box stunning transitions
Open-source project
Supports eight chart types
Responsive

  1. Paper.js

Paper.js is an open-source vector graphic–scripting framework running on the top of HTML5 Canvas. It offers a lot of powerful functionality to create and work with Bézier curves and vector graphics. It’s based on Scriptographer, a scripting environment for Adobe Illustrator. Paper.js is easy to learn for beginners but also has a lot of advanced features for advanced users.
Key features:
Easy to get started with
Well-designed and battle-hardened API
Based on Scriptographer, using HTML5 standards
It offers nested layers, groups, paths, compound paths, rasters, symbols, etc.

  1. Fabric.js

Fabric.js is a great JavaScript framework for working with HTML canvas elements easily. It has both an interactive object model on top of the canvas element and an SVG-to-canvas parser.
With Fabric, one can easily create simple shapes, like circles, triangles, rectangles, or other polygons, using JavaScript.
Key features:
Unit tested
Modular architecture
Cross-browser functionality
It’s fast and follows semantic versioning

  1. ECharts

ECharts is a powerful visualization and charting library for JavaScript that offers easy ways of adding interactive, intuitive, and highly customizable charts to applications and currently has about 40,000 stars on GitHub. It’s based on ZRender and written in pure JavaScript.
Key features:
Incubator project of the Apache Software Foundation
Free to use
Supports multidimensional data analysis
Active community
Charts for all sizes of devices

  1. Two.js

Two.js is a small API for two-dimensional drawing in modern browsers. It’s renderer-agnostic, enabling rendering in multiple contexts, such as WebGL, Canvas2D, or SVG, with the same API.
Key features:
Focus on vector shapes
Relies on scene graphs
Built-in animation loop
Features a scalable vector-graphics interpreter

Python Sorting Algorithms

1. bubbleSort

def bubbleSort(arr):
    for i in range(1, len(arr)):
        for j in range(0, len(arr)-i):
            if arr[j] > arr[j+1]:
                arr[j], arr[j + 1] = arr[j + 1], arr[j]
    return arr

2. radixSort

def radix(arr):

    digit = 0
    max_digit = 1
    max_value = max(arr)
    while 10**max_digit < max_value:
        max_digit = max_digit + 1

    while digit < max_digit:
        temp = [[] for i in range(10)]
        for i in arr:
            t = int((i/10**digit)%10)
            temp[t].append(i)

        coll = []
        for bucket in temp:
            for i in bucket:
                coll.append(i)

        arr = coll
        digit = digit + 1

    return arr

3. selectionSort

def selectionSort(arr):
    for i in range(len(arr) - 1):
        minIndex = i
        for j in range(i + 1, len(arr)):
            if arr[j] < arr[minIndex]:
                minIndex = j
        # exchange when i is not the min
        if i != minIndex:
            arr[i], arr[minIndex] = arr[minIndex], arr[i]
    return arr

4. insertionSort

def insertionSort(arr):
    for i in range(len(arr)):
        preIndex = i-1
        current = arr[i]
        while preIndex >= 0 and arr[preIndex] > current:
            arr[preIndex+1] = arr[preIndex]
            preIndex-=1
        arr[preIndex+1] = current
    return arr

5. shellSort

def shellSort(arr):
    import math
    gap=1
    while(gap < len(arr)/3):
        gap = gap*3+1
    while gap > 0:
        for i in range(gap,len(arr)):
            temp = arr[i]
            j = i-gap
            while j >=0 and arr[j] > temp:
                arr[j+gap]=arr[j]
                j-=gap
            arr[j+gap] = temp
        gap = math.floor(gap/3)
    return arr

6. mergeSort

def mergeSort(arr):
    import math
    if(len(arr)<2):
        return arr
    middle = math.floor(len(arr)/2)
    left, right = arr[0:middle], arr[middle:]
    return merge(mergeSort(left), mergeSort(right))

def merge(left,right):
    result = []
    while left and right:
        if left[0] <= right[0]:
            result.append(left.pop(0));
        else:
            result.append(right.pop(0));
    while left:
        result.append(left.pop(0));
    while right:
        result.append(right.pop(0));
    return result

7. quickSort

def quickSort(arr, left=None, right=None):
    left = 0 if not isinstance(left,(int, float)) else left
    right = len(arr)-1 if not isinstance(right,(int, float)) else right
    if left < right:
        partitionIndex = partition(arr, left, right)
        quickSort(arr, left, partitionIndex-1)
        quickSort(arr, partitionIndex+1, right)
    return arr

def partition(arr, left, right):
    pivot = left
    index = pivot+1
    i = index
    while  i <= right:
        if arr[i] < arr[pivot]:
            swap(arr, i, index)
            index+=1
        i+=1
    swap(arr,pivot,index-1)
    return index-1

def swap(arr, i, j):
    arr[i], arr[j] = arr[j], arr[i]

Publish your own python project on PyPi.org

  1. create a simple project:
    Directory of C:\Hans\packaging_tutorial
C:\Hans\packaging_tutorial>tree /F
Folder PATH listing for volume Windows7_OS
Volume serial number is 006F0074 54AA:C963
C:.
│ LICENSE
│ README.md
│ setup.py
│
└─list_difference
__init__.py

C:\Hans\packaging_tutorial>type setup.py

import setuptools

with open("README.md", "r") as fh:
    long_description = fh.read()

setuptools.setup(
    name="list_difference_zhuby1973", # Replace with your own username
    version="0.0.2",
    author="Hans Zhu",
    author_email="zhuby1973@gmail.com",
    description="A package to find difference between two list",
    long_description=long_description,
    long_description_content_type="text/markdown",
    url="https://github.com/pypa/sampleproject",
    packages=setuptools.find_packages(),
    classifiers=[
        "Programming Language :: Python :: 3",
        "License :: OSI Approved :: MIT License",
        "Operating System :: OS Independent",
    ],
    python_requires='>=3.6',
)

C:\Hans\packaging_tutorial>type README.md

Example Package
This is a simple example package.
  1. Generating distribution archives
    Make sure you have the latest versions of setuptools and wheel installed:
    python -m pip install –user –upgrade setuptools wheel
    Now run this command from the same directory where setup.py is located:
    python setup.py sdist bdist_wheel
    This command should output a lot of text and once completed should generate two files in the dist directory:
    Directory of C:\Hans\packaging_tutorial\dist

05/28/2020 06:31 PM .
05/28/2020 06:31 PM ..
05/28/2020 06:31 PM 2,626 list_difference_zhuby1973-0.0.1-py3-none-
any.whl
05/28/2020 06:31 PM 1,304 list_difference_zhuby1973-0.0.1.tar.gz
2 File(s) 3,930 bytes

  1. Uploading the distribution archives
    you need register an account on pypi.org first!
    You’ll need to install Twine:
    python -m pip install –user –upgrade twine
    Once installed, run Twine to upload all of the archives under dist:
    python -m twine upload –repository pypi dist/*
    You will be prompted for a username and password.
  2. Installing your newly uploaded package
    You can use pip to install your package and verify that it works.
    python -m pip install –index-url https://pypi.org/simple/ –no-deps list_difference_zhuby1973
    Make sure to specify your username in the package name!
    pip should install the package from Test PyPI and the output should look something like this:
    Collecting list_difference_zhuby1973
    Downloading list_difference_zhuby1973-0.0.1-py3-none-any.whl (2.6 kB)
    Installing collected packages: list-difference-zhuby1973
    Successfully installed list-difference-zhuby1973-0.0.1
    You can test that it was installed correctly by importing the package. Run the Python interpreter (make sure you’re still in your virtualenv):

C:> python
and from the interpreter shell import the package: import list_difference

Congratulations, you’ve packaged and distributed a Python project!

Blueprint validation

#!/usr/bin/python
import os
import sys
import yaml
import json
from termcolor import colored
bp_dir = sys.argv[1]
cwd = os.getcwd()
bppath = os.path.join(cwd, bp_dir)
inpath = os.path.join(bppath, 'input')
y_file = os.path.join(bppath, 'blueprint.yaml')
def get_diff(list1, list2):
   difference = set(list1).symmetric_difference(set(list2))
   list_difference = list(difference)
   if len(list_difference) == 0:
       print("input.json parameters are matching with blueprint.yaml")
   else:
       print('Found miss match between YAML and JSON, please check below parameters:')
       print(colored(list_difference, 'red'))
def yaml_json_compare(yaml_file, json_file):
with open(yaml_file, 'r') as stream:
   try:
       dict = yaml.load(stream, Loader=yaml.FullLoader)
       for key, value in dict.items():
           if key == 'inputs':
               dict2 = value
               aList = list(dict2)
               #print(aList)
               with open(json_file) as f:
                   try:
                       data = json.load(f)
                       bList = list(data)
                       print(json_file + " is valid")
                       get_diff(aList, bList)
                   except ValueError as exc:
                       print(json_file + " is invalid")
   except yaml.YAMLError as exc:
       print(exc)
       print("blueprint.yaml is invalid")
def walk(dirname):
   for name in os.listdir(dirname):
       path = os.path.join(dirname, name)
       if os.path.isfile(path):
           yaml_json_compare(y_file, path)
       else:
           walk(path)
if __name__ == '__main__':
   walk(inpath)
here is the output:
(venv) lindas-MacBook-Air:hello linda$ python3 write_excel.py DEMO
/Users/linda/PycharmProjects/hello/DEMO/input/SIT/inputs.json is valid
Found miss match between YAML and JSON, please check below parameters:
['vm_size']
/Users/linda/PycharmProjects/hello/DEMO/input/DEV/inputs.json is valid
Found miss match between YAML and JSON, please check below parameters:
['cost1', 'cost']
/Users/linda/PycharmProjects/hello/DEMO/input/UAT/inputs.json is valid
input.json parameters are matching with blueprint.yaml