
1. Make a bootable USB drive with the Windows utility program DiskPart
If you dare to do the necessary work by hand, you can simply use the cmd.exe application, better known as “Command Prompt”, to create a bootable USB drive on all operating systems from Windows Vista (including Windows 10). This goes as follows:
Plug the USB drive into your computer’s USB port.
Search for the “cmd” application in the Windows start menu, right-click on the item, and select “Run as administrator” from the context menu. This opens a small window with white text on a black background.
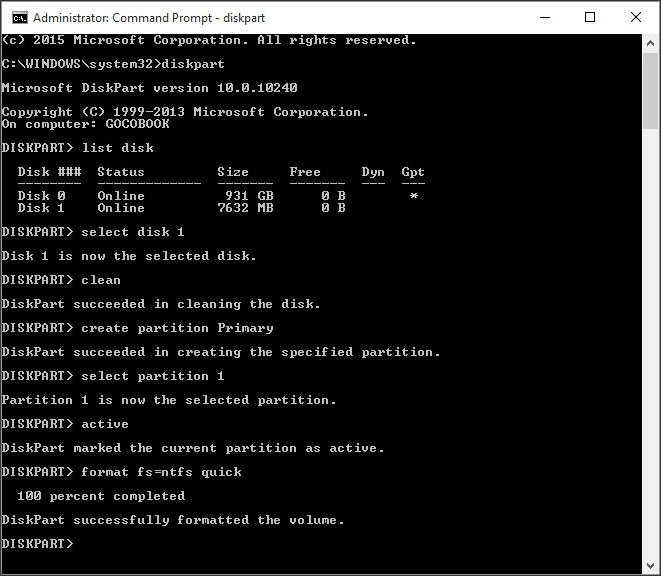
Type the command “diskpart” and confirm your input with the enter key (you’ll also do this after every other entered command). This starts the storage device manager.
Enter the command “list disk” to display all available storage devices.
You can recognize your USB by its storage capacity, and it’s usually listed as “disk 1”. In the system partition, “disk 0” is usually your PC, so a hard drive or solid state drive in your computer.
Based on the assumption that your USB has the label “disk 1”, enter the command “sel disk 1” to select it (or the corresponding “disk 2”, etc.).
Enter then command “clean” to delete all files from the USB.
Enter the command “create partition primary” to create a main partition.
Enter the command “list par” and select the newly created main partition with “sel par 1”.
Activate the partition with the command “active”.
Format the USB with the command “format fs=FAT32 label=“WINDOWSUSB” quick override” (in place of “WINDOWS USB” you can also choose another label, so long as it doesn’t contain any spaces or special characters. The drive will later be displayed under this name if you plug into a running Windows computer). Formatting may take a while. You can track its progress in the percentage bar.
As soon as the process is finished, enter the command “assign” to automatically assign a drive letter (for example “G:”) to your USB.
Enter “exit” to close DiskPart, and then “exit” again to close the command prompt.
To finish the process, you just have to copy the Windows ISO file to a bootable USB stick. This is done with a basic drag-and-drop. If you’re using an installation disc, you can also drag all setup files from there onto your drive (use the folder options to display all of the hidden files first). That’s all possible in the command prompt as well. For a source media with the drive letter “D:” and a USB drive with the letter “G:”, the corresponding command would look as follows: “xcopy D:*. G:*. /S /E /F” (all of the spaces are intentional).
2. create Bootable USB with Rufus
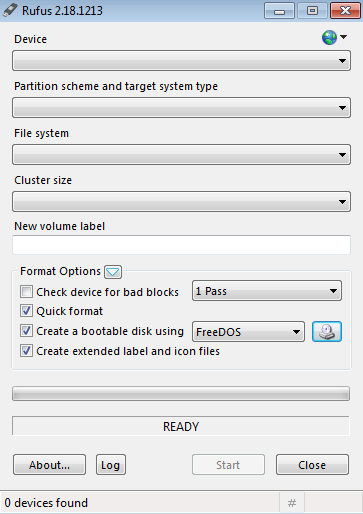
Rufus is widely considered to be the fastest and most reliable tool for the creation of a bootable USB. It also supports UEFI (“Unified Extensible Firmware Interface”), a new mainboard firmware that replaced the old BIOS and can already be found on almost all newer computers. From Windows 8, it’s also possible to install “Windows2Go” as a portable operating system on an external storage device with Rufus.
Operation of the tool is simple:
Open the program with a double-click
Select your USB drive in “Device”
Select “Create a bootable disk using” and the option “ISO Image”
Right-click on the CD-ROM symbol and select the ISO file
Under “New volume label”, you can enter whatever name you like for your USB drive
You’ll receive the warning “ALL DATA ON THIS DEVICE WILL BE DESTROYED”, which you can confidently confirm with “OK”– at this point, you’ve ideally already saved any important files from the USB drive
Click on “Start”
As soon as the green bar is full, click on “Finish”
Eject your bootable USB drive with “Safely eject hardware”
3. Create Windows 10 installation media
https://www.microsoft.com/en-ca/software-download/windows10
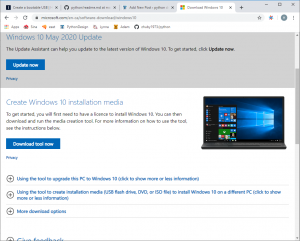
click "Download tool now"
then select "Using the tool to create installation media (USB flash drive) to install Windows 10 on a different PC"
4. after bootable USB created, you need change your computer BIOS settings to make it startup from USB first!
reboot and start Windows 10 installation!