-
we can search php and apache image on Docker Hub, we will use php:7.0-apache for this demo.
-
create Dockerfile and src/index.php as below
root@ubunu2004:~/docker_sample# tree . ├── Dockerfile └── src └── index.php 1 directory, 2 files root@ubunu2004:~/docker_sample# cat Dockerfile FROM php:7.0-apache COPY src/ /var/www/html EXPOSE 80 root@ubunu2004:~/docker_sample# cat src/index.php <?php echo "Hello World!"; -
build the container
docker build -t hello_world . -
run the container
docker run -p 82:80 hello_world
then you can verify it on http://192.168.0.43:82/ -
if you want mapping the index.php to container, you can start it with
docker run -p 82:80 -v /root/docker_sample/src/:/var/www/html/ hello_world
now if you update index.php, you will get the change immediately on http://192.168.0.43:82/ -
you can push this image to Docker Hub
root@ubunu2004:~/docker_sample# docker images
REPOSITORY TAG IMAGE ID CREATED SIZE
hello_world latest dc8c649d4e8b 19 minutes ago 368MB
root@ubunu2004:~/docker_sample# docker run -it -d hello_world:latest
root@ubunu2004:~/docker_sample# docker ps
CONTAINER ID IMAGE COMMAND CREATED STATUS PORTS NAMES
d2963444e718 hello_world:latest "docker-php-entrypoi…" 10 seconds ago Up 6 seconds 80/tcp laughing_williamson
root@ubunu2004:~/docker_sample# docker commit d2963444e718 zhuby1973/php:1
sha256:1f2007f4786c344c8007b574af6f71b7604431c6d6cce0e2091e6adf1a8c8621
root@ubunu2004:~/docker_sample# docker push zhuby1973/php:1
commit and push a docker image to Docker Hub
- sign up on Docker Hub to get your user id and password
- pull a image from Docker Hub
docker pull ubuntu - make a dir on ubuntu image and commit/push image
docker images docker run -it -d ubuntu docker ps -a root@ubunu2004:~# docker exec -it 6e08ac7cc702 bash root@6e08ac7cc702:/# mkdir /test_dir root@6e08ac7cc702:/# exit exit docker commit 6e08ac7cc702 zhuby1973/ubuntu:1 root@ubunu2004:~# docker login Login with your Docker ID to push and pull images from Docker Hub. If you don't have a Docker ID, head over to https://hub.docker.com to create one. Username: zhuby1973 Password: WARNING! Your password will be stored unencrypted in /root/.docker/config.json. Configure a credential helper to remove this warning. See https://docs.docker.com/engine/reference/commandline/login/#credentials-store Login Succeeded root@ubunu2004:~# docker push zhuby1973/ubuntu:1 The push refers to repository [docker.io/zhuby1973/ubuntu] d3d28de77691: Pushed 544a70a875fc: Mounted from library/ubuntu cf0f3facc4a3: Mounted from library/ubuntu 132bcd1e0eb5: Mounted from library/ubuntu d22cfd6a8b16: Mounted from library/ubuntu 2: digest: sha256:4c50ab7b0f8cadd72f5d37a569795a4ba697be892fca1b36a96eb9aa49a59d2e size: 1359 - logon https://hub.docker.com/repositories you will find zhuby1973/ubuntu already there!
- you can start this container to verify
root@ubunu2004:~# docker run -it -d zhuby1973/ubuntu:1
e5477e45b6b2bfe330e9f37a6f74e90964ef887f0f0a37ae23bbae4319a465a1
root@ubunu2004:~# docker ps
CONTAINER ID        IMAGE                COMMAND             CREATED             STATUS              PORTS               NAMES
e5477e45b6b2        zhuby1973/ubuntu:1   "/bin/bash"         26 seconds ago      Up 24 seconds                           vigilant_satoshi
df78087a8ef1        zhuby1973/test:2     "/bin/bash"         17 minutes ago      Up 17 minutes                           charming_wiles
6e08ac7cc702        ubuntu               "/bin/bash"         32 minutes ago      Up 32 minutes                           charming_goodall
root@ubunu2004:~# docker exec -it e5477e45b6b2 bash
root@e5477e45b6b2:/# ls -ltr /test-dir
total 0
My First SoapUI SOAP project
- create a SOAP API project
Ctrl-N to create a new SOAP project:
we will use http://webservices.oorsprong.org/websamples.countryinfo/CountryInfoService.wso?WSDL for demo

- get info by click ListOfCountryNamesByCode
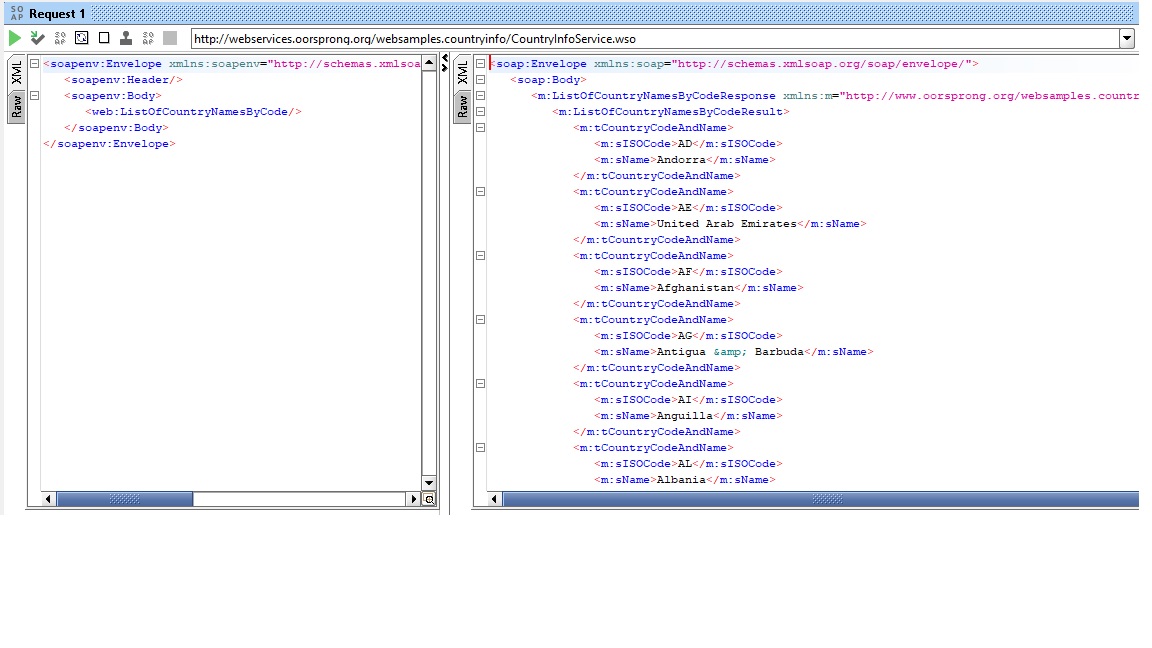
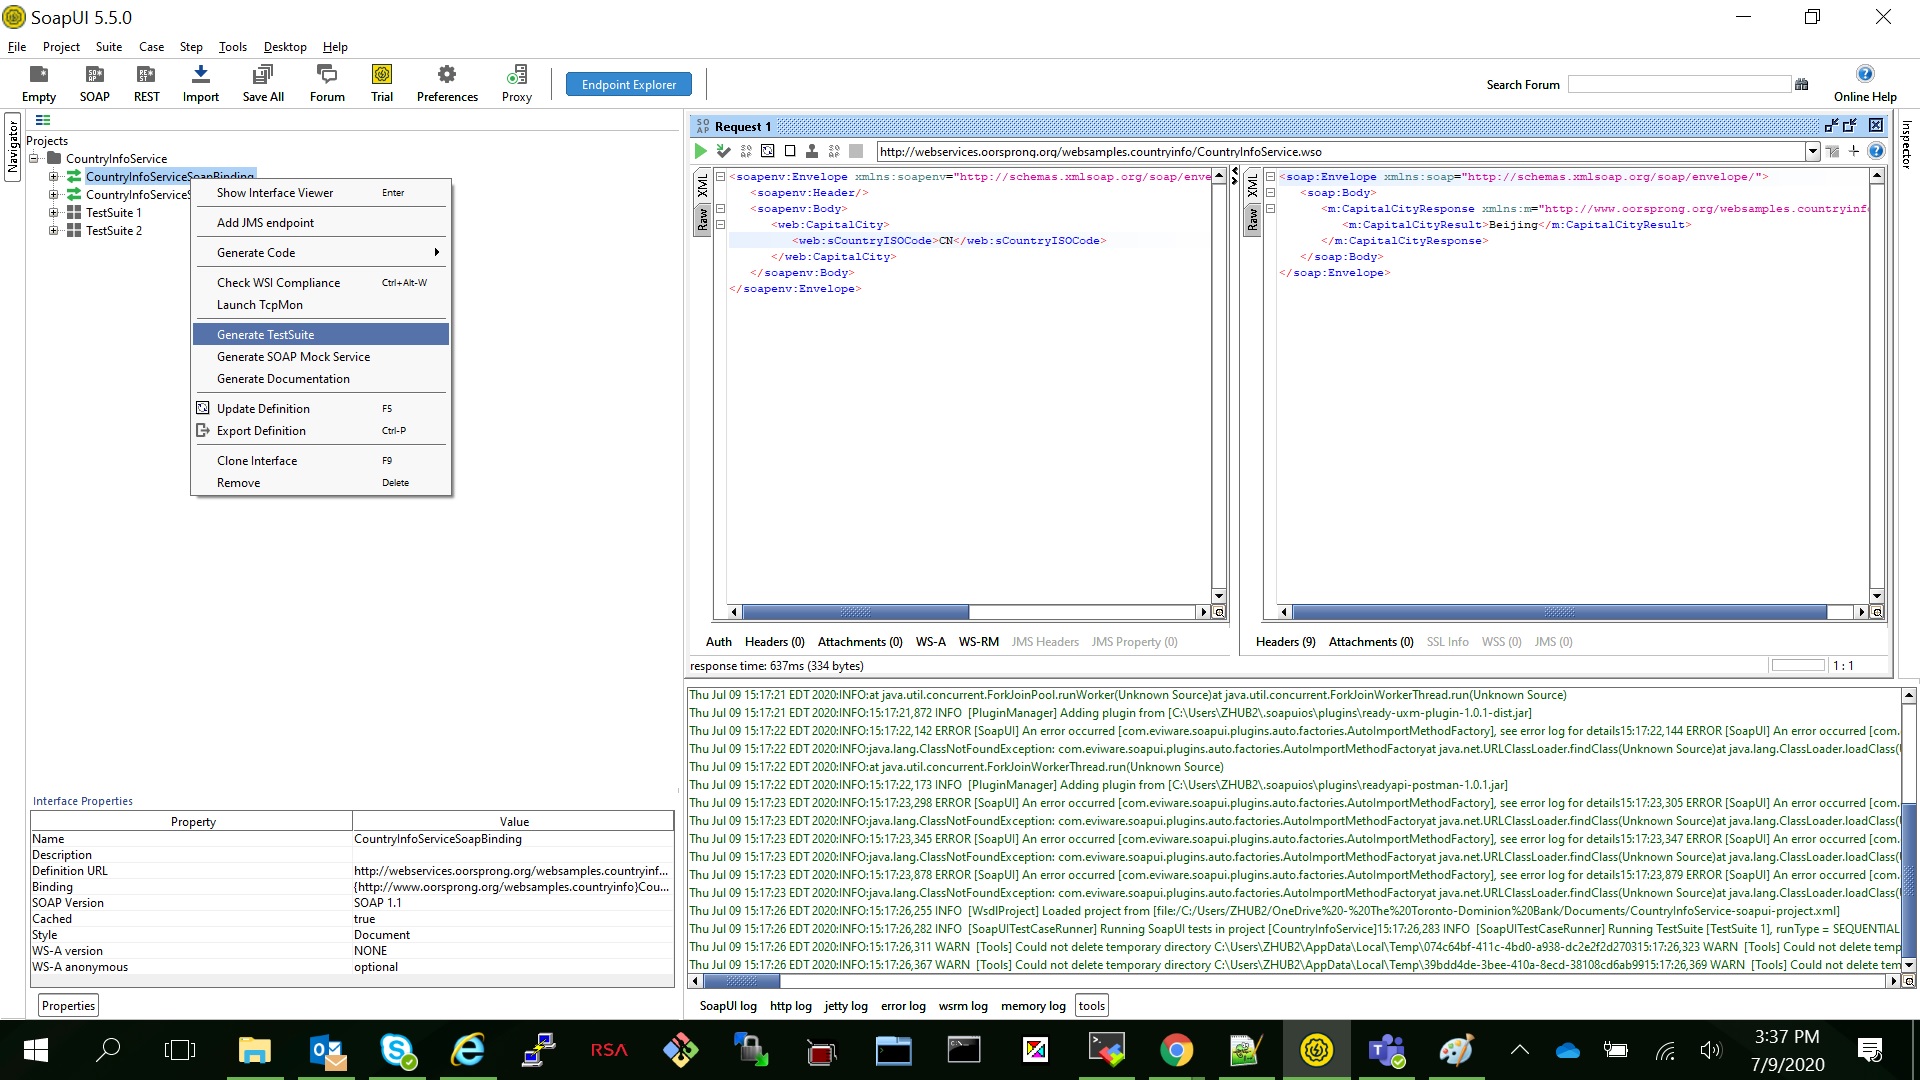
- create TestSuite -> Test Cases
right click "CountryInfoServiceSoapBinding" and select "Generate Testsuite"
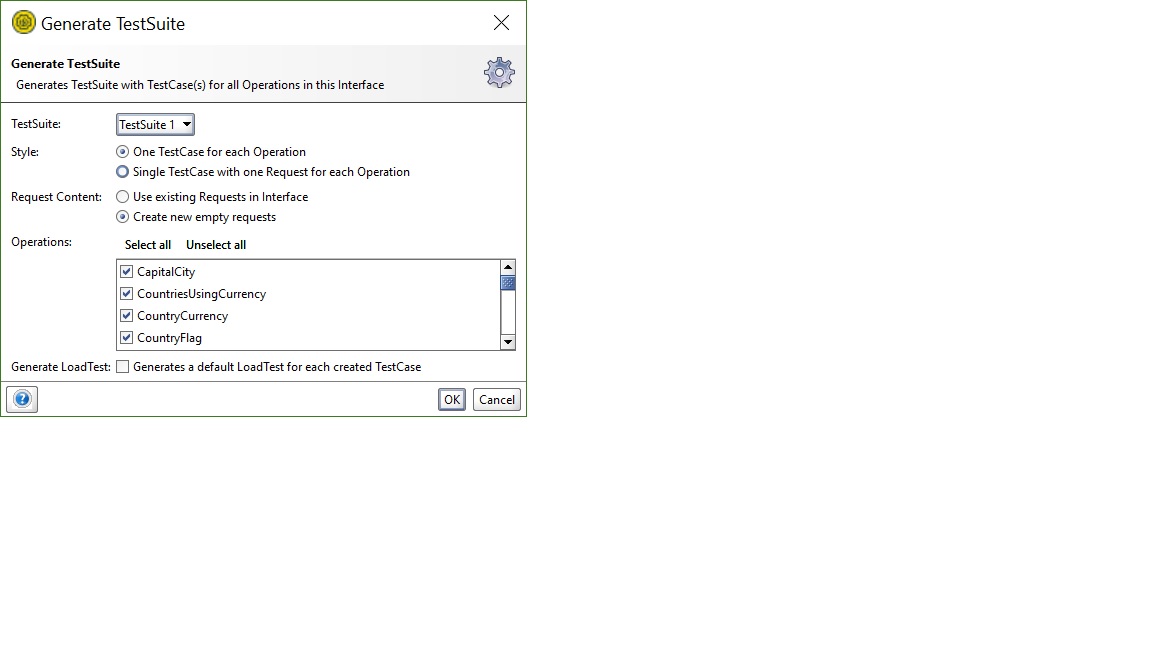
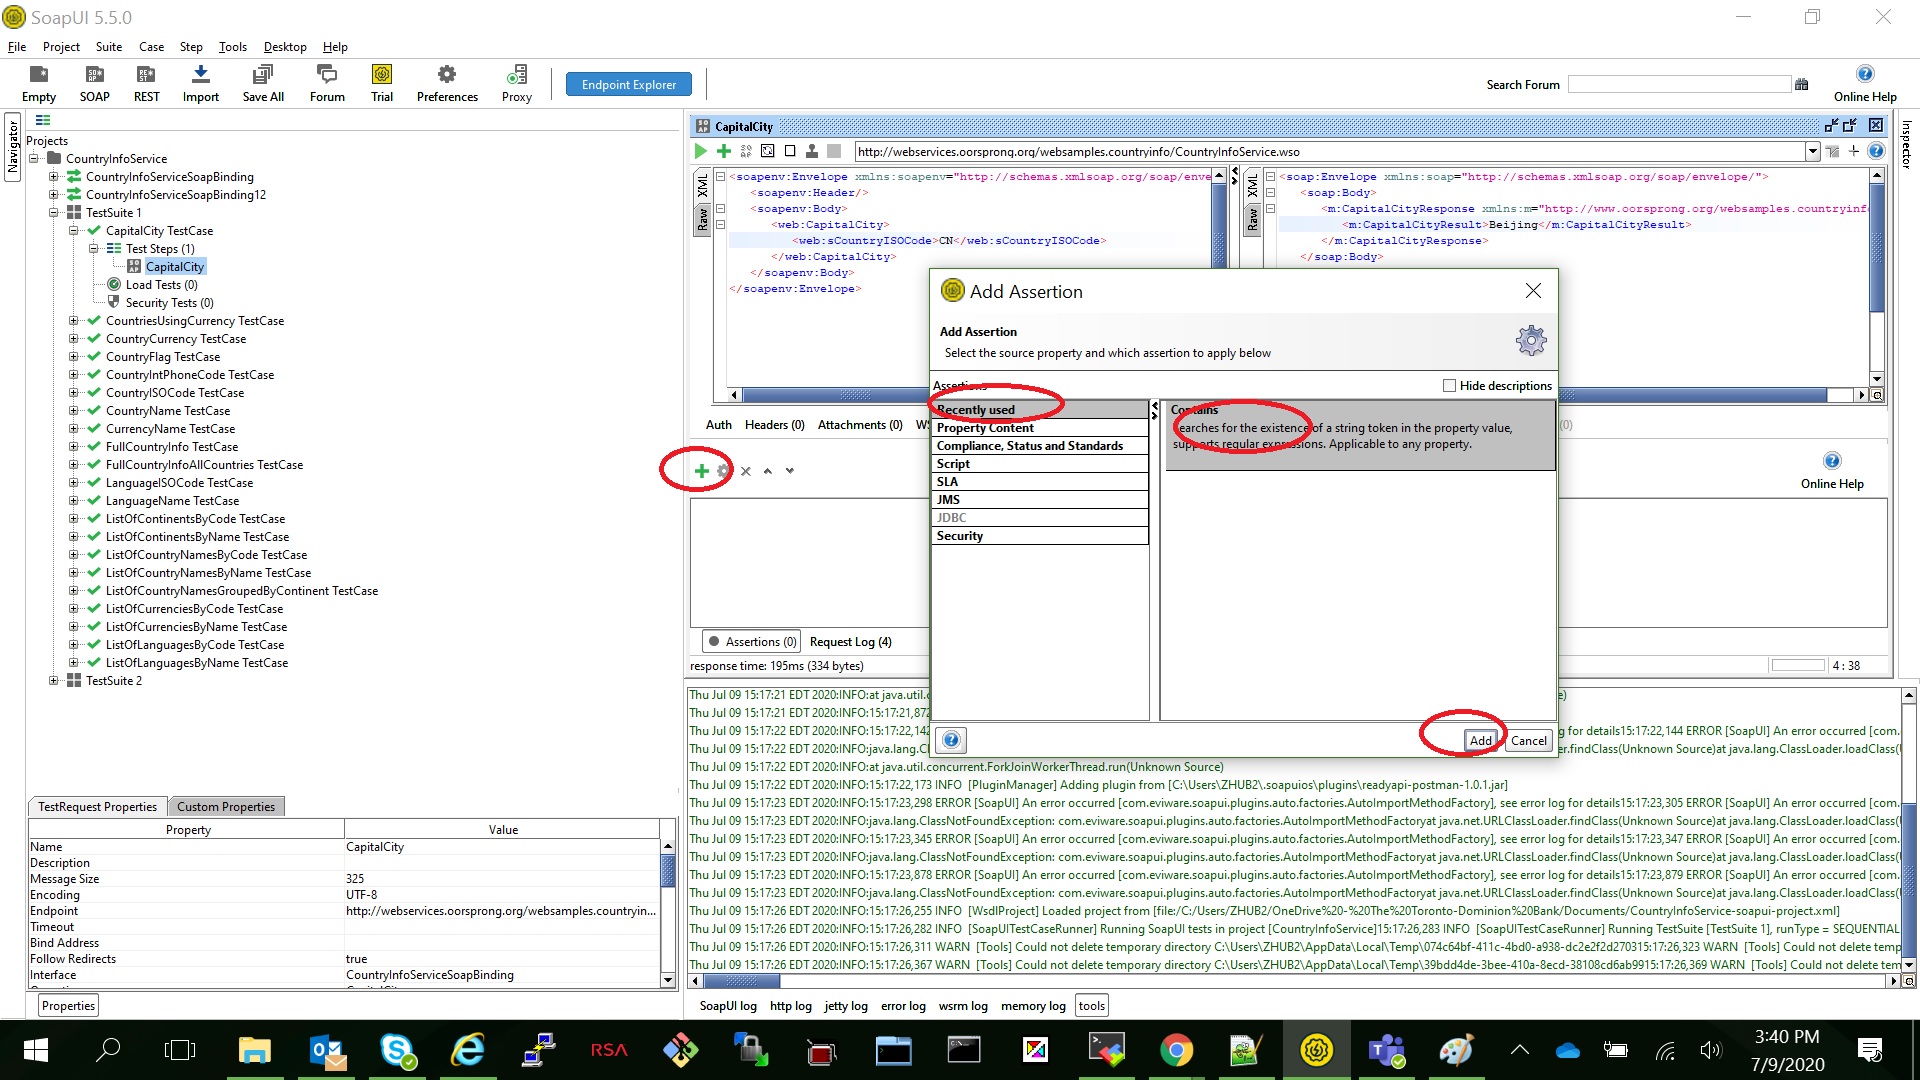
- add Assertions
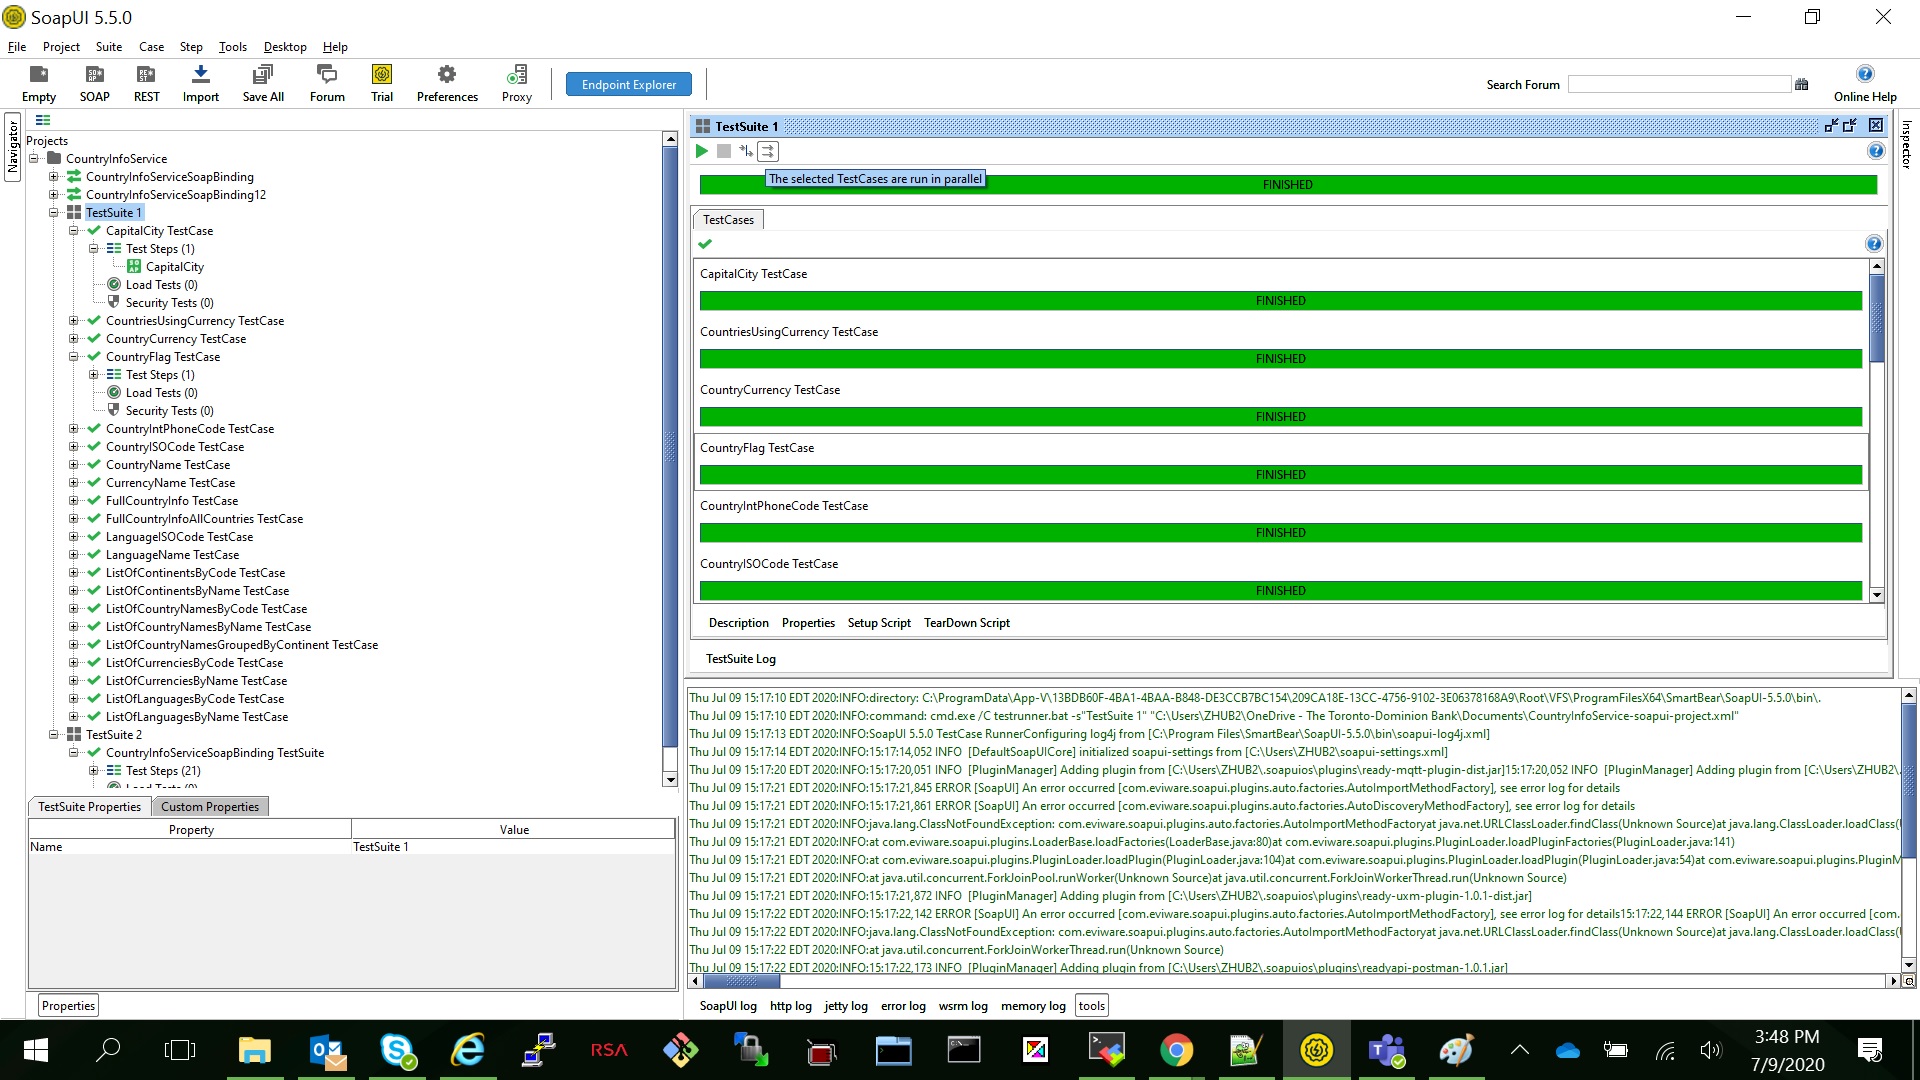
- how to run in sequence and in parallel
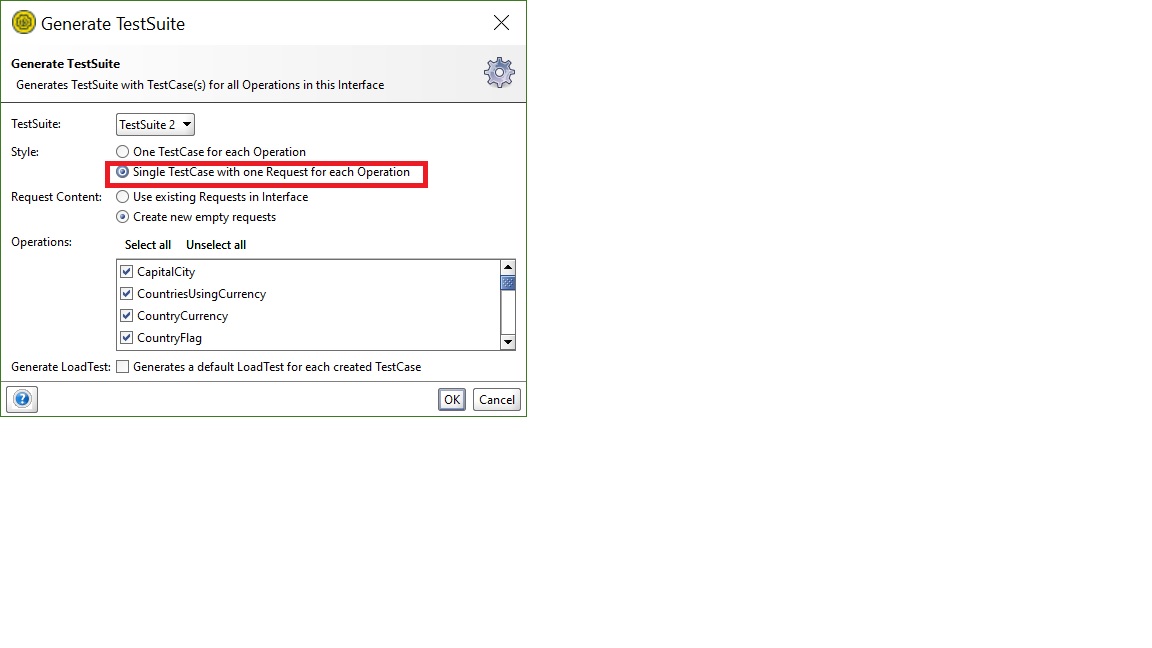
- how to create single testcase with one request
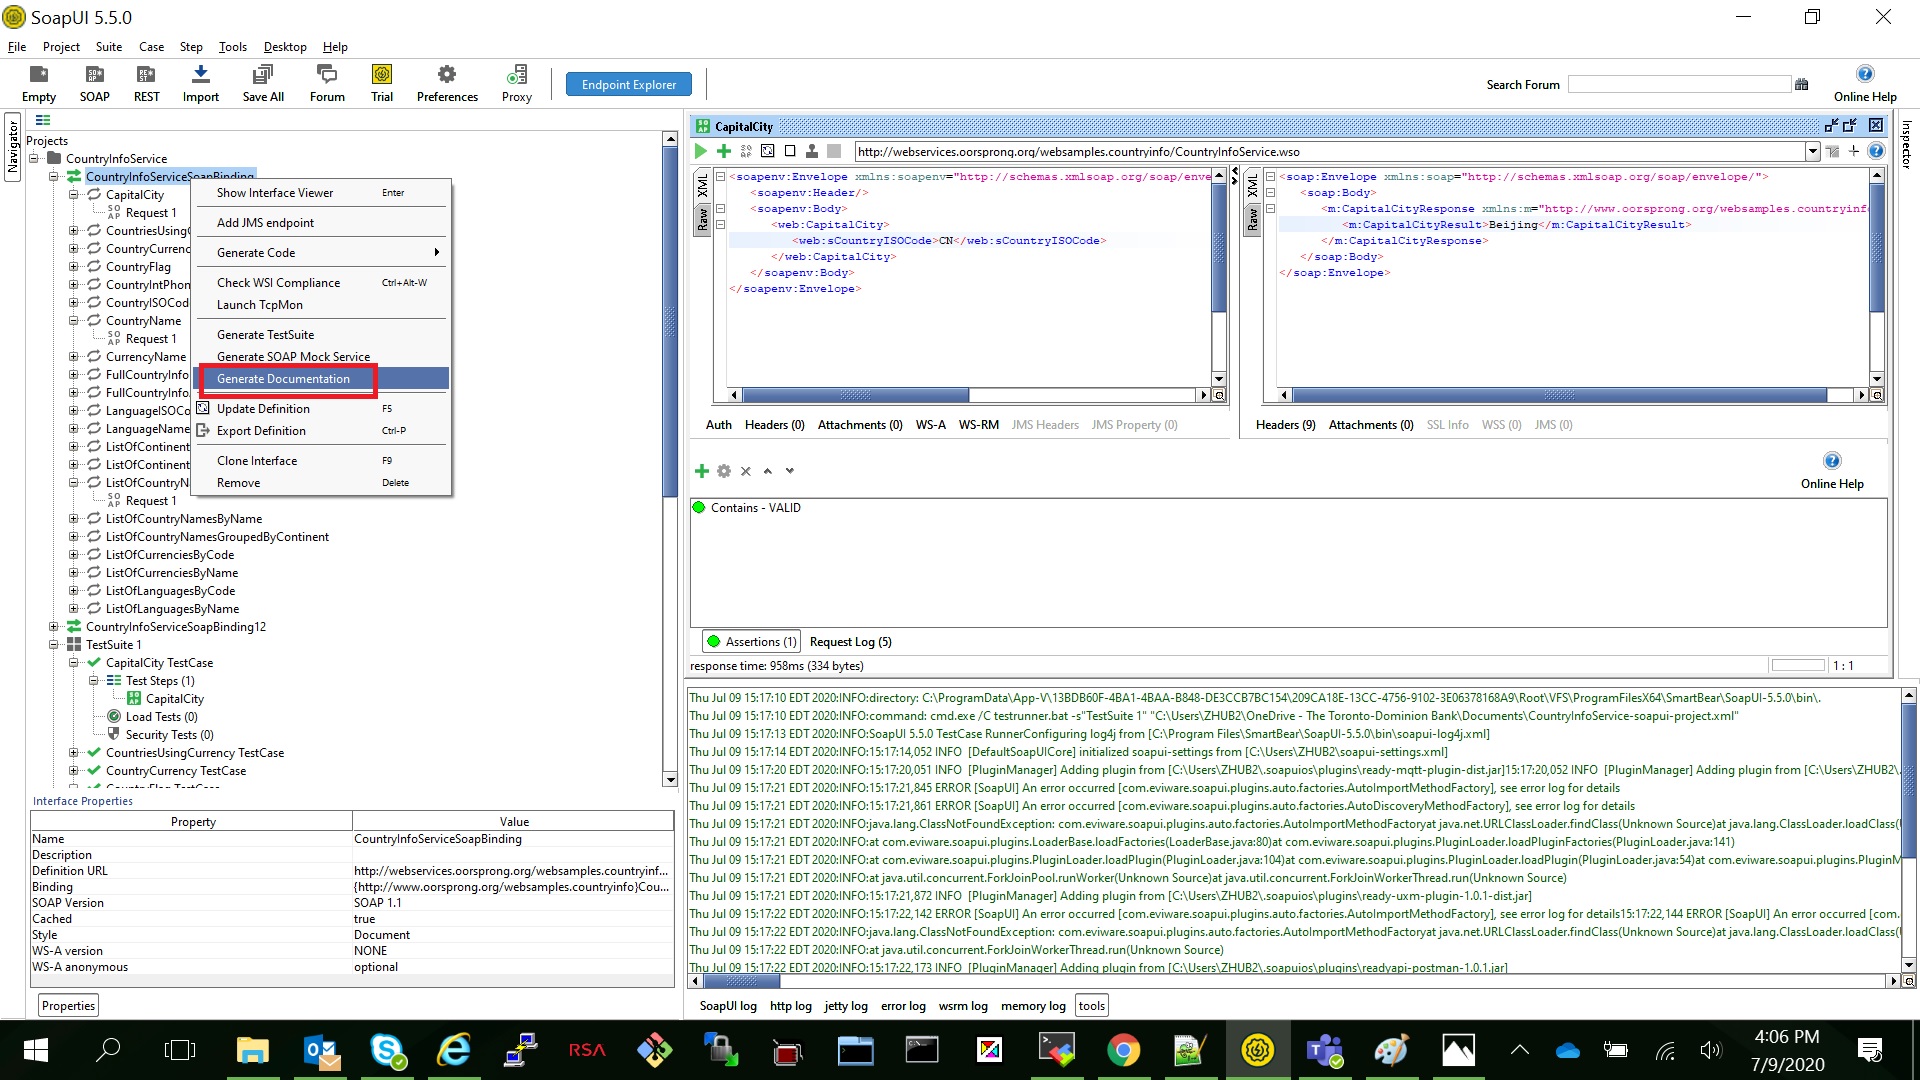
- how to create API Documention
install Docker on Ubuntu and setup CONTAINER openspug/spug
- install Docker on Ubuntu
sudo apt-get update
sudo apt install docker.io
sudo systemctl start docker
sudo systemctl enable docker
docker –version - setup openspug/spug container
openspug/spug is a small server manage tool developed with python!
https://github.com/openspug/spug
sudo docker pull openspug/spug
sudo docker run -d -p 80:80 openspug/spug
if port 80 already in use, you can find the process by:
sudo lsof -i:80
in our case it’s apache, stop it with:
sudo systemctl stop apache2
sudo docker ps to get running container details:
(base) ubuntu@ubunu2004:/$ sudo docker ps
CONTAINER ID        IMAGE               COMMAND             CREATED             STATUS              PORTS                NAMES
c493cbf6aceb        openspug/spug       "/entrypoint.sh"    4 minutes ago       Up 4 minutes        0.0.0.0:80->80/tcp   determined_allen
initial and restart the spug:
export CONTAINER_ID=c493cbf6aceb
sudo docker exec $CONTAINER_ID init_spug admin spug.dev
sudo docker restart $CONTAINER_ID
then you can login http://192.168.0.43/ with:
user: admin
password: spug.dev
create Maven project in Jenkins and deploy to Jboss
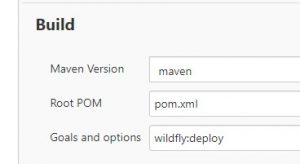
- in Jenkins select create new item, give name as "java-web-project", type as "Maven Project". Keep all default value, only add "wildfly:deploy" in "Build => Goals and options" then apply and save.
- in /var/lib/jenkins/workspace/, run maven command to create webapp:
mvn archetype:generate -DgroupId=com.pythondesign.web -DartifactId=java-web-project -DarchetypeArtifactId=maven-archetype-webapp -DinteractiveMode=false
you will get files:(base) ubuntu@ubunu2004:/var/lib/jenkins/workspace/java-web-project$ tree . ├── pom.xml ├── src │ └── main │ ├── resources │ └── webapp │ ├── index.jsp │ └── WEB-INF │ └── web.xml
3. update pom.xml as below:
```xml
<project xmlns="http://maven.apache.org/POM/4.0.0" xmlns:xsi="http://www.w3.org/2001/XMLSchema-instance"
  xsi:schemaLocation="http://maven.apache.org/POM/4.0.0 http://maven.apache.org/maven-v4_0_0.xsd">
  <modelVersion>4.0.0</modelVersion>
  <groupId>com.mkyong.web</groupId>
  <artifactId>java-web-project</artifactId>
  <packaging>war</packaging>
  <version>1.0-SNAPSHOT</version>
  <name>java-web-project Maven Webapp</name>
  <url>http://maven.apache.org</url>
  <dependencies>
    <dependency>
      <groupId>junit</groupId>
      <artifactId>junit</artifactId>
      <version>3.8.1</version>
      <scope>test</scope>
    </dependency>
  </dependencies>
  <build>
    <finalName>java-web-project</finalName>
        <pluginManagement><!-- lock down plugins versions to avoid using Maven defaults (may be moved to parent pom) -->
         <plugins>
        <plugin>
            <groupId>org.wildfly.plugins</groupId>
            <artifactId>wildfly-maven-plugin</artifactId>
            <version>2.1.0.Beta1</version>
            <configuration>
                <hostname>localhost</hostname>
                <port>9990</port>
                <username>admin</username>
                <password>pas8word@</password>
            </configuration>
        </plugin>
         </plugins>
        </pluginManagement>
  </build>
</project>
- you can test it with command:
mvn package
mvn wildfly:deploy - now we can click "Build Now" in Jenkins, check the console, you will get:
BUILD SUCCESS! and verify the webapp on jboss:
http://192.168.0.43:8090/java-web-project/index.jsp
Using selenium login pan.baidu.com with cookie
we relsoved two issues in this code:
- login with cookie
- close the popup window after login.
here is the code:import requests import time from selenium import webdriver PATH = "C:\Program Files\chromedriver.exe" driver = webdriver.Chrome(PATH) url = "https://pan.baidu.com/disk/home#/all?path=%2F&vmode=list" driver.get(url) cookies = { "BDUSS": "your_BDUSS", "STOKEN": "your_STOKEN", "domain": "pan.baidu.com" } response_cookies_browser = [{'name':name, 'value':value} for name, value in cookies.items()] c = [driver.add_cookie(c) for c in response_cookies_browser] #the browser now contains the cookies generated from the authentication driver.get(url) #wait 10 seconds for the popup window, so we can click the close button time.sleep(10) driver.find_elements_by_xpath('.//span[@class = "dialog-icon dialog-close icon icon-close"]')[-1].click()
Install Ansible on Ubuntu 20.04 and run ansible-playbook
- create user ID and sudo rules
create ID ansible on all Linux:
sudo adduser ansible
echo "ansible ALL=(ALL) NOPASSWD:ALL" | sudo tee /etc/sudoers.d/ansible - generate SSH key and copy to client servers:
ssh-keygen
ssh-copy-id ansible@192.168.0.143
ssh-copy-id ansible@192.168.0.61 - install ansible:
sudo apt update
sudo apt install ansible - add client servers:
sudo vi /etc/ansible/hosts
[servers]
server1 ansible_host=192.168.0.143
server2 ansible_host=192.168.0.61 - verify ansible hosts and run playbook
sudo ansible-inventory –list -y
mkdir ~/ansible-demo
create few ansible-playbook in ~/ansible-demo:ansible@ubunu2004:~/ansible-demo$ cat install-apt.yml --- - hosts: all become: yes tasks: - name: Install packages apt: name: - ntpdate - nmap state: latest cache_valid_time: 3600 ansible@ubunu2004:~/ansible-demo$ cat linux-echo.yml --- - hosts: all become: yes tasks: - name: Echo the Date to a tmp file shell: echo "`date`"> /tmp/date - name: Echo String to a tmp file shell: echo "Techexpert.tips is a greate website" > /tmp/techexpert
run the playbook:
```bash
ansible@ubunu2004:~/ansible-demo$ ansible-playbook install-apt.yml

PLAY [all] ***************************************************************************************************************************************************************************************************

TASK [Gathering Facts] ***************************************************************************************************************************************************************************************
ok: [server1]
ok: [server2]

TASK [Install packages] **************************************************************************************************************************************************************************************
changed: [server1]
changed: [server2]

PLAY RECAP ***************************************************************************************************************************************************************************************************
server1                    : ok=2    changed=1    unreachable=0    failed=0    skipped=0    rescued=0    ignored=0
server2                    : ok=2    changed=1    unreachable=0    failed=0    skipped=0    rescued=0    ignored=0
Ansible Playbook Example – Reading a Variable from the Command-line
This Ansible playbook example named linux-scan.yml will install the Nmap package.
It will read the IP addres from the IP_VAR variable and use NMAP to scan this host.
---
- hosts: all
  become: yes
  tasks:
  - name: Install packages
    apt:
      name:
      - nmap
      state: latest
      cache_valid_time: 3600
  - name: Scan host using nmap
    shell: nmap "{{ ip_var }}"
    register: out

  - debug: var=out.stdout_lines

To run this Ansible playbook, use the following command:
ansible-playbook --extra-vars ip_var=192.168.0.143 linux-scan.ymlDEPLOY AN APPLICATION TO JBOSS WITH MAVEN
-
sudo apt install maven
-
git clone https://github.com/jboss-developer/jboss-eap-quickstarts.git
-
edit pom.xml for ~/jboss-eap-quickstarts/helloworld project
cd ~/jboss-eap-quickstarts/helloworld
add below lines into pom.xml:<build> <pluginManagement><!-- lock down plugins versions to avoid using Maven defaults (may be moved to parent pom) --> <plugins> <plugin> <groupId>org.wildfly.plugins</groupId> <artifactId>wildfly-maven-plugin</artifactId> <version>2.1.0.Beta1</version> <configuration> <hostname>localhost</hostname> <port>9990</port> <username>admin</username> <password>pas8word@</password> </configuration> </plugin> </plugins> </pluginManagement> </build> -
run mvn package to generate helloworld.war
-
mvn wildfly:deploy
(mvn wildfly:undeploy to undeploy it)
….
[INFO] — wildfly-maven-plugin:2.1.0.Beta1:deploy (default-cli) @ helloworld —
[INFO] JBoss Threads version 2.3.3.Final
[INFO] JBoss Remoting version 5.0.12.Final
[INFO] XNIO version 3.7.2.Final
[INFO] XNIO NIO Implementation Version 3.7.2.Final
[INFO] ELY00001: WildFly Elytron version 1.9.1.Final
[INFO] ————————————————————————
[INFO] BUILD SUCCESS
[INFO] ————————————————————————
[INFO] Total time: 23.553 s
[INFO] Finished at: 2020-06-26T09:51:01-04:00
[INFO] ————————————————————————
you can verify from your jboss console
http://192.168.0.43:9990/console/index.html, the app has been deployed.
or you can open helloworld app directly:
http://192.168.0.43:8090/helloworld/HelloWorld

check full package in https://github.com/zhuby1973/python/tree/master/maven_jboss
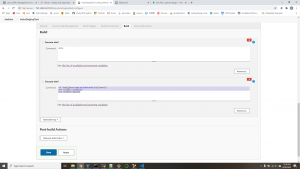
you can also create a freestyle job AutoDeployTest in Jenkins:
choose exec shell in Build:
cd /tmp/jboss-eap-quickstarts/helloworld
mvn wildfly:undeploy
mvn wildfly:deploy
REF:
https://maven.apache.org/guides/getting-started/maven-in-five-minutes.html
https://github.com/jboss-developer/jboss-eap-quickstarts.git
https://github.com/jbossas/jboss-as-maven-plugin.git
Install and Configure WildFly (JBoss7) App Server on Ubuntu 20.04
Step 1: Install OpenJDK
sudo apt install openjdk-8-jdk
Step 2: Setup WildFly User
sudo groupadd -r wildfly
sudo useradd -r -g wildfly -d /opt/wildfly -s /sbin/nologin wildfly
Step 3: Download and Configure WildFly
cd /tmp
wget https://download.jboss.org/wildfly/20.0.0.Final/wildfly-20.0.0.Final.tar.gz
tar xvf wildfly-20.0.0.Final.tar.gz
sudo mkdir /opt/wildfly
sudo mv wildfly-20.0.0.Final/ /opt/wildfly
sudo chown -RH wildfly: /opt/wildfly
Step 4: create WildFly service
sudo mkdir -p /etc/wildfly
sudo cp /opt/wildfly/docs/contrib/scripts/systemd/wildfly.conf /etc/wildfly/
sudo cp /opt/wildfly/docs/contrib/scripts/systemd/launch.sh /opt/wildfly/bin/
sudo sh -c ‘chmod +x /opt/wildfly/bin/.sh’
sudo cp /opt/wildfly/docs/contrib/scripts/systemd/wildfly.service /etc/systemd/system/
sudo systemctl enable wildfly.service
sudo systemctl stop/start/status wildfly.service

run the commands below to create a user account that will connect and manage the app server web console:
sudo /opt/wildfly/bin/add-user.sh
step 5: enable admin console remote login
Out of the box, the server console is restricted to the local server only… If you’d like to connect from a remote location, Open it’s configuration file by running the commands below:
edit /etc/wildfly/wildfly.conf as below:
# The configuration you want to run
WILDFLY_CONFIG=standalone.xml
# The mode you want to run
WILDFLY_MODE=standalone
# The address to bind to
WILDFLY_BIND=0.0.0.0
#WildFly Console bind
WILDFLY_CONSOLE_BIND=0.0.0.0
edit /opt/wildfly/bin/launch.sh as below:
#!/bin/bash
if [ "x$WILDFLY_HOME" = "x" ]; then
    WILDFLY_HOME="/opt/wildfly"
fi
if [[ "$1" == "domain" ]]; then
    $WILDFLY_HOME/bin/domain.sh -c $2 -b $3 -bmanagement $4
else
    $WILDFLY_HOME/bin/standalone.sh -c $2 -b $3 -bmanagement $4
fi
edit /etc/systemd/system/wildfly.service as below:
[Unit]
Description=The WildFly Application Server
After=syslog.target network.target
Before=httpd.service

[Service]
Environment=LAUNCH_JBOSS_IN_BACKGROUND=1
EnvironmentFile=-/etc/wildfly/wildfly.conf
User=wildfly
LimitNOFILE=102642
PIDFile=/var/run/wildfly/wildfly.pid
ExecStart=/opt/wildfly/bin/launch.sh $WILDFLY_MODE $WILDFLY_CONFIG $WILDFLY_BIND $WILDFLY_CONSOLE_BIND
StandardOutput=null

[Install]
WantedBy=multi-user.target
sudo systemctl daemon-reload
sudo systemctl restart wildfly.service
That’s it! You can now access the admin console remotely…
http://192.168.0.43:9990/console/index.html

install jenkins_2.235.1 on ubuntu20
- sudo apt install openjdk-8-jdk
- wget -q -O – https://pkg.jenkins.io/debian-stable/jenkins.io.key | sudo apt-key add –
- sudo sh -c ‘echo deb http://pkg.jenkins.io/debian-stable binary/ > /etc/apt/sources.list.d/jenkins.list’
- sudo apt update
- sudo apt install jenkins
- sudo ufw allow 8080
(jenkins_url)/restart– Forces a restart without waiting for builds to complete.
Setting Up Jenkins
To set up your new Jenkins installation, open your browser, type your domain or IP address followed by port 8080, http://your_ip_or_domain:8080 and screen similar to the following will be displayed:
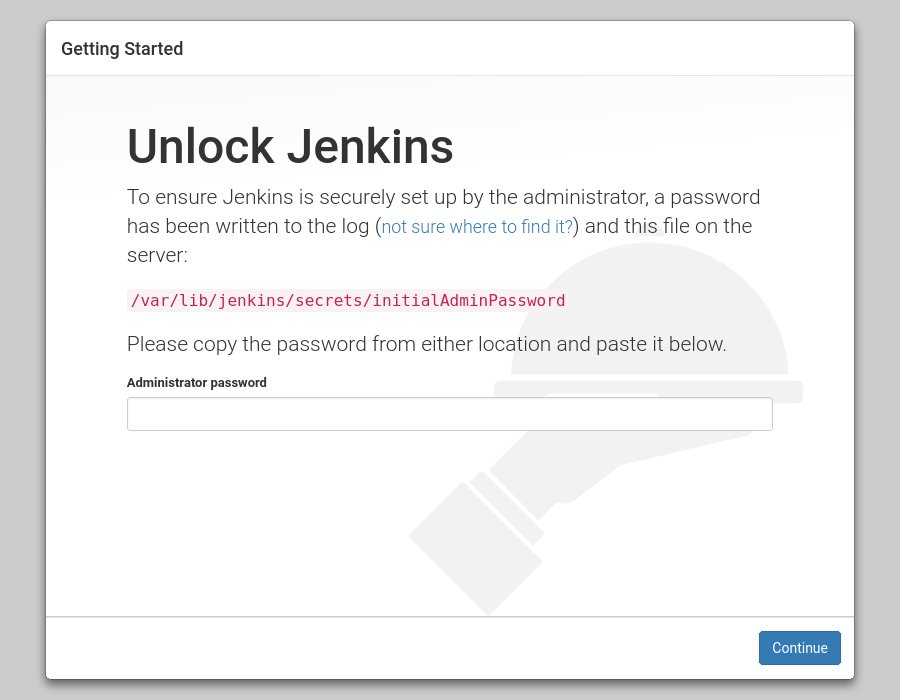
Use the following command to print the password on your terminal:
sudo cat /var/lib/jenkins/secrets/initialAdminPassword
Copy the password from your terminal, paste it into the Administrator password field and click Continue.

follow the page to setup admin user and url, then you can logon your Jenkins:
http://192.168.0.43:8080/

