Deploy Docker images to Azure Kubernetes Service cluster

  1. create userAKSCluster
    az aks create \
    –resource-group teamResources \
    –name userAKSCluster \
    –location eastus \
    –enable-addons monitoring,kube-dashboard \
    –node-count 1 \
    –attach-acr registryjrm1796 \
    –generate-ssh-keys \
    –enable-managed-identity \
    –enable-cluster-autoscaler \
    –min-count 1 \
    –max-count 2

  2. another way to create and attach to acr
    az login
    az group create –name HansResourceGroup –location eastus
    az aks create –resource-group HansResourceGroup –name myAKSCluster –node-count 1 –enable-addons monitoring –generate-ssh-keys
    az aks get-credentials –resource-group HansResourceGroup –name myAKSCluster
    az aks update -n myAKSCluster -g HansResourceGroup –attach-acr registryjrm1796
    az acr repository list –name registryjrm1796 –output table
    az acr repository show-tags –name registryjrm1796 –repository user-java –output table
    az acr list –resource-group teamResources –query "[].{acrLoginServer:loginServer}" –output table

  3. Connect to the cluster
    az aks get-credentials –resource-group teamResources –name userAKSCluster
    kubectl get nodes

  4. Deploy azure-vote sample app to AKSCluster
    root@labvm:~/azure-voting-app-redis/azure-vote# kubectl apply -f https://raw.githubusercontent.com/zhuby1973/azure/main/azure-vote.yaml
    deployment.apps/azure-vote-back created
    service/azure-vote-back created
    deployment.apps/azure-vote-front created
    service/azure-vote-front created

  5. Test the application
    root@labvm:~/azure-voting-app-redis/azure-vote# kubectl get service azure-vote-front –watch
    NAME TYPE CLUSTER-IP EXTERNAL-IP PORT(S) AGE
    azure-vote-front LoadBalancer 10.0.183.193 20.75.153.18 80:32384/TCP 25s
    you can verify it on http://20.75.153.18/
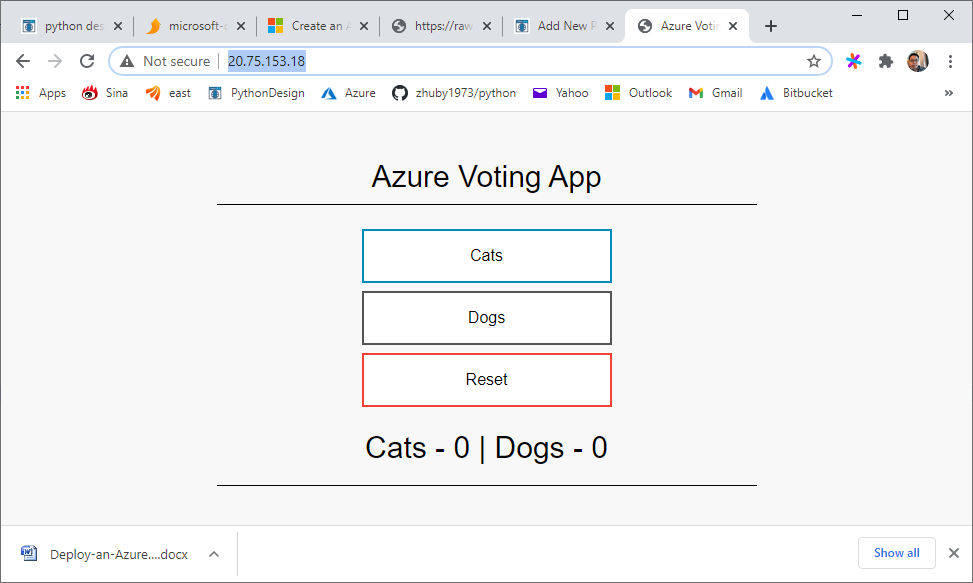
    you can read the sample code on https://github.com/Azure-Samples/azure-voting-app-redis

NOTE commands to push docker images to acr, use user-java image as example:
az login
az acr login –name registryjrm1796
docker tag user-java registryjrm1796.azurecr.io/user-java:latest
docker push registryjrm1796.azurecr.io/user-java
then you should be able to find user-java in Container registries/registryjrm1796/Repositories on https://portal.azure.com/

use curl for API query, post and delete

  1. QUERY
    $ curl http://localhost:5000/student/
    $ curl http://localhost:5000/student/?page=1
    $ curl http://localhost:5000/student/?class=1&age=19

  2. UPDATE
    $ curl -X POST -d ‘{"name": "Lily", "age": 17, "class":1, "profile":"Likely"}’ -H "Content-Type: application/json" http://127.0.0.1:5000/student/
    {"age":17,"class":"1","id":8,"name":"Lily","profile":"Likely"}

$ curl -X PATCH -d ‘{"class":3}’ -H "Content-Type: application/json" http://127.0.0.1:5000/student/1
{"age":18,"class":"3","id":1,"name":"\u5f20\u4e09","profile":"\u64c5\u957f\u5b66\u4e60"}

  1. DELETE
    $ curl -X DELETE -H "Content-Type: application/json" http://127.0.0.1:5000/student/8

  2. OTHERS (meta and export)
    $ curl http://127.0.0.1:5000/student/meta
    $ curl -o student.csv http://127.0.0.1:5000/student/?export

Curl Cookbook: https://catonmat.net/cookbooks/curl

create a interactive 3D global with pyecharts

  1. pip install pyecharts
  2. write earth.py as below:
import pyecharts.options as opts
from pyecharts.charts import MapGlobe
from pyecharts.faker import POPULATION
  
data = [x for _, x in POPULATION[1:]]
low, high = min(data), max(data)
c = (
MapGlobe(init_opts=opts.InitOpts(width='300px', height='300px',bg_color='#FFFAFA',))
.add_schema()
.add(
maptype="world",
series_name="World Population",
data_pair=POPULATION[1:],
is_map_symbol_show=True,
label_opts=opts.LabelOpts(is_show=True),
)
.set_global_opts(
title_opts=opts.TitleOpts(title="3D Global"),

visualmap_opts=opts.VisualMapOpts(
min_=low,
max_=high,
range_text=["max", "min"],
is_calculable=True,
range_color=["lightskyblue", "yellow", "orangered"],
)
)
.render("world_map_3d.html")
)

3. python earth.py, it will generate world_map_3d.html file, open it in browser:

Awesome-pyecharts

use python Faker to generate test data for any situation

  1. pip install Faker
  2. test Faker functions:
>>> from faker import Faker
>>> fake = Faker(locale='it_IT')
>>> fake.name()
'Romeo Lanfranchi'
>>> fake.address()
'Piazza Antonio 599 Appartamento 12\nSan Ludovica, 42403 Reggio Emilia (TR)'
>>> fake.ssn()
'YQGCOO12N17H487H'
>>> fake.company()
'Acerbi, Rossini e Viola s.r.l.'
>>> fake.ascii_email()
'campanellaguido@hotmail.it'

3. generate test data with name, password and address

import pymysql
from faker import Faker

conn = pymysql.connect(host="ubuntu2020", port=3306, user="monty", password="password", db="flask201",
                       charset="utf8")

cursor = conn.cursor()
sql1 = """drop table if exists faker_user"""
sql2 = """
create table faker_user(
pid int primary key auto_increment,
username varchar(40),
password varchar(20),
address varchar(100) 
)
"""
cursor.execute(sql1)
cursor.execute(sql2)
fake = Faker("en-US")
for i in range(20):
    sql = """insert into faker_user(username,password,address) 
    values('%s','%s','%s')""" % (fake.name(), fake.password(special_chars=False), fake.address())
    print('NAME:'+fake.name() + '|PASSWORD:'+fake.password(special_chars=False) + '|ADDR:'+fake.address())
    cursor.execute(sql)

conn.commit()
cursor.close()
conn.close()

4. generate a json of 10 students with name students.json that contains student name, address, location coordinates and student roll number

from faker import Faker 
import json            # To create a json file                 
from random import randint      # For student id 
fake = Faker() 
def input_data(x): 
  
    # dictionary 
    student_data ={} 
    for i in range(0, x): 
        student_data[i]={} 
        student_data[i]['id']= randint(1, 100) 
        student_data[i]['name']= fake.name() 
        student_data[i]['address']= fake.address() 
        student_data[i]['latitude']= str(fake.latitude()) 
        student_data[i]['longitude']= str(fake.longitude()) 
    print(student_data) 
  
    # dictionary dumped as json in a json file 
    with open('students.json', 'w') as fp: 
        json.dump(student_data, fp) 
      
def main():
      # Enter number of students 
    number_of_students = 10  
    input_data(number_of_students) 
main() 

C:\Users\zhuby>test_faker.py
{0: {'id': 57, 'name': 'Joshua Russell', 'address': '27726 Reed Bypass Apt. 649\nNelsonburgh, PA 87356', 'latitude': '-86.0037635', 'longitude': '-88.371746'}, 1: {'id': 88, 'name': 'Alexander Carpenter', 'address': '5124 Gonzales Center Apt. 087\nAngelamouth, RI 36493', 'latitude': '87.4800465', 'longitude': '-16.477034'}, 2: {'id': 40, 'name': 'Rachel Miller', 'address': '2878 Curtis Parkways Suite 338\nCarolburgh, OK 27880', 'latitude': '-87.890325', 'longitude': '-98.986404'}, 3: {'id': 72, 'name': 'Jon Graves', 'address': '087 Kelley Ports\nSusanmouth, MN 32402', 'latitude': '-50.9987975', 'longitude': '-145.366978'}, 4: {'id': 1, 'name': 'Joseph Rogers', 'address': '630 Sheryl Underpass\nEast Cheryl, IL 95386', 'latitude': '-62.0369605', 'longitude': '-167.059577'}, 5: {'id': 28, 'name': 'Cheryl Hill', 'address': '6863 Christopher Flats\nNew Angela, OK 10664', 'latitude': '59.4719505', 'longitude': '-73.419133'}, 6: {'id': 93, 'name': 'Sean Robinson', 'address': '911 Gardner Center\nEduardoshire, DC 78317', 'latitude': '7.7988015', 'longitude': '156.459505'}, 7: {'id': 6, 'name': 'Jason Myers', 'address': '9577 Shane Valleys Apt. 973\nNew Peggychester, MI 19213', 'latitude': '27.410656', 'longitude': '71.306510'}, 8: {'id': 100, 'name': 'Lindsay Johnson', 'address': '8592 Kathleen Forge Apt. 490\nBerryhaven, TX 84031', 'latitude': '58.841526', 'longitude': '79.355569'}, 9: {'id': 23, 'name': 'Sandra White', 'address': '93126 Schneider Center Suite 054\nAmandaberg, CA 31652', 'latitude': '25.893303', 'longitude': '113.012125'}}

use groovy for Jenkins job automation

  1. we can find latest Jenkins version from https://www.jenkins.io/download/, if we select Docker, to use the latest LTS: docker pull jenkins/jenkins:lts
  2. git clone https://github.com/zhuby1973/jenkins-docker-groovy.git
root@ubunu2004:~/jenkins-docker-groovy# ls
build.sh  config.xml  create-seed-job.groovy  Dockerfile  plugins.groovy  plugins.txt  README.md  security.groovy  seeddsl.groovy
root@ubunu2004:~/jenkins-docker-groovy# cat Dockerfile
FROM jenkins/jenkins:lts
ENV JAVA_OPTS="-Djenkins.install.runSetupWizard=false"
COPY security.groovy /usr/share/jenkins/ref/init.groovy.d/security.groovy
COPY seeddsl.groovy /usr/share/jenkins/seeddsl.groovy
COPY config.xml /usr/share/jenkins/seed-job-config.xml
COPY create-seed-job.groovy /usr/share/jenkins/ref/init.groovy.d/create-seed-job.groovy
COPY plugins.txt /usr/share/jenkins/ref/plugins.txt
RUN /usr/local/bin/install-plugins.sh < /usr/share/jenkins/ref/plugins.txt
root@ubunu2004:~/jenkins-docker-groovy# cat build.sh
#!/bin/bash
docker rm -f `docker ps -a -q`
docker build -t local/jenkins . && docker run --name jenkins -d -p 80:8080 -p 50000:50000 local/jenkins && docker logs -f `docker ps -a -q`

3. sh build.sh you will get Jenkins Docker image build and running on port 80, you can login with admin/admin (which we created from security.groovy

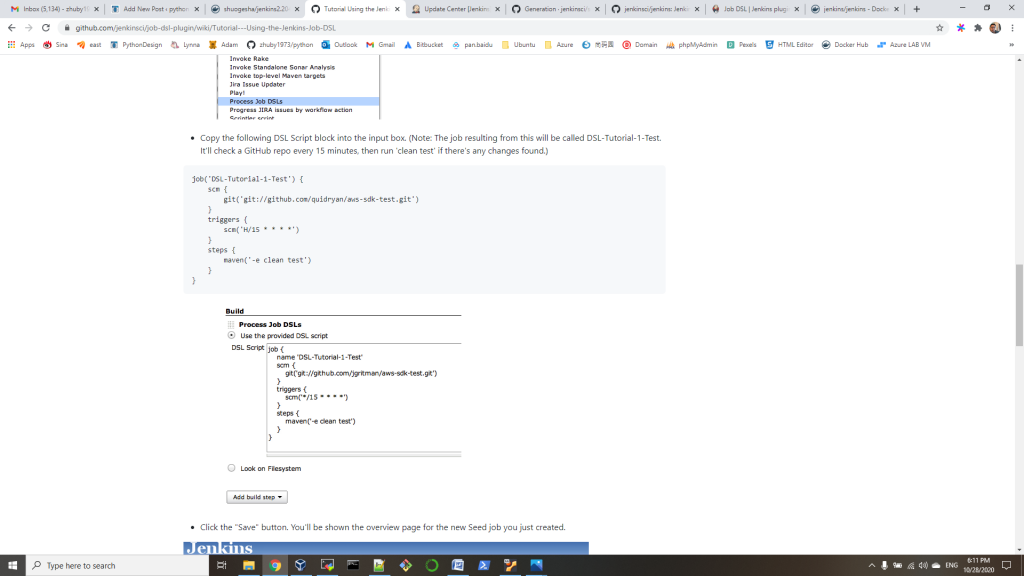
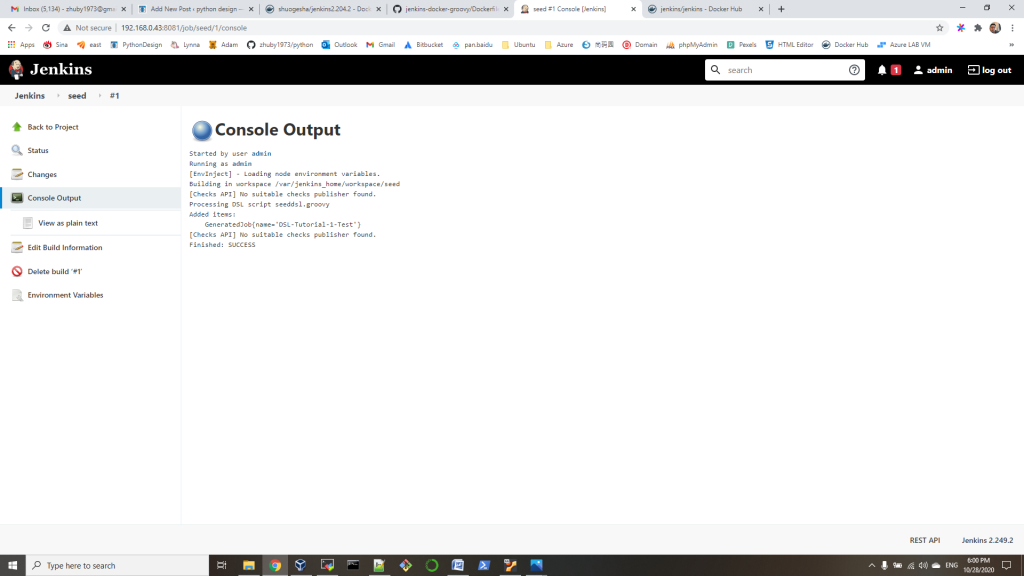
4. run “seed” job, you will find another job “DSL-Tutorial-1-Test” created successfully!

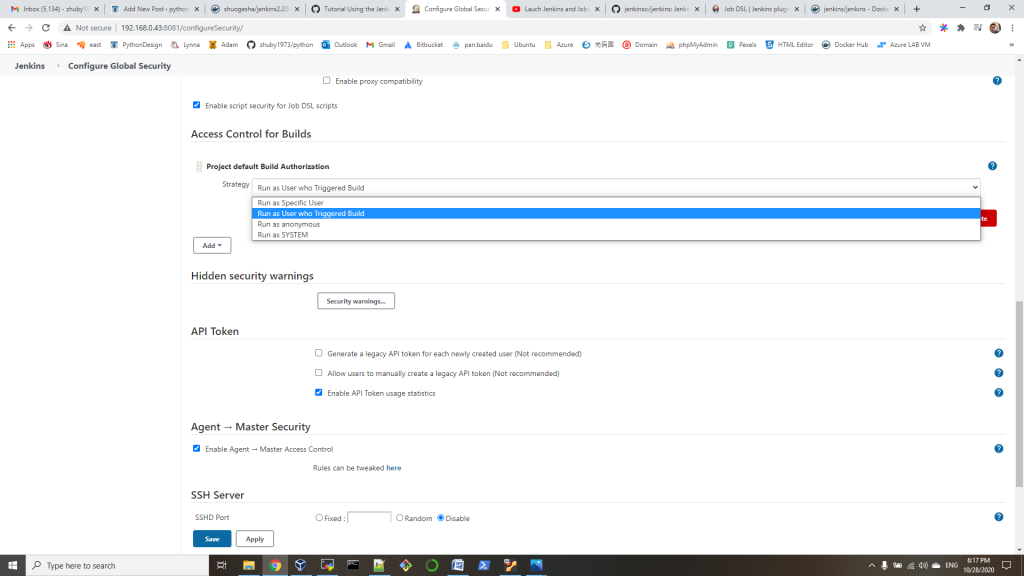
5. we installed two important plugins: Seed Jenkins plug-in and Authorize Project for this automation. you can manually approve groovy script in “In-process Script Approval”, or you can install Authorize Project, then update “Configure Global Security” => “Access Control for Builds” as below:

6. reference link:
https://plugins.jenkins.io/job-dsl/
https://github.com/jenkinsci/seed-plugin/wiki/Generation
https://github.com/jenkinsci/job-dsl-plugin/wiki/Tutorial—Using-the-Jenkins-Job-DSL

How to enable vault on WildFly

  • create vault keystore

root@ubunu2004:/opt/wildfly/bin# keytool -genseckey -alias busa -storetype jceks -keyalg AES -keysize 256 -storepass union1234 -keypass union1234 -keystore vault.store

  • setup vault
root@ubunu2004:/opt/wildfly/bin# ./vault.sh --keystore ./vault/vault.store  --keystore-password union1234 --alias busa --vault-block vb --attribute password --sec-attr something --enc-dir ./vault/ --iteration 50 --salt 1234abcd
=========================================================================

  JBoss Vault

  JBOSS_HOME: /opt/wildfly

  JAVA: java

=========================================================================

Oct 08, 2020 9:24:25 AM org.picketbox.plugins.vault.PicketBoxSecurityVault init
INFO: PBOX00361: Default Security Vault Implementation Initialized and Ready
WFLYSEC0047: Secured attribute value has been stored in Vault.
Please make note of the following:
********************************************
Vault Block:vb
Attribute Name:password
Configuration should be done as follows:
VAULT::vb::password::1
********************************************
WFLYSEC0048: Vault Configuration commands in WildFly for CLI:
********************************************
For standalone mode:
/core-service=vault:add(vault-options=[("KEYSTORE_URL" => "./vault/vault.store"),("KEYSTORE_PASSWORD" => "MASK-0FOV91/9idPaMgF3tkR9.V"),("KEYSTORE_ALIAS" => "busa"),("SALT" => "1234abcd"),("ITERATION_COUNT" => "50"),("ENC_FILE_DIR" => "./vault/")])
********************************************
For domain mode:
/host=the_host/core-service=vault:add(vault-options=[("KEYSTORE_URL" => "./vault/vault.store"),("KEYSTORE_PASSWORD" => "MASK-0FOV91/9idPaMgF3tkR9.V"),("KEYSTORE_ALIAS" => "busa"),("SALT" => "1234abcd"),("ITERATION_COUNT" => "50"),("ENC_FILE_DIR" => "./vault/")])
********************************************
  • run CLI command to add Vault Configuration
root@ubunu2004:/opt/wildfly# ./bin/jboss-cli.sh --connect controller=192.168.0.43:9990
[standalone@192.168.0.43:9990 /] /core-service=vault:add(vault-options=[("KEYSTORE_URL" => "/opt/wildfly/bin/vault/vault.store"),("KEYSTORE_PASSWORD" => "MASK-0FOV91/9idPaMgF3tkR9.V"),("KEYSTORE_ALIAS" => "busa"),("SALT" => "1234abcd"),("ITERATION_COUNT" => "50"),("ENC_FILE_DIR" => "/opt/wildfly/bin/vault/")])
{"outcome" => "success"}
  • verify the standalone.xml
    <vault>
        <vault-option name="KEYSTORE_URL" value="/opt/wildfly/bin/vault/vault.store"/>
        <vault-option name="KEYSTORE_PASSWORD" value="MASK-0FOV91/9idPaMgF3tkR9.V"/>
        <vault-option name="KEYSTORE_ALIAS" value="busa"/>
        <vault-option name="SALT" value="1234abcd"/>
        <vault-option name="ITERATION_COUNT" value="50"/>
        <vault-option name="ENC_FILE_DIR" value="/opt/wildfly/bin/vault/"/>
    </vault>

create Kubernetes Service (AKS) and ACR with Azure CLI

baiyun@Azure:~$ version=$(az aks get-versions -l eastus --query 'orchestrators[-1].orchestratorVersion' -o tsv)
baiyun@Azure:~$ az group create --name akshandsonlab2 --location eastus
baiyun@Azure:~$ az aks create --resource-group akshandsonlab --name hansakscluster20201 --enable-addons monitoring --kubernetes-version $version --generate-ssh-keys --location eastus
baiyun@Azure:~$ az acr create --resource-group akshandsonlab --name hansacr2020 --sku Standard --location eastus
baiyun@Azure:~$ AKS_RESOURCE_GROUP="akshandsonlab"
baiyun@Azure:~$ AKS_CLUSTER_NAME="hansakscluster2020"
baiyun@Azure:~$ ACR_RESOURCE_GROUP="akshandsonlab"
baiyun@Azure:~$ ACR_NAME="hansacr2020"
baiyun@Azure:~$ CLIENT_ID=$(az aks show --resource-group $AKS_RESOURCE_GROUP --name $AKS_CLUSTER_NAME --query "servicePrincipalProfile.clientId" --output tsv)
baiyun@Azure:~$ ACR_ID=$(az acr show --name $ACR_NAME --resource-group $ACR_RESOURCE_GROUP --query "id" --output tsv)
baiyun@Azure:~$ az role assignment create --assignee $CLIENT_ID --role acrpull --scope $ACR_ID
baiyun@Azure:~$ az sql server create -l eastus -g akshandsonlab -n hanssqlserver2020 -u sqladmin -p P2ssw0rd1234
baiyun@Azure:~$ az sql db create -g akshandsonlab -s hanssqlserver2020 -n mhcdb --service-objective S0

check names on https://portal.azure.com/:
Server name: hanssqlserver2020.database.windows.net
Login server: hansacr2020.azurecr.io


baiyun@Azure:~$ az aks get-credentials --resource-group akshandsonlab --name hansakscluster2020
Merged "hansakscluster2020" as current context in /home/baiyun/.kube/config
baiyun@Azure:~$ kubectl get nodes
NAME                                STATUS   ROLES   AGE   VERSION
aks-nodepool1-32402993-vmss000000   Ready    agent   31m   v1.19.0
aks-nodepool1-32402993-vmss000001   Ready    agent   31m   v1.19.0
aks-nodepool1-32402993-vmss000002   Ready    agent   31m   v1.19.0

How to use File Storage transfer files to Azure clouddrive

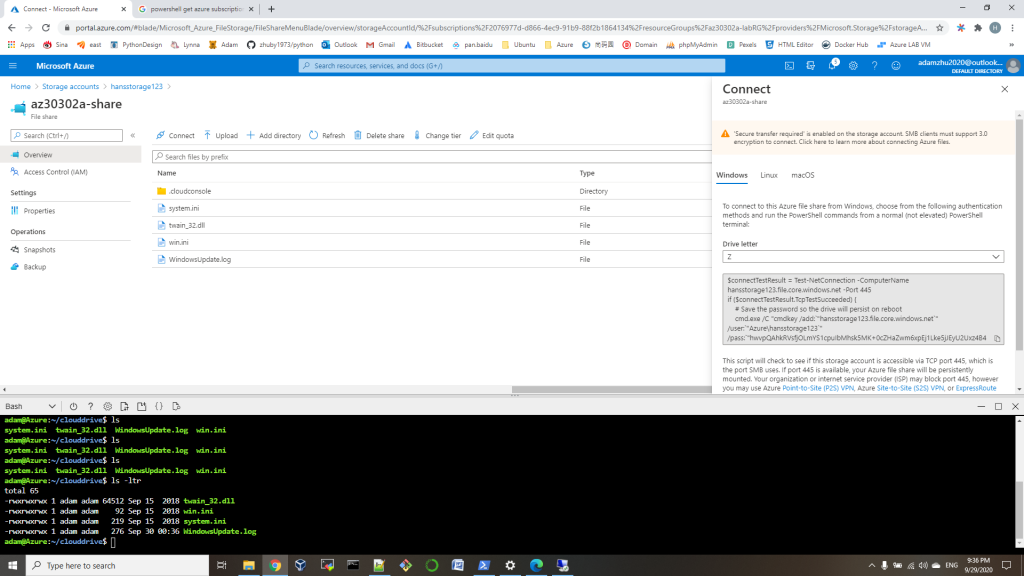
  1. create a Azure Storage Account and File Storage first, then click “Connect” to get connection Credential

2. open a PowerShell on local computer, run the commands copied from first step:

# Save the password so the drive will persist on reboot 
cmd.exe /C "cmdkey /add:`"hansstorage123.file.core.windows.net`" /user:`"Azure\hansstorage123`" /pass:`"hwvpQAhkRVsfjOLmYS1cpuIbMhsk5MK+0cZHaZwm6xpEj1Lke5jJEyU2Uxz4B4QKFLLaMcgyUQvQE0VzkxtGxA==`"" 

# Mount the drive 
New-PSDrive -Name Z -PSProvider FileSystem -Root "\\hansstorage123.file.core.windows.net\az30302a-share" -Persist

3. then you can copy files to Z: driver

4. run below command on Azure PowerShell window, you will find all the files in Z: mounted to your Azure:~/clouddrive

$subscription_id = (Get-AzContext).Subscription.id
clouddrive mount -s "$subscription_id" -g 'az30302a-labRG' -n 'hansstorage123' -f 'az30302a-share'

or you can use git clone your repository to your Azure:~/clouddrive.

List or remove Azure resources with Bash or PowerShell

Bash:

list:
az group list --query "[?starts_with(name,'az30301a-')]".name --output tsv
remove:
az group list --query "[?starts_with(name,'az30301a-')]".name --output tsv | xargs -L1 bash -c 'az group delete --name $0 --no-wait --yes'

PowerShell:

list:
Get-AzResourceGroup -Name ‘*’
remove:
Get-AzResourceGroup -Name ‘*’ | Remove-AzResourceGroup -Force -AsJob

Deploy with template and parameters file:

az deployment group create \ 
--resource-group az30301b-testRG \ 
--template-file azuredeploy30301rgb.json \ 
--parameters @azuredeploy30301rgb.parameters.json

Azure Template deployment and RGs clean

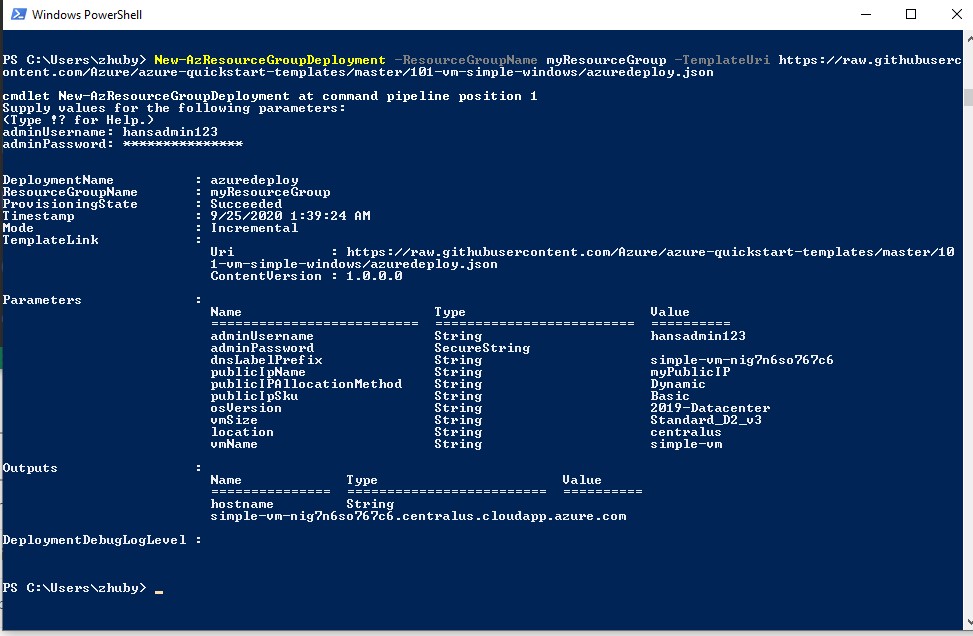
  1. we can create a VM with a simple template:
    New-AzResourceGroupDeployment -ResourceGroupName myResourceGroup -TemplateUri https://raw.githubusercontent.com/Azure/azure-quickstart-templates/master/101-vm-simple-windows/azuredeploy.json

2. we can try to create our own template file azuredeploy.json:

{
    "$schema": "https://schema.management.azure.com/schemas/2019-04-01/deploymentTemplate.json#",
    "contentVersion": "1.0.0.0",
    "resources": [
      {
        "type": "Microsoft.Storage/storageAccounts",
        "apiVersion": "2019-04-01",
        "name": "{provide-unique-name}",
        "location": "eastus",
        "sku": {
          "name": "Standard_LRS"
        },
        "kind": "StorageV2",
        "properties": {
          "supportsHttpsTrafficOnly": true
        }
      }
    ]
  }

create resource with commands:

1. create a new ResourceGroup
New-AzResourceGroup `
  -Name myResourceGroup `
  -Location "Central US"

2. addstorage
 $templateFile = "azuredeploy.json"
New-AzResourceGroupDeployment `
  -Name addstorage `
  -ResourceGroupName myResourceGroup `
  -TemplateFile $templateFile

3. you can delete ALL ResourceGroups with command:
Get-AzResourceGroup -Name ‘*’ | Remove-AzResourceGroup -Force -AsJob