Create a Conversational AI Bot Service on Azure

Step 1. Clone the repository
https://github.com/MicrosoftLearning/AI-102-AIEngineer
We will use 13-bot-framework\Python

Step 2. Create a bot based on the EchoBot template
pip install botbuilder-core
pip install asyncio
pip install aiohttp
pip install cookiecutter==1.7.0
cookiecutter https://github.com/microsoft/botbuilder-python/releases/download/Templates/echo.zip
when prompted by cookiecutter, enter the following details:
bot_name: TimeBot
bot_description: A bot for our times

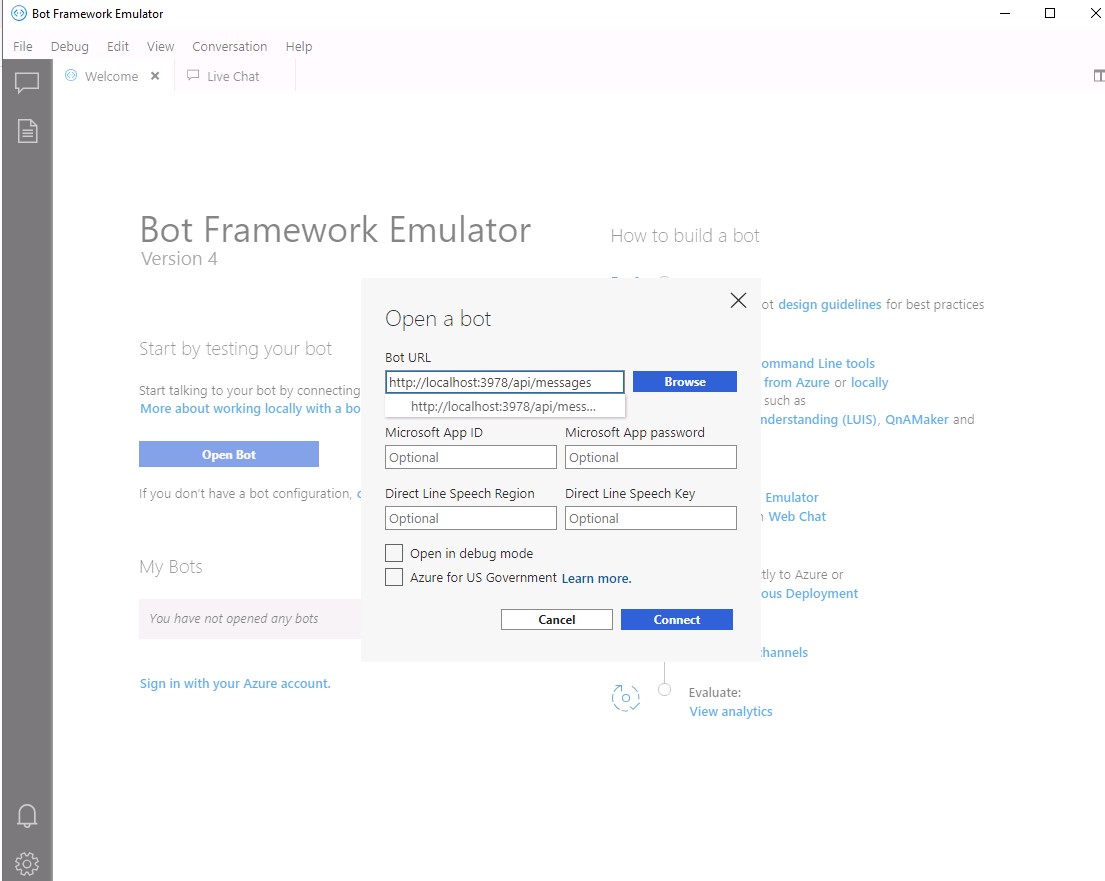
Step 3. Test the bot in the Bot Framework Emulator

(base) C:\Users\Student\hans\AI-102-AIEngineer\13-bot-framework\Python\TimeBot>python app.py
======== Running on http://localhost:3978 ========
(Press CTRL+C to quit)

Start the Bot Framework Emulator, and open your bot by specifying the endpoint with the /api/messages path appended, like this: http://localhost:3978/api/messages

Step 4. Update bot.py

# Copyright (c) Microsoft Corporation. All rights reserved.
# Licensed under the MIT License.

from botbuilder.core import ActivityHandler, TurnContext
from botbuilder.schema import ChannelAccount
from datetime import datetime

class MyBot(ActivityHandler):
    # See https://aka.ms/about-bot-activity-message to learn more about the message and other activity types.

    async def on_message_activity(self, turn_context: TurnContext):
        input_message = turn_context.activity.text
        response_message = 'Ask me what the time is.'
        if (input_message.lower().startswith('what') and 'time' in input_message.lower()):
            now = datetime.now()
            response_message = 'The time is {}:{:02d}.'.format(now.hour,now.minute)
        await turn_context.send_activity(response_message)
    
    async def on_members_added_activity(
        self,
        members_added: ChannelAccount,
        turn_context: TurnContext
    ):
        for member_added in members_added:
            if member_added.id != turn_context.activity.recipient.id:
                await turn_context.send_activity("Hello and welcome!")

Step 5. Create an Azure application registration
az login
az ad app create –display-name “TimeBot” –password “Super$ecretPassw0rd” –available-to-other-tenants

Step 6. Create Azure resources
az deployment group create –resource-group “YOUR_RESOURCE_GROUP” –template-file “deploymenttemplates/template-with-preexisting-rg.json” –parameters appId=”YOUR_APP_ID” appSecret=”Super$ecretPassw0rd” botId=”A_UNIQUE_BOT_ID” newWebAppName=”A_UNIQUE_WEB_APP_NAME” newAppServicePlanName=”A_UNIQUE_PLAN_NAME” appServicePlanLocation=”REGION” –name “A_UNIQUE_SERVICE_NAME”

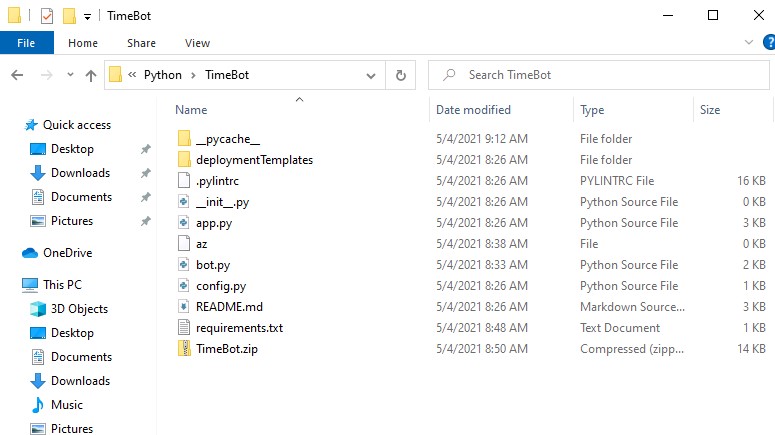
Step 7. Create a zip archive for deployment
select all of the files in the TimeBot folder to TimeBot.zip.

Step 8. Deploy and test the bot in Azure Portal
az webapp deployment source config-zip –resource-group “YOUR_RESOURCE_GROUP” –name “YOUR_WEB_APP_NAME” –src “TimeBot.zip”
In the Azure portal, in the resource group containing your resources, open the Bot Channels Registration resource (which will have the name you assigned to the BotId parameter when creating Azure resources).
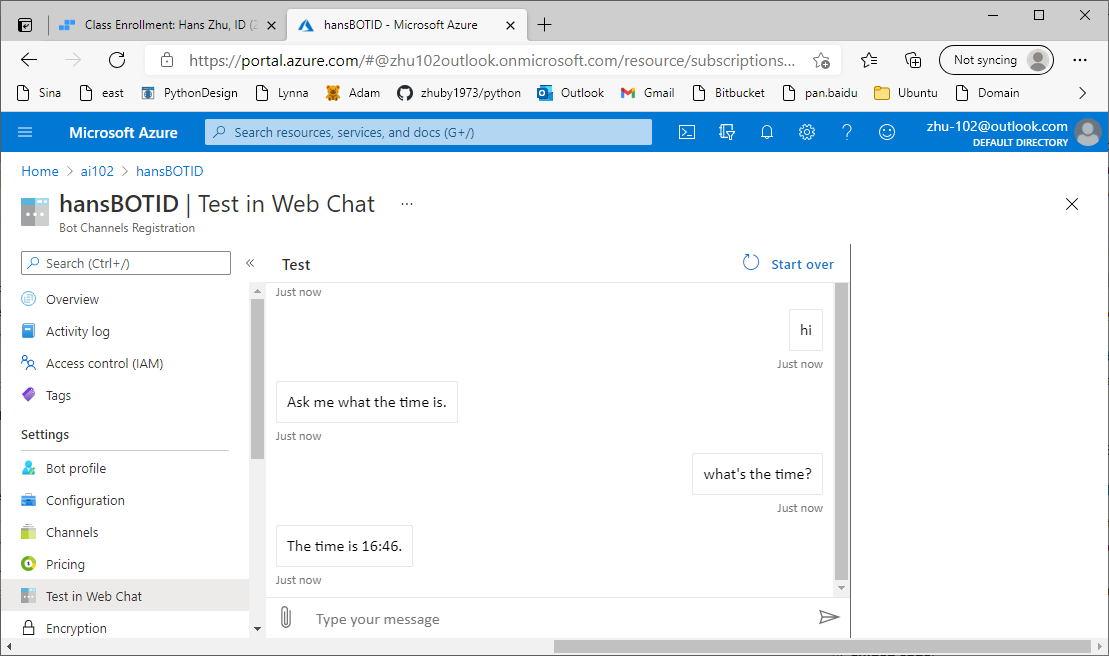
In the Bot management section, select Test in Web Chat. Then wait for your bot to initialize.
Enter a message such as Hello and view the response from the bot, which should be Ask me what the time is.
Enter What is the time? and view the response.

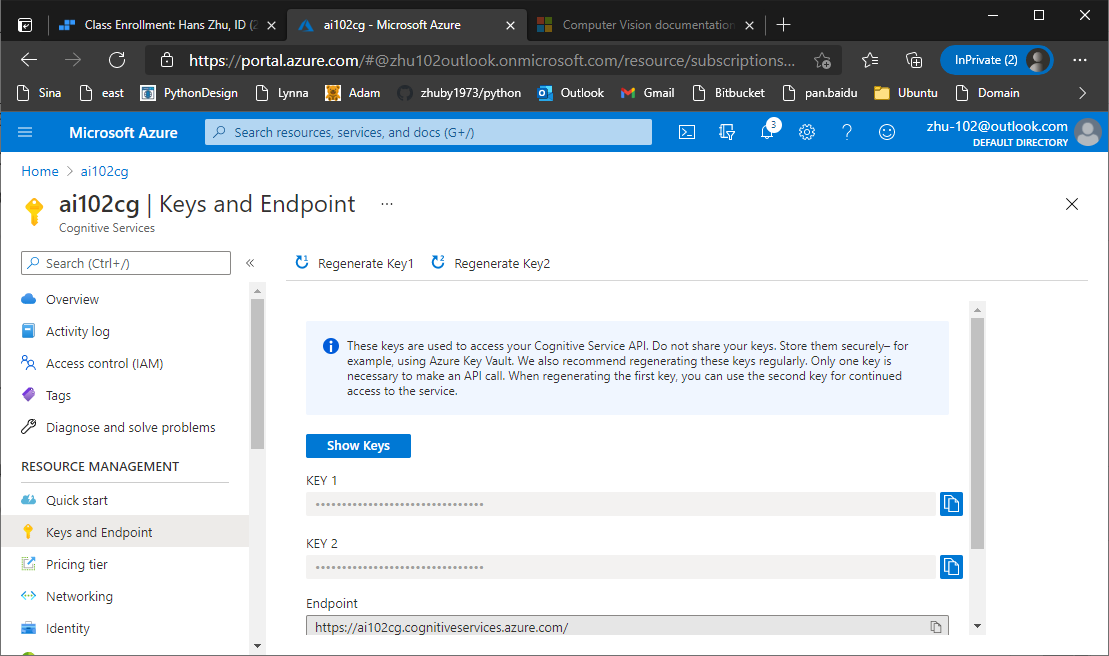
Step 9. Get the Web Chat channel info from Azure Portal

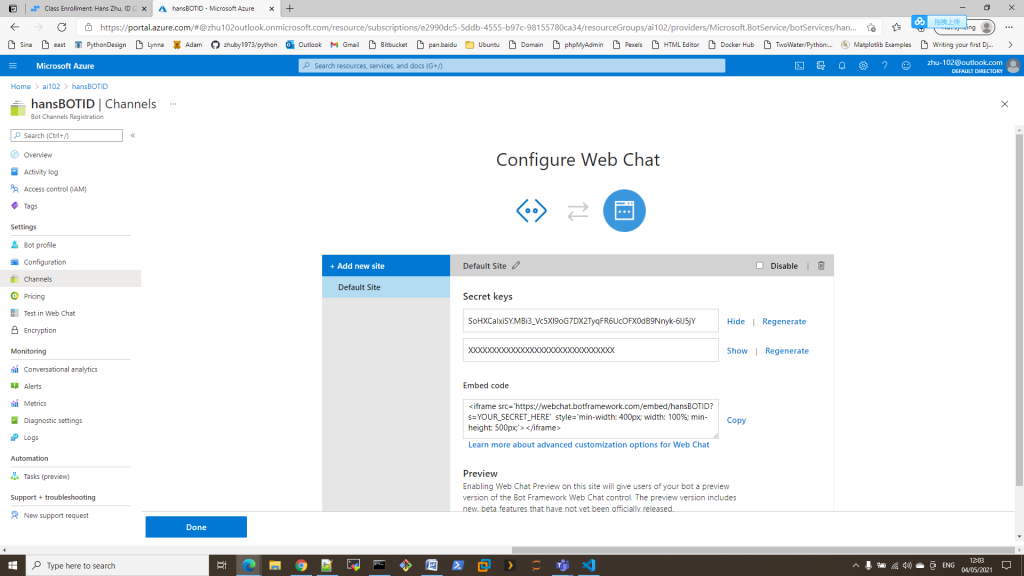
Step 10. Update 13-bot-framework/web-client/default.html with Embed code and Secret Key

<head>
    <title>Time for Bots</title>
</head>
<Body>
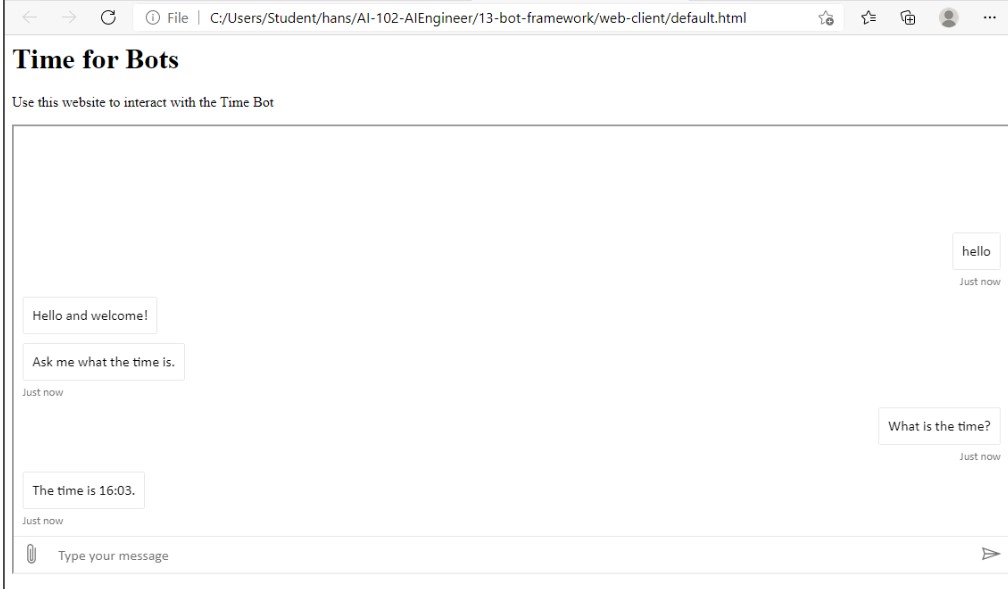
    <h1>Time for Bots</h1>
    <p>Use this website to interact with the Time Bot</p>
    <!-- add the iframe for the bot here-->
    <iframe src='https://webchat.botframework.com/embed/hansBOTID?s=SoHXCaIxiSY.MBi3_Vc5Xl9oG7DX2TyqFR6UcOFX0dB9Nnyk-6lJ5jY'  style='min-width: 400px; width: 100%; min-height: 500px;'></iframe>
</Body>

then you can open the html page in Edge and test the Bots service:

Create Azure Text Analytics API with Cognitive Services

Step 1. Clone the repository
Start Visual Studio Code.
Open the palette (SHIFT+CTRL+P) and run a Git: Clone command to clone the https://github.com/MicrosoftLearning/AI-102-AIEngineer repository to a local folder.

Step 2. Create a Cognitive Services resource with the following settings:
Subscription: Your Azure subscription
Resource group: Choose or create a resource group
Region: Choose any available region
Name: Enter a unique name
Pricing tier: Standard S0

When the resource has been deployed, go to it and view its Keys and Endpoint page. You will need the endpoint and one of the keys from this page in our API.

Step 3. In Visual Studio Code, in the Explorer pane, browse to the 05-analyze-text folder and expand the Python folder.
Right-click the text-analysis folder and open an integrated terminal. Then install the Text Analytics SDK package by running the appropriate command for your language preference:
pip install azure-ai-textanalytics==5.0.0, then edit .env with your Coginitive Services info:
COG_SERVICE_ENDPOINT=your_cognitive_services_endpoint
COG_SERVICE_KEY=your_cognitive_services_key

Step 4. Edit text-analysis.py as below:

from dotenv import load_dotenv
import os
# Import namespaces
from azure.core.credentials import AzureKeyCredential
from azure.ai.textanalytics import TextAnalyticsClient

def main():
    try:
        # Get Configuration Settings
        load_dotenv()
        cog_endpoint = os.getenv('COG_SERVICE_ENDPOINT')
        cog_key = os.getenv('COG_SERVICE_KEY')

        # Create client using endpoint and key
        credential = AzureKeyCredential(cog_key)
        cog_client = TextAnalyticsClient(endpoint=cog_endpoint, credential=credential)

        # Analyze each text file in the reviews folder
        reviews_folder = 'reviews'
        for file_name in os.listdir(reviews_folder):
            # Read the file contents
            print('\n-------------\n' + file_name)
            text = open(os.path.join(reviews_folder, file_name), encoding='utf8').read()
            print('\n' + text)

            # Get language
            detectedLanguage = cog_client.detect_language(documents=[text])[0]
            print('\nLanguage: {}'.format(detectedLanguage.primary_language.name))

            # Get sentiment
            sentimentAnalysis = cog_client.analyze_sentiment(documents=[text])[0]
            print("\nSentiment: {}".format(sentimentAnalysis.sentiment))

            # Get key phrases
            phrases = cog_client.extract_key_phrases(documents=[text])[0].key_phrases
            if len(phrases) > 0:
                print("\nKey Phrases:")
                for phrase in phrases:
                    print('\t{}'.format(phrase))

            # Get entities
            entities = cog_client.recognize_entities(documents=[text])[0].entities
            if len(entities) > 0:
                print("\nEntities")
                for entity in entities:
                    print('\t{} ({})'.format(entity.text, entity.category))

            # Get linked entities
            entities = cog_client.recognize_linked_entities(documents=[text])[0].entities
            if len(entities) > 0:
                print("\nLinks")
                for linked_entity in entities:
                    print('\t{} ({})'.format(linked_entity.name, linked_entity.url))
    except Exception as ex:
        print(ex)
if __name__ == "__main__":
    main()

Algorithmic Stock Trading Strategy Using Python

stock_trading_strategy

Stock Price Prediction Using Python & Machine Learning

stock_prediction

create Solr server with ansible roles from Galaxy

Apache Solr is a fast and scalable search server optimized for full-text search, word highlighting, faceted search, fast indexing, and more. It’s a very popular search server, and it’s pretty easy to install and configure using Ansible.

Step 1. Getting roles from Galaxy
https://galaxy.ansible.com/

ansible-galaxy install geerlingguy.java geerlingguy.solr

Step 2. create solr.yml

---
- hosts: all
  become: yes
  
  roles:
    - geerlingguy.java
    - geerlingguy.solr

Step 3. run it with ansible-playbook solr.yml, then you can open http://ubuntu2004:8983/solr

if you didn’t install roles, the playbook.yml could be:

---
- hosts: all
  become: true

  vars_files:
    - vars.yml

  pre_tasks:
    - name: Update apt cache if needed.
      apt: update_cache=true cache_valid_time=3600

  tasks:
    - name: Install Java.
      apt: name=openjdk-11-jdk state=present

    - name: Download Solr.
      get_url:
        url: "https://archive.apache.org/dist/lucene/solr/{{ solr_version }}/solr-{{ solr_version }}.tgz"
        dest: "{{ download_dir }}/solr-{{ solr_version }}.tgz"
        checksum: "{{ solr_checksum }}"

    - name: Expand Solr.
      unarchive:
        src: "{{ download_dir }}/solr-{{ solr_version }}.tgz"
        dest: "{{ download_dir }}"
        remote_src: true
        creates: "{{ download_dir }}/solr-{{ solr_version }}/README.txt"

    - name: Run Solr installation script.
      command: >
        {{ download_dir }}/solr-{{ solr_version }}/bin/install_solr_service.sh
        {{ download_dir }}/solr-{{ solr_version }}.tgz
        -i /opt
        -d /var/solr
        -u solr
        -s solr
        -p 8983
        creates={{ solr_dir }}/bin/solr

    - name: Ensure solr is started and enabled on boot.
      service: name=solr state=started enabled=yes

Helpful Galaxy commands:
ansible-galaxy list displays a list of installed roles, with version numbers
ansible-galaxy remove [role] removes an installed role

Using ansible-vault to store ssh and sudo password

  1. edit /etc/ansible/ansible.cfg
    host_key_checking = False
  2. edit /etc/ansible/hosts
    [all:vars]
    ansible_connection=ssh
    ansible_ssh_user=your_sshid
    ansible_ssh_pass=your_sshpassword
    ansible_sudo_pass=your_sudopassword
    [appservers]
    192.168.0.[1-3]
  3. edit playbook.yml
---
-hosts: all
 vars_files:
 - vars.yml
 tasks:
  -name: download file from link
   get_url:
    url:http://github.com/test.txt
    dest: /tmp/test.txt
    mode: 0755
  -name: ensure directory exists
   file:
     path: "{{ jboss_conf_location }}"
     state: directory
     owner: jboss
     group: jboss
  -name: copy file
   command: >
     cp /tmp/test.txt {{ jboss_conf_location }}
   become: yes
   become_user: jboss
  -name: remove file
   file:
     path: "{{ jboss_conf_location }}/test.txt"
     state: absent
   become: yes
   become_user: jboss   

then you can run it with ansible-playbook playbook.yml

there is another way to store password, ansible-vault create passwd.yml

ansible_ssh_user: your_sshid
ansible_ssh_pass: your_sshpassword
ansible_sudo_pass: your_sudopassword

then you can run it with command:

ansible-playbook --ask-vault-pass --extra-vars '@passwd.yml' playbook.yml

you can run Shell command with sudo password input:

ansible appservers -m shell -a "source /home/pm2/.bashrc && pm2 status" -b --become-user=pm2 -K

scp files:

- name: Copy configuration files.
  copy:
    src: "{{ item.src }}"
    dest: "{{ item.dest }}"
    owner: root
    group: root
    mode: 0644
  with_items:
    - src: httpd.conf
      dest: /etc/httpd/conf/httpd.conf
    - src: httpd-vhosts.conf
      dest: /etc/httpd/conf/httpd-vhosts.conf

Make sure Apache or other service is started now and at boot:

- name: Make sure Apache is started now and at boot
  service: name=httpd state=started enabled=yes

yum install apache or other packages:

- name: Install Apache.
  yum:
    name:
      - httpd
      - httpd-devel
    state: present

lineinfile edit:

- name: Adjust OpCache memory setting.
  lineinfile:
    dest: "/etc/php/7.1/apache2/conf.d/10-opcache.ini"
    regexp: "^opcache.memory_consumption"
    line: "opcache.memory_consumption = 96"
    state: present
  notify: restart apache

git clone:

- name: Check out drush 8.x branch.
  git:
    repo: https://github.com/drush-ops/drush.git
    version: 8.x
    dest: /opt/drush

run command in one line:

- name: Install Drush dependencies with Composer.
  command: >
    /usr/local/bin/composer install
    chdir=/opt/drush
    creates=/opt/drush/vendor/autoload.php

create file link:

- name: Create drush bin symlink.
  file:
    src: /opt/drush/drush
    dest: /usr/local/bin/drush
    state: link

list files in directory:

    - shell: 'ls -ltr /opt/jboss/log/'
      register: ps

    - debug: var=ps.stdout_lines

How to Install Anaconda and Jupyter on Ubuntu 20.04

STEP1. Commands:
sudo apt install libgl1-mesa-glx libegl1-mesa libxrandr2 libxrandr2 libxss1 libxcursor1 libxcomposite1 libasound2 libxi6 libxtst6
wget -P /tmp https://repo.anaconda.com/archive/Anaconda3-2020.02-Linux-x86_64.sh
bash /tmp/Anaconda3-2020.02-Linux-x86_64.sh
source ~/.bashrc
conda update –all

STEP2. anaconda-navigator to open the Navigator GUI in terminal:

STEP3. install jupyter notebook extension and start it

pip install jupyter_nbextensions_configurator
jupyter nbextensions_configurator enable –user
conda install -c conda-forge jupyter_contrib_nbextensions
jupyter notebook –ip 0.0.0.0
then you can open http://192.168.226.128:8888/tree#notebooks

You can enable Table of Content to add TOC for your notebook!

Query google geocoding API with python

  1. Create your application’s API key:
  • Go to the Google API Console https://console.cloud.google.com/apis/dashboard
  • From the projects list, select a project or create a new one.
  • If the APIs & services page isn’t already open, open the left side menu and select APIs & services.
  • On the left, choose Credentials.
  • Click Create credentials and then select API key.
  1. Enable Geocoding API:
  • Log in to the Google API Manager Console here: https://console.developers.google.com/apis/library
  • Click the Library link in the left sidebar
  • Select the project you created when you created your API Key for WP Google Maps (See the top arrow in the screenshot below)
  • Click the link to the Google Maps Geocoding API
  • Click Enable on the Google Maps Geocoding API window.
  1. Verify your KEY in browser https://maps.googleapis.com/maps/api/geocode/json?address=1600+Amphitheatre+Parkway,+Mountain+View,+CA&key=your-key
  1. Create geocode.py
import json
import time
import urllib.error
import urllib.request
import urllib.parse

api_file = 'your-key'
base_url = "https://maps.googleapis.com/maps/api/geocode/json"

def geoapi(address):
    params = urllib.parse.urlencode({"address": address, "key": api_file})
    url = f"{base_url}?{params}"
    response = urllib.request.urlopen(url)
    result = json.load(response)
    return result

if __name__ == "__main__":
    goecode = geoapi('3600 Steeles Ave E, Markham, ON')
    print(goecode)
  1. run it with python geocode.py

build Django/PostgreSQL application with Docker Compose

STEP1: install docker and docker compose
1. sudo apt-get install docker-ce docker-ce-cli containerd.io
2. sudo groupadd docker
3. ubuntu@ubuntu2004:~$ sudo usermod -aG docker $USER (you should be able to run docker with user ubuntu now)
4. sudo curl -L “https://github.com/docker/compose/releases/download/1.28.5/docker-compose-$(uname -s)-$(uname -m)” -o /usr/local/bin/docker-compose
5. sudo chmod +x /usr/local/bin/docker-compose

STEP2: create Django_Compose folder and files:
Dockerfile
requirements.txt
docker-compose.yml

ubuntu@ubuntu2004:~/Django_Compose$ cat Dockerfile
FROM python:3
ENV PYTHONUNBUFFERED=1
WORKDIR /code
COPY requirements.txt /code/
RUN pip install -r requirements.txt
COPY . /code/

ubuntu@ubuntu2004:~/Django_Compose$ cat requirements.txt
Django>=3.0,<4.0
psycopg2-binary>=2.8

ubuntu@ubuntu2004:~/Django_Compose$ cat docker-compose.yml
version: "3.9"

services:
  db:
    image: postgres
    environment:
      - POSTGRES_DB=postgres
      - POSTGRES_USER=postgres
      - POSTGRES_PASSWORD=postgres
  web:
    build: .
    command: python manage.py runserver 0.0.0.0:8000
    volumes:
      - .:/code
    ports:
      - "8000:8000"
    depends_on:
      - db

STEP3: Create a Django project
sudo docker-compose run web django-admin startproject composeexample .
sudo chown -R $USER:$USER .

STEP4: edit composeexample/settings.py
Replace the DATABASES = … with the following:
and also update ALLOWED_HOSTS = [‘*’]

DATABASES = {
    'default': {
        'ENGINE': 'django.db.backends.postgresql',
        'NAME': 'postgres',
        'USER': 'postgres',
        'PASSWORD': 'postgres',
        'HOST': 'db',
        'PORT': 5432,
    }
}

STEP5 : start docker compose with command “docker-compose up”

ubuntu@ubuntu2004:~/Django_Compose$ docker-compose up
Starting django_compose_db_1 ... done
Starting django_compose_web_1 ... done
Attaching to django_compose_db_1, django_compose_web_1
db_1   |
db_1   | PostgreSQL Database directory appears to contain a database; Skipping initialization
db_1   |
db_1   | 2021-03-11 17:34:58.762 UTC [1] LOG:  starting PostgreSQL 13.2 (Debian 13.2-1.pgdg100+1) on x86_64-pc-linux-gnu, compiled by gcc (Debian 8.3.0-6) 8.3.0, 64-bit
db_1   | 2021-03-11 17:34:58.762 UTC [1] LOG:  listening on IPv4 address "0.0.0.0", port 5432
db_1   | 2021-03-11 17:34:58.763 UTC [1] LOG:  listening on IPv6 address "::", port 5432
db_1   | 2021-03-11 17:34:58.765 UTC [1] LOG:  listening on Unix socket "/var/run/postgresql/.s.PGSQL.5432"
db_1   | 2021-03-11 17:34:58.770 UTC [25] LOG:  database system was shut down at 2021-03-11 17:25:27 UTC
db_1   | 2021-03-11 17:34:58.775 UTC [1] LOG:  database system is ready to accept connections
web_1  | Watching for file changes with StatReloader
web_1  | Performing system checks...
web_1  |
web_1  | System check identified no issues (0 silenced).
web_1  |
web_1  | You have 18 unapplied migration(s). Your project may not work properly until you apply the migrations for app(s): admin, auth, contenttypes, sessions.
web_1  | Run 'python manage.py migrate' to apply them.
web_1  | March 11, 2021 - 17:35:00
web_1  | Django version 3.1.7, using settings 'composeexample.settings'
web_1  | Starting development server at http://0.0.0.0:8000/