Draw the system architecture diagrams with python

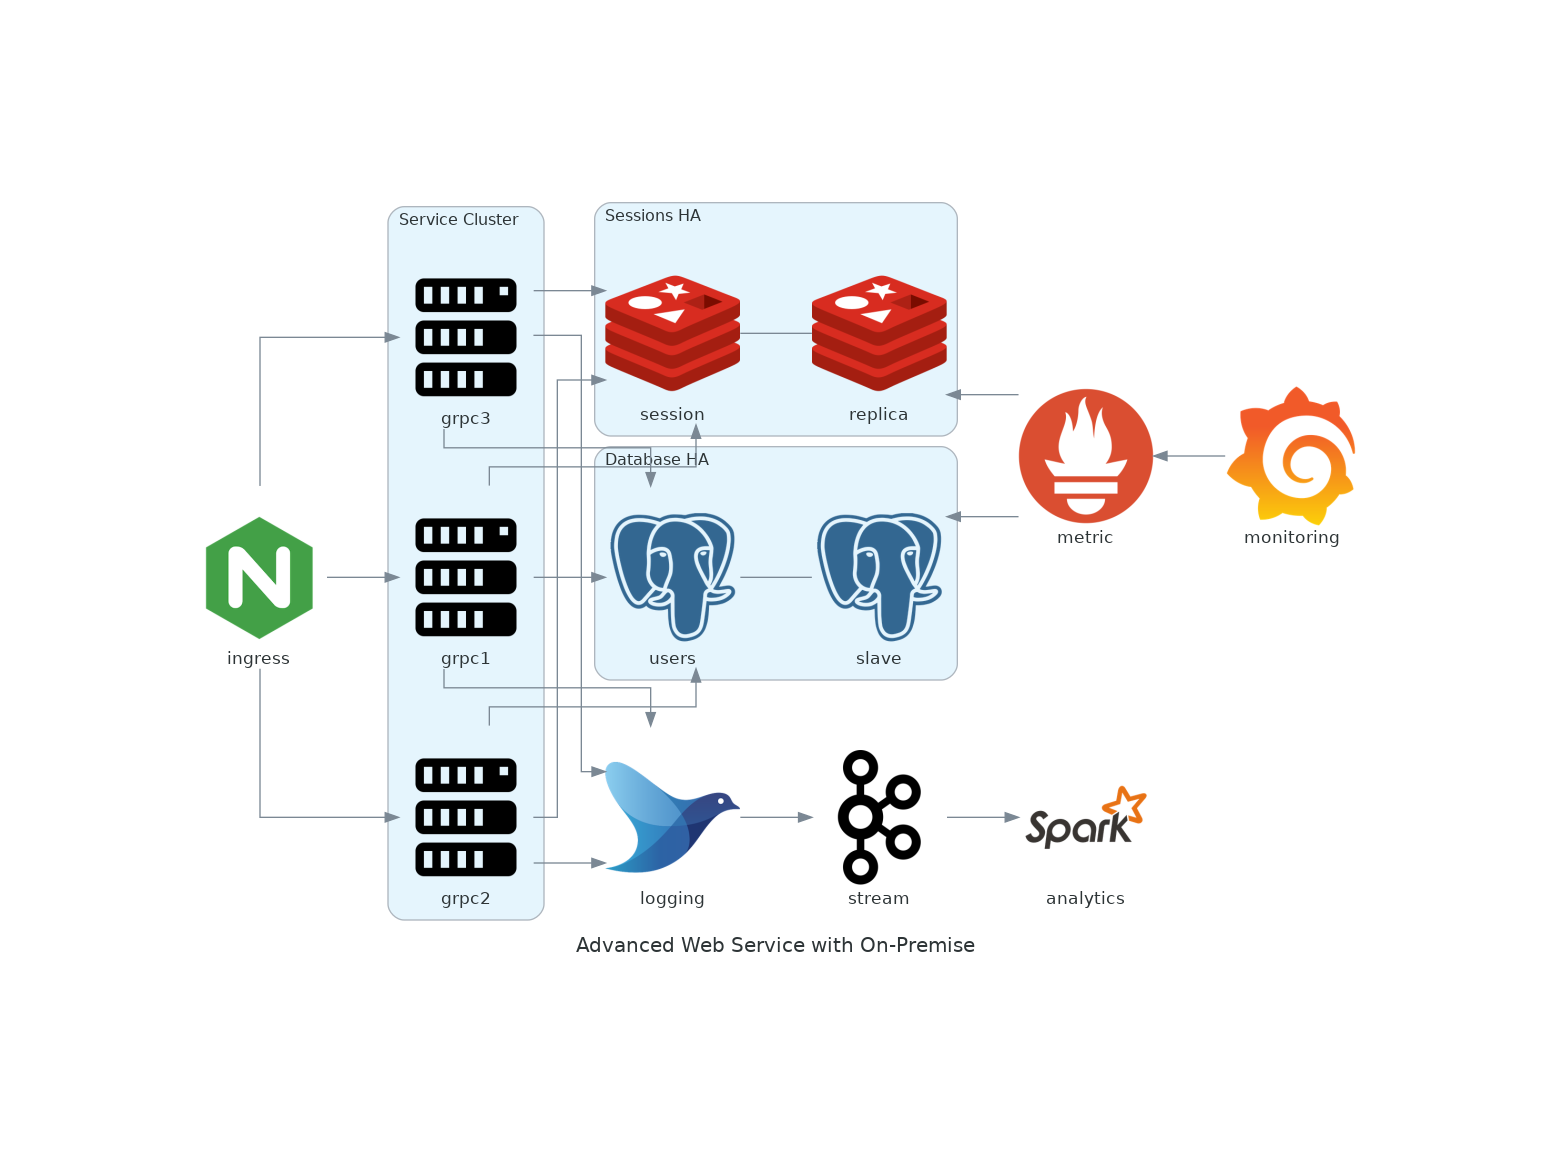
Stop spending time manually tweaking misaligned arrows in visio, now you can create beautiful architecture diagrams with Python diagrams library!

  1. installation on Ubuntu
    sudo apt-get install python3-pydot graphviz
    sudo pip3 install diagrams

2. get sample code diagram.py from https://diagrams.mingrammer.com/docs/getting-started/examples

from diagrams import Cluster, Diagram
from diagrams.onprem.analytics import Spark
from diagrams.onprem.compute import Server
from diagrams.onprem.database import PostgreSQL
from diagrams.onprem.inmemory import Redis
from diagrams.onprem.aggregator import Fluentd
from diagrams.onprem.monitoring import Grafana, Prometheus
from diagrams.onprem.network import Nginx
from diagrams.onprem.queue import Kafka

with Diagram("Advanced Web Service with On-Premise", show=False):
    ingress = Nginx("ingress")

    metrics = Prometheus("metric")
    metrics << Grafana("monitoring")

    with Cluster("Service Cluster"):
        grpcsvc = [
            Server("grpc1"),
            Server("grpc2"),
            Server("grpc3")]

    with Cluster("Sessions HA"):
        master = Redis("session")
        master - Redis("replica") << metrics
        grpcsvc >> master

    with Cluster("Database HA"):
        master = PostgreSQL("users")
        master - PostgreSQL("slave") << metrics
        grpcsvc >> master

    aggregator = Fluentd("logging")
    aggregator >> Kafka("stream") >> Spark("analytics")

    ingress >> grpcsvc >> aggregator

3. run it with python3 diagram.py, you will get advanced_web_service_with_on-premise.png in same folder

Webcam Face Detection with OpenCV & Python3

import cv2
import sys
facecascade = cv2.CascadeClassifier('haarcascade_frontalface_default.xml')
video_capture = cv2.VideoCapture(0)

while True:
    # Capture frame-by-frame
    ret, frame = video_capture.read()
    gray = cv2.cvtColor(frame, cv2.COLOR_BGR2GRAY)
    faces = facecascade.detectMultiScale(
        gray,
        scaleFactor=1.1,
        minNeighbors=5,
        minSize=(30, 30),
        flags=cv2.CASCADE_SCALE_IMAGE
    )

    # Draw a rectangle around the faces
    for (x, y, w, h) in faces:
        cv2.rectangle(frame, (x, y), (x+w, y+h), (0, 255, 0), 2)
        crop_face = frame[y:y + h, x:x + w]
    # save faces
        cv2.imwrite(str(x) + '_' + str(y) + '_face.jpg', crop_face)
    # Display the resulting frame
    cv2.imshow('Video', frame)

    if cv2.waitKey(1) & 0xFF == ord('q'):
        break

# When everything is done, release the capture
video_capture.release()
cv2.destroyAllWindows()

Run it with python sample.py, it will popup your webcam window and do face detection, you can type “q” to quit.

.

Photo Face Detection with OpenCV & Python3

  1. install opencv
    pip install opencv-python
  2. Face detection using Haar cascades is a machine learning based approach where a cascade function is trained with a set of input data. OpenCV already contains many pre-trained classifiers for face, eyes, smiles, etc.. Today we will be using the face classifier. You can experiment with other classifiers as well.
    You need to download the trained classifier XML file (haarcascade_frontalface_default.xml), which is available in OpenCv’s GitHub repository. Save it to your working location.
  3. download logo.jpg from internet

4. python3 code to detect faces in image

import cv2
# Load the cascade
#face_cascade = cv2.CascadeClassifier('haarcascade_frontalface_default.xml')
face_cascade = cv2.CascadeClassifier(cv2.data.haarcascades + "haarcascade_frontalface_default.xml")
# Read the input image
img = cv2.imread('logo.jpg')
# Convert into grayscale
gray = cv2.cvtColor(img, cv2.COLOR_BGR2GRAY)
# Detect faces
faces = face_cascade.detectMultiScale(gray, 1.1, 4)
# Draw rectangle around the faces
for (x, y, w, h) in faces:
    cv2.rectangle(img, (x, y), (x+w, y+h), (255, 0, 0), 2)
    crop_face = img[y:y + h, x:x + w]
    # save faces
    cv2.imwrite(str(x) + '_' + str(y) + '_face.jpg', crop_face)
# Display the output
cv2.imshow('img', img)
cv2.imshow("imgcropped", crop_face)
cv2.waitKey()

5. run it with pythoh cv2_sample.py, you will find faces detected and cropped faces saved:

Serve Flask app with apache and wsgi on Ubuntu 20

  1. install Apache and WSGI
    sudo apt install apache2 libapache2-mod-wsgi-py3 python3-pip python3-virtualenv
    sudo pip3 install flask (skip this if you are planning to setup venv)
  2. enable mod_wsgi
    sudo a2enmod wsgi
  3. create files as below (the __init__.py and wsgi file are mandatory)

4. create apache wsgi conf file /etc/apache2/sites-available/flaskhelloworldsite.com.conf
and enable it: $ sudo a2ensite flaskhelloworldsite.com.conf

<VirtualHost *:80>
    ServerAdmin webmaster@flaskhelloworldsite.com
    ServerName 192.168.0.51
    ServerAlias flaskhelloworldsite.com
    ErrorLog /var/www/flaskhelloworldsite.com/logs/error.log
    CustomLog /var/www/flaskhelloworldsite.com/logs/access.log combined

    WSGIDaemonProcess helloworldapp user=www-data group=www-data threads=5
    WSGIProcessGroup helloworldapp
    WSGIScriptAlias / /var/www/FLASKAPPS/helloworldapp/helloworldapp.wsgi
    <Directory /var/www/FLASKAPPS/helloworldapp>
        Order allow,deny
        Allow from all
    </Directory>
</VirtualHost>

5. create log directory
$ sudo mkdir -p /var/www/flaskhelloworldsite.com/logs
$ sudo chown -R www-data:www-data flaskhelloworldsite.com

6. restart apache and verify the app
systemctl restart apache2
then you can open http://192.168.0.51/

NOTE: if you want use python virtual env, we can setup venv in /var/www/FLASKAPPS:
virtualenv venv
source venv/bin/activate
pip install flask

then update WSGIDaemonProcess in /etc/apache2/sites-available/flaskhelloworldsite.com.conf with python-home:
WSGIDaemonProcess helloworldapp user=www-data group=www-data threads=5 python-home=/var/www/FLASKAPPS/venv

flask_sqlalchemy insert or update record

  1. create hello.py with class User(db.Model)
from flask import Flask
from flask_sqlalchemy import SQLAlchemy
app = Flask(__name__)
 
app.config['SQLALCHEMY_DATABASE_URI'] = 'sqlite:///users.sqlite3'
app.config['SECRET_KEY'] = "op23413kjkjljlksjfaksjfdlksajfkjlkjlkjk"
app.config['SQLALCHEMY_TRACK_MODIFICATIONS'] = False
db = SQLAlchemy(app)
 
class User(db.Model):
    __tablename__ = 'users'
    username = db.Column(db.String(64), primary_key=True)
    passwd = db.Column(db.String(64))
    def __repr__(self):
        return '<User %r>' % self.username
 
if __name__ == "__main__":
        db.create_all()
        app.run("0.0.0.0", 8090, debug=True)

2. test hello.py with python3 shell

zhub2@apache-vm1:~ $ python3
>>> from hello import db
>>> db.create_all()
>>> from hello import User
### INSERT NEW User
>>> user_john = User(username='john', passwd='carlos23')
>>> db.session.add(user_john)
>>> db.session.commit()
### LIST ALL User
>>> User.query.all()
[<User 'john'>]
### UPDATE User WHERE username='john'
>>> user_john = User.query.filter_by(username='john').first()
>>> user_john.passwd='test123'
>>> db.session.add(user_john)
>>> db.session.commit()

scale up Flask apps with gevent asynchronous I/O

Gevent is the use of simple, sequential programming in python to achieve scalability provided by asynchronous IO and lightweight multi-threading (as opposed to the callback-style of programming using Twisted’s Deferred).
It is built on top of libevent/libev (for asynchronous I/O) and greenlets (lightweight cooperative multi-threading).
we can use pip install gevent to install it.
Here is the sample.py:

from gevent import monkey
monkey.patch_all()
from flask import Flask
from gevent import pywsgi
app = Flask(__name__)
@app.route('/')
def hello():
    return "Hello World!"
if __name__ == '__main__':
    #app.run()
    server = pywsgi.WSGIServer(("0.0.0.0", 8080), app)
    server.serve_forever()                            

you can run it in background:
nohup python3 sample.py &
then you can open the sample app on http://your_server_ip:8080

Use ApacheBench To Do Load Testing:
1. apt-get install apache2-utils
2. ab -r -n 2000 -c 200 http://127.0.0.1:8080/?delay=1

Concurrency Level:      200
Time taken for tests:   2.470 seconds
Complete requests:      2000
Failed requests:        0
Total transferred:      294000 bytes
HTML transferred:       24000 bytes
Requests per second:    809.60 [#/sec] (mean)
Time per request:       247.035 [ms] (mean)
Time per request:       1.235 [ms] (mean, across all concurrent requests)
Transfer rate:          116.22 [Kbytes/sec] received

compare it with sample_old.py without gevent:

from flask import Flask
app = Flask(__name__)
@app.route('/')
def hello():
    return "Hello World!"
if __name__ == '__main__':
    app.run(port=8080)

run same ab command, you will get:

Concurrency Level:      200
Time taken for tests:   4.493 seconds
Complete requests:      2000
Failed requests:        0
Total transferred:      330000 bytes
HTML transferred:       24000 bytes
Requests per second:    445.10 [#/sec] (mean)
Time per request:       449.340 [ms] (mean)
Time per request:       2.247 [ms] (mean, across all concurrent requests)
Transfer rate:          71.72 [Kbytes/sec] received

Time per request reduced from 449ms to 247ms!
ref: https://iximiuz.com/en/posts/flask-gevent-tutorial/

How To Serve Flask Applications with Gunicorn and Nginx

Step 1 — Installing the Components
sudo apt install nginx python3-pip python3-dev build-essential libssl-dev libffi-dev python3-setuptools

Step 2 — Creating a Python Virtual Environment
sudo apt install python3-venv
mkdir ~/myproject
cd ~/myproject
python3 -m venv myprojectenv
source myprojectenv/bin/activate

Step 3 — Setting Up a Flask Application
pip install gunicorn flask
nano ~/myproject/myproject.py

from flask import Flask
app = Flask(__name__)

@app.route("/")
def hello():
    return "<h1 style='color:blue'>Hello There!</h1>"

if __name__ == "__main__":
    app.run(host='0.0.0.0')

Step 4 — Creating the WSGI Entry Point and Configuring Gunicorn
nano ~/myproject/wsgi.py

from myproject import app

if __name__ == "__main__":
    app.run()

cd ~/myproject
gunicorn –bind 0.0.0.0:5000 wsgi:app
then you should be able to open http://your_server_ip:5000

When you have confirmed that it’s functioning properly, press CTRL-C in your terminal window. We’re now done with our virtual environment, so we can deactivate it:
deactivate

Step 5 — Setup Gunicorn service
sudo nano /etc/systemd/system/myproject.service

[Unit]
Description=Gunicorn instance to serve myproject
After=network.target

[Service]
User=ubuntu
Group=ubuntu
WorkingDirectory=/home/ubuntu/myproject
Environment="PATH=/home/ubuntu/myproject/myprojectenv/bin"
ExecStart=/home/ubuntu/myproject/myprojectenv/bin/gunicorn --workers 3 --bind 127.0.0.1:5000 wsgi:app

[Install]
WantedBy=multi-user.target

you can start/enable it and check its status:
sudo systemctl start myproject
sudo systemctl enable myproject
sudo systemctl status myproject

Step 6 — Configuring Nginx to Proxy Requests
sudo nano /etc/nginx/sites-available/myproject

server {
    listen 80;
    server_name ubuntu2020 www.ubuntu2020.ht.home;

    location / {
        include proxy_params;
        proxy_pass http://127.0.0.1:5000;
    }
}

sudo ln -s /etc/nginx/sites-available/myproject /etc/nginx/sites-enabled
sudo nginx -t
sudo systemctl restart nginx
sudo ufw allow ‘Nginx Full’

Step 7 — Securing the Application
 Certbot provides a variety of ways to obtain SSL certificates through plugins. The Nginx plugin will take care of reconfiguring Nginx and reloading the config whenever necessary.
sudo add-apt-repository ppa:certbot/certbot
sudo apt install python-certbot-nginx
sudo certbot –nginx -d your_domain -d www.your_domain

then you can open you site with SSL https://your_domain

Inspired by:
1. How to Create a Self-signed SSL Certificate for Nginx on Ubuntu
2. How to use Flask with gevent WSGI and Gunicorn

How to find top 10 hot python projects on github

import requests

def get_data():
    base_url = 'https://api.github.com/search/repositories?q=language:python+created:%3E2019-12-31&sort=stars&order=desc&per_page=10'
    response = requests.get(base_url)
    result = response.json()
    data = {}
    for item in result['items']:
        #data[item['name']] = [item['html_url'], item['stargazers_count'], item['watchers_count'], item['forks']]
        data[item['name']] = [item['html_url']]
    return data
print(get_data())
PS C:\Users\zhuby> & python c:/Hans/hot_python_githuh.py
{'Depix': ['https://github.com/beurtschipper/Depix'], 'diagrams': ['https://github.com/mingrammer/diagrams'], 'EasyOCR': ['https://github.com/JaidedAI/EasyOCR'], 'avatarify': ['https://github.com/alievk/avatarify'], 'GHunt': 
['https://github.com/mxrch/GHunt'], 'PaddleOCR': ['https://github.com/PaddlePaddle/PaddleOCR'], 'eat_tensorflow2_in_30_days': ['https://github.com/lyhue1991/eat_tensorflow2_in_30_days'], 'yolov5': ['https://github.com/ultralytics/yolov5'], 'Bringing-Old-Photos-Back-to-Life': ['https://github.com/microsoft/Bringing-Old-Photos-Back-to-Life'], 'practical-python': ['https://github.com/dabeaz-course/practical-python']}

Convert PDF file to Speech with Text to Speech (TTS) library pyttsx3

  1. install library on Ubuntu
    sudo apt install libespeak1
    sudo apt-get install ffmpeg
    pip3 install pdfplumber
    pip3 install pyttsx3
  2. prepare the PDF file test.pdf (one page only)
WHAT language is thine, O sea?
   The language of eternal question.
What language is thy answer, O sky?
   The language of eternal silence.

3. write the python3 code read_pdf.py

import pdfplumber
pdf = pdfplumber.open("/home/ubuntu/test.pdf")
print("total pages:",len(pdf.pages))
print("-----------------------------------------")
first_page = pdf.pages[0]
print("current page:",first_page.page_number+1)
print("-----------------------------------------")

text = first_page.extract_text()
print(text)

import pyttsx3
engine = pyttsx3.init()
text = text.replace('\n','')
engine.say(text)
engine.runAndWait()

# save speech as mp3
engine.save_to_file(text, 'test.mp3')
engine.runAndWait()

4. execute the read_pdf.py, get test.mp3

create Nightingale Rose Chart with pyecharts

  1. install python library
    pip3 install pyecharts
    pip3 install xlrd
  2. download excel data ca.xls from https://github.com/zhuby1973/geopandas
  3. write the code
import pandas as pd
from pyecharts.charts import Pie
from pyecharts import options as opts
# load data
df = pd.read_excel("ca.xls")
v = df['Province'].values.tolist()
d = df['cases'].values.tolist()
# set color
color_series = ['#FAE927','#E9E416','#C9DA36','#9ECB3C','#6DBC49',
                '#37B44E','#3DBA78','#14ADCF','#209AC9','#1E91CA',
                '#2C6BA0','#2B55A1','#2D3D8E','#44388E','#6A368B'
                '#7D3990','#A63F98','#C31C88','#D52178','#D5225B',
                '#D02C2A','#D44C2D','#F57A34','#FA8F2F','#D99D21',
                '#CF7B25','#CF7B25','#CF7B25']

pie1 = Pie(init_opts=opts.InitOpts(width='1350px', height='750px'))
pie1.set_colors(color_series)

pie1.add("", [list(z) for z in zip(v, d)],
        radius=["30%", "135%"],
        center=["50%", "65%"],
        rosetype="area"
        )
pie1.set_global_opts(title_opts=opts.TitleOpts(title='rose'),
                     legend_opts=opts.LegendOpts(is_show=False),
                     toolbox_opts=opts.ToolboxOpts())
pie1.set_series_opts(label_opts=opts.LabelOpts(is_show=True, position="inside", font_size=12,
                                               formatter="{b}:{c}例", font_style="italic",
                                               font_weight="bold", font_family="Microsoft YaHei"
                                               ),
                     )
# generate html file
pie1.render("rose.html")