webpage navigating and submit text with selenium[3]

we can use below actions for webpage navigating:
  • driver.find_element_by_link_text(“Selenium Automate Your Login Process”)
  • driver.implicitly_wait(30)
  • driver.back()
  • driver.forward()
  • main.find_element_by_id(‘submit’).click()
    C:\Users\zhuby\hans>page_nav.py
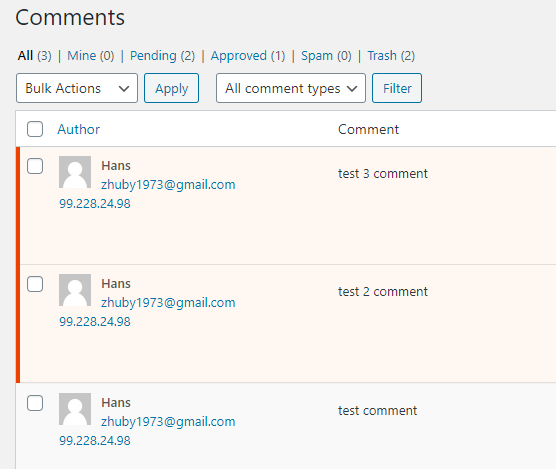
    DevTools listening on ws://127.0.0.1:53533/devtools/browser/94c2afb2-731a-4d62-baa6-7b46d0f24fcd python design – explaining the world with python (zhuby1973@gmail.com) and you will find your comments has been posted to the site:
from selenium import webdriver
from selenium.webdriver.common.keys import Keys
from selenium.webdriver.common.by import By
from selenium.webdriver.support.ui import WebDriverWait
from selenium.webdriver.support import expected_conditions as EC
import time

PATH = "C:\Program Files\chromedriver.exe"
driver = webdriver.Chrome(PATH)

driver.get("http://pythondesign.ca")
print(driver.title)
driver.implicitly_wait(30)
link = driver.find_element_by_link_text("Selenium Automate Your Login Process")
link.click()


try:
    main = WebDriverWait(driver, 10).until(
        EC.presence_of_element_located((By.ID, "commentform"))
    )
    main.find_element_by_id('comment').click()
    main.find_element_by_id('comment').send_keys('test 3 comment')
    main.find_element_by_id('author').click()
    main.find_element_by_id('author').send_keys('Hans')
    main.find_element_by_id('email').click()
    main.find_element_by_id('email').send_keys('zhuby1973@gmail.com')
    main.find_element_by_id('submit').click()
    driver.back()
    driver.forward()
finally:
    driver.quit()

Selenium Automate Your Login Process

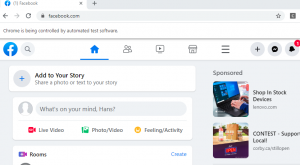
we can use selenium to automate our facebook login:

from selenium import webdriver

PATH = "C:\Program Files\chromedriver.exe"
driver = webdriver.Chrome(PATH)

driver.get("https://www.facebook.com/")
print(driver.title)
driver.find_element_by_id('email').send_keys('zhuby1973@gmail.com')
driver.find_element_by_id('pass').send_keys('password')
driver.find_element_by_id('loginbutton').click()

C:\Users\zhuby\hans>fb_login.py
DevTools listening on ws://127.0.0.1:50006/devtools/browser/c11f32df-6a6e-4d33-8f91-bf4173548ae5
Facebook – Log In or Sign Up

access website with selenium webdriver[2]

we will try to use selenium webdriver search in the website and return the article title.
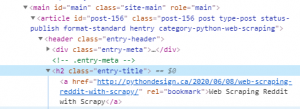
try to search something like "scrapy" on http://pythondesign.ca/ and inspect the elements, you will get something like:

so we can update test_selenium.py as below:

from selenium import webdriver
from selenium.webdriver.common.keys import Keys
from selenium.webdriver.common.by import By
from selenium.webdriver.support.ui import WebDriverWait
from selenium.webdriver.support import expected_conditions as EC
import time

PATH = "C:\Program Files\chromedriver.exe"
driver = webdriver.Chrome(PATH)

driver.get("http://pythondesign.ca")
print(driver.title)

search = driver.find_element_by_id("search-form-1") # find the search box
search.send_keys("scrapy") # type in the keyword "scrapy"
search.send_keys(Keys.RETURN)  # click the search button
#print(driver.page_source) #you can print all the source pages

try:
    main = WebDriverWait(driver, 10).until(
        EC.presence_of_element_located((By.ID, "main"))
    )
    articles = main.find_elements_by_tag_name("article")
    for article in articles:
        hearder = article.find_element_by_class_name("entry-title")
        url = hearder.find_element_by_css_selector('a').get_attribute('href')
        print(hearder.text)
        print(url)
finally:
    driver.quit()

test the code:
C:\Users\zhuby\hans>test_selenium.py

DevTools listening on ws://127.0.0.1:61798/devtools/browser/9e65a346-2cdc-4dec-8699-e0a0ac023bf6
python design – explaining the world with python (zhuby1973@gmail.com)
Web Scraping Reddit with Scrapy
http://pythondesign.ca/2020/06/08/web-scraping-reddit-with-scrapy/
access website with selenium webdriver[2]
http://pythondesign.ca/2020/06/08/access-website-with-selenium-webdriver2/

access website with selenium webdriver[1]

1. download chromedriver.exe

from https://chromedriver.chromium.org/downloads
download chromedriver.exe match with your Chrome version

2. pip install selenium

then code test_selenium.py:

from selenium import webdriver

PATH = "C:\Program Files\chromedriver.exe"
driver = webdriver.Chrome(PATH)

driver.get("http://pythondesign.ca")
print(driver.title)
driver.quit()

3. testing

C:\Users\zhuby\hans>test_selenium.py
DevTools listening on ws://127.0.0.1:56440/devtools/browser/423ca555-35ae-46dc-8cfe-11925d381214
python design – explaining the world with python (zhuby1973@gmail.com)
you will get above info on console and the website opened in Chrome then closed.

Web Scraping Reddit with Scrapy

1. install scrapy

you need install Microsoft Visual C++ 14.0 from https://visualstudio.microsoft.com/thank-you-downloading-visual-studio/?sku=BuildTools&rel=16, then pip install scrapy.

2. create scrapy project

C:\Users\zhuby\hans>scrapy startproject reddit
New Scrapy project ‘reddit’, using template directory ‘c:\python\lib\site-packages\scrapy\templates\project’, created in:
C:\Users\zhuby\hans\reddit

You can start your first spider with:
cd reddit
scrapy genspider example example.com

3. C:\Users\zhuby\hans\reddit\reddit\spiders>code redditspider.py

import scrapy

class RedditSpider(scrapy.Spider):
    name = "reddit"
    start_urls = ["https://www.reddit.com/r/cats"]

    def parse(self, response):
        links = response.xpath("//img/@src")
        html =""

        for link in links:
            url = link.get()
            if any(extension in url for extension in [".jpg", ".gif", ".png"]):
                html += """<a href="{url}"
                target="_blank">
                <img src="{url}" height="33%" width="33%">
                </a>""".format(url=url)

                with open("frontpage.html", "a") as page:
                    page.write(html)
                    page.close()

4. test the redditspider.py

C:\Users\zhuby\hans\reddit>scrapy crawl reddit
2020-06-08 16:14:25 [scrapy.utils.log] INFO: Scrapy 2.1.0 started (bot: reddit)
2020-06-08 16:14:25 [scrapy.utils.log] INFO: Versions: lxml 4.5.1.0, libxml2 2.9.5, cssselect 1.1.0, parsel 1.6.0, w3lib 1.22.0, Twisted 20.3.0, Python 3.8.3 (tags/v3.8.3:6f8c832, May 13 2020, 22:37:02) [MSC v.1924 64 bit (AMD64)], pyOpenSSL 19.1.0 (OpenSSL 1.1.1g 21 Apr 2020), cryptography 2.9.2, Platform Windows-10-10.0.19041-SP0
2020-06-08 16:14:25 [scrapy.utils.log] DEBUG: Using reactor: twisted.internet.selectreactor.SelectReactor
2020-06-08 16:14:25 [scrapy.crawler] INFO: Overridden settings:
{‘BOT_NAME’: ‘reddit’,
………………..
then you will get file:///C:/Users/zhuby/hans/reddit/frontpage.html

call openweathermap API with python3

1. Create an Account on https://home.openweathermap.org/ and create your API key, save it into config.ini:

[openweathermap]
api=7383374766289c804cbf5a68ac704491

2. create get_weather.py

import configparser
import requests
import sys

def get_api_key():
    config = configparser.ConfigParser()
    config.read('config.ini')
    return config['openweathermap']['api']

def get_weather(api_key, location):
    url = "https://api.openweathermap.org/data/2.5/weather?q={}&units=metric&appid={}".format(location, api_key)
    r = requests.get(url)
    return r.json()

def main():
    if len(sys.argv) != 2:
        exit("Usage: {} LOCATION".format(sys.argv[0]))
    location = sys.argv[1]

    api_key = get_api_key()
    weather = get_weather(api_key, location)

    print(weather['main']['temp'])
    print(weather)

if __name__ == '__main__':
    main()
  1. test code:
    C:\Users\zhuby\hans>python get_weather.py Toronto
    20.2
    {‘coord’: {‘lon’: -79.42, ‘lat’: 43.7}, ‘weather’: [{‘id’: 800, ‘main’: ‘Clear’, ‘description’: ‘clear sky’, ‘icon’: ’01d’}], ‘base’: ‘stations’, ‘main’: {‘temp’: 20.2, ‘feels_like’: 18.43, ‘temp_min’: 18, ‘temp_max’: 22.78, ‘pressure’: 1020, ‘humidity’: 52}, ‘visibility’: 14484, ‘wind’: {‘speed’: 2.6, ‘deg’: 100}, ‘clouds’: {‘all’: 1}, ‘dt’: 1591637542, ‘sys’: {‘type’: 1, ‘id’: 941, ‘country’: ‘CA’, ‘sunrise’: 1591608974, ‘sunset’: 1591664262}, ‘timezone’: -14400, ‘id’: 6167865, ‘name’: ‘Toronto’, ‘cod’: 200}

Make a bootable USB drive to install Windows 10

1. Make a bootable USB drive with the Windows utility program DiskPart

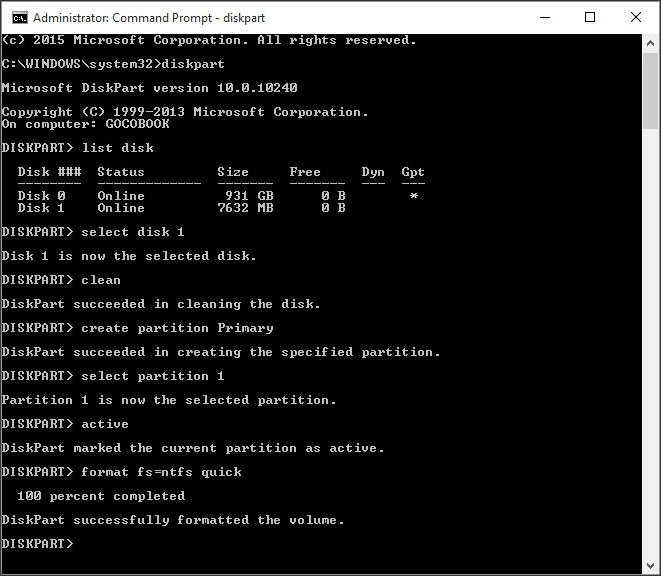
If you dare to do the necessary work by hand, you can simply use the cmd.exe application, better known as “Command Prompt”, to create a bootable USB drive on all operating systems from Windows Vista (including Windows 10). This goes as follows:

Plug the USB drive into your computer’s USB port.
Search for the “cmd” application in the Windows start menu, right-click on the item, and select “Run as administrator” from the context menu. This opens a small window with white text on a black background.
Type the command “diskpart” and confirm your input with the enter key (you’ll also do this after every other entered command). This starts the storage device manager.
Enter the command “list disk” to display all available storage devices.
You can recognize your USB by its storage capacity, and it’s usually listed as “disk 1”. In the system partition, “disk 0” is usually your PC, so a hard drive or solid state drive in your computer.
Based on the assumption that your USB has the label “disk 1”, enter the command “sel disk 1” to select it (or the corresponding “disk 2”, etc.).
Enter then command “clean” to delete all files from the USB.
Enter the command “create partition primary” to create a main partition.
Enter the command “list par” and select the newly created main partition with “sel par 1”.
Activate the partition with the command “active”.
Format the USB with the command “format fs=FAT32 label=“WINDOWSUSB” quick override” (in place of “WINDOWS USB” you can also choose another label, so long as it doesn’t contain any spaces or special characters. The drive will later be displayed under this name if you plug into a running Windows computer). Formatting may take a while. You can track its progress in the percentage bar.
As soon as the process is finished, enter the command “assign” to automatically assign a drive letter (for example “G:”) to your USB.
Enter “exit” to close DiskPart, and then “exit” again to close the command prompt.

To finish the process, you just have to copy the Windows ISO file to a bootable USB stick. This is done with a basic drag-and-drop. If you’re using an installation disc, you can also drag all setup files from there onto your drive (use the folder options to display all of the hidden files first). That’s all possible in the command prompt as well. For a source media with the drive letter “D:” and a USB drive with the letter “G:”, the corresponding command would look as follows: “xcopy D:*. G:*. /S /E /F” (all of the spaces are intentional).

2. create Bootable USB with Rufus

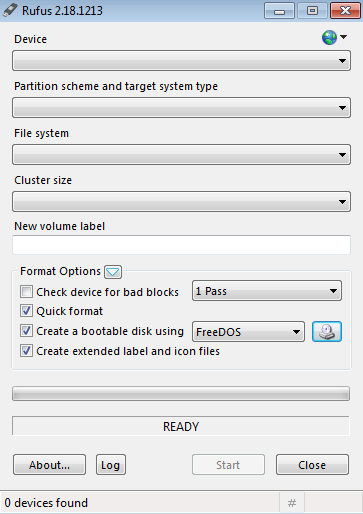
Rufus is widely considered to be the fastest and most reliable tool for the creation of a bootable USB. It also supports UEFI (“Unified Extensible Firmware Interface”), a new mainboard firmware that replaced the old BIOS and can already be found on almost all newer computers. From Windows 8, it’s also possible to install “Windows2Go” as a portable operating system on an external storage device with Rufus.

Operation of the tool is simple:
Open the program with a double-click
Select your USB drive in “Device”
Select “Create a bootable disk using” and the option “ISO Image”
Right-click on the CD-ROM symbol and select the ISO file
Under “New volume label”, you can enter whatever name you like for your USB drive
You’ll receive the warning “ALL DATA ON THIS DEVICE WILL BE DESTROYED”, which you can confidently confirm with “OK”– at this point, you’ve ideally already saved any important files from the USB drive
Click on “Start”
As soon as the green bar is full, click on “Finish”
Eject your bootable USB drive with “Safely eject hardware”

3. Create Windows 10 installation media

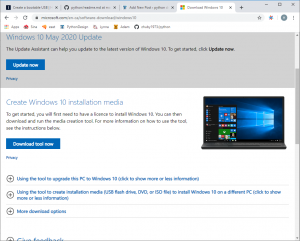
https://www.microsoft.com/en-ca/software-download/windows10

click "Download tool now"
then select "Using the tool to create installation media (USB flash drive) to install Windows 10 on a different PC"

4. after bootable USB created, you need change your computer BIOS settings to make it startup from USB first!

reboot and start Windows 10 installation!

CRUD Operations in Python on MySQL

1. install MySQL on Ubuntu

sudo apt update
sudo apt install mysql-server
sudo mysql_secure_installation

Verify the installation:
sudo mysql
mysql> SELECT user,authentication_string,plugin,host FROM mysql.user;
mysql> ALTER USER ‘root’@’localhost’ IDENTIFIED WITH mysql_native_password BY ‘password’;
mysql> FLUSH PRIVILEGES;
mysql> exit
$ mysql -u root -p to test your login

2. ubuntu@ubunu2004:~$ pip3 install mysql-connector-python

create db.py to create db, table and records

import mysql.connector #Importing Connector package   
mysqldb=mysql.connector.connect(host="localhost",user="root",password="password")#established connection   
mycursor=mysqldb.cursor()#cursor() method create a cursor object  
mycursor.execute("create database dbpython")#Execute SQL Query to create a database    
mysqldb.close()#Connection Close  

#Create a table into dbpython database  
import mysql.connector  
mysqldb=mysql.connector.connect(host="localhost",user="root",password="password",database="dbpython")#established connection between your database   
mycursor=mysqldb.cursor()#cursor() method create a cursor object  
mycursor.execute("create table student(roll INT,name VARCHAR(255), marks INT)")#Execute SQL Query to create a table into your database  
mysqldb.close()#Connection Close  

import mysql.connector  
mysqldb=mysql.connector.connect(host="localhost",user="root",password="password",database="dbpython")#established connection between your database  
mycursor=mysqldb.cursor()#cursor() method create a cursor object    
try:  
   #Execute SQL Query to insert record  
   mycursor.execute("insert into student values(1,'Sarfaraj',80),(2,'Kumar',89),(3,'Sohan',90)")  
   mysqldb.commit() # Commit is used for your changes in the database  
   print('Record inserted successfully...')   
except:  
   # rollback used for if any error   
   mysqldb.rollback()  
mysqldb.close()#Connection Close  

ubuntu@ubunu2004:~$ python3 db.py
Record inserted successfully…
you can also check in MySQL:
mysql> show databases;
mysql> use dbpython;
mysql> show tables;
+——————–+
| Tables_in_dbpython |
+——————–+
| student |
+——————–+
1 row in set (0.00 sec)
mysql> select * from student;
+——+———-+——-+
| roll | name | marks |
+——+———-+——-+
| 1 | Sarfaraj | 80 |
| 2 | Kumar | 89 |
| 3 | Sohan | 90 |
+——+———-+——-+
3 rows in set (0.00 sec)

3. create update_record.py

import mysql.connector
mysqldb=mysql.connector.connect(host="localhost",user="root",password="password",database="dbpython")#established connection between your database
mycursor=mysqldb.cursor()#cursor() method create a cursor object
try:
   mycursor.execute("UPDATE student SET name='Ramu', marks=100 WHERE roll=1")#Execute SQL Query to update record
   mysqldb.commit() # Commit is used for your changes in the database
   print('Record updated successfully...')
except:
   # rollback used for if any error
   mysqldb.rollback()
mysqldb.close()#Connection Close

4. create delete_record.py

import mysql.connector
mysqldb=mysql.connector.connect(host="localhost",user="root",password="password",database="dbpython")#established connection between your database
mycursor=mysqldb.cursor()#cursor() method create a cursor object
try:
   mycursor.execute("DELETE FROM student WHERE roll=3")#Execute SQL Query to detete a record
   mysqldb.commit() # Commit is used for your changes in the database
   print('Record deteted successfully...')
except:
   # rollback used for if any error
   mysqldb.rollback()
mysqldb.close()#Connection Close

5. test the code with display_db.py

import mysql.connector
mysqldb=mysql.connector.connect(host="localhost",user="root",password="password",database="dbpython")#established connection between your database
mycursor=mysqldb.cursor()#cursor() method create a cursor object
try:
   mycursor.execute("select * from student")#Execute SQL Query to select all record
   result=mycursor.fetchall() #fetches all the rows in a result set
   for i in result:
      roll=i[0]
      name=i[1]
      marks=i[2]
      print(roll,name,marks)
except:
   print('Error:Unable to fetch data.')
mysqldb.close()#Connection Close

ubuntu@ubunu2004:~$ python3 display_db.py
1 Sarfaraj 80
2 Kumar 89
3 Sohan 90
ubuntu@ubunu2004:~$ python3 update.py
Record updated successfully…
ubuntu@ubunu2004:~$ python3 display_db.py
1 Ramu 100
2 Kumar 89
3 Sohan 90
ubuntu@ubunu2004:~$ python3 delete.py
Record deteted successfully…
ubuntu@ubunu2004:~$ python3 display_db.py
1 Ramu 100
2 Kumar 89

NOTE:

  1. if you cannot connect to MySQL from remote, you need update the binding port:
    sudo vi /etc/mysql/mysql.conf.d/mysqld.cnf
    from:
    bind-address = 127.0.0.1
    change to:
    bind-address = 0.0.0.0
    then restart MySQL
    sudo systemctl restart mysql.service
  2. if you got error msg:
    mysql.connector.errors.DatabaseError: 1130: Host ‘192.168.0.28’ is not allowed to connect to this MySQL server
    root is NOT allowed login from remote, you can create a new user and grant PRIVILEGES:
    mysql> CREATE USER ‘monty’@’%’ IDENTIFIED BY ‘somIUpass#98’;
    mysql> GRANT ALL PRIVILEGES ON . TO ‘monty’@’%’ WITH GRANT OPTION;
    then you can query from remote with this ID:
    C:\Users\zhuby\python_code>python display_db.py
    1 Ramu 100
    2 Kumar 89
Flask-RESTful API develop

We need install flask-restful first: pip install flask-restful. then develop api.py:

from flask import Flask
from flask_restful import reqparse, abort, Api, Resource

app = Flask(__name__)
api = Api(app)

TODOS = {
    'todo1': {'task': 'build an API'},
    'todo2': {'task': '?????'},
    'todo3': {'task': 'profit!'},
}


def abort_if_todo_doesnt_exist(todo_id):
    if todo_id not in TODOS:
        abort(404, message="Todo {} doesn't exist".format(todo_id))

parser = reqparse.RequestParser()
parser.add_argument('task')

# shows a single todo item and lets you delete a todo item
class Todo(Resource):
    def get(self, todo_id):
        abort_if_todo_doesnt_exist(todo_id)
        return TODOS[todo_id]

    def delete(self, todo_id):
        abort_if_todo_doesnt_exist(todo_id)
        del TODOS[todo_id]
        return '', 204

    def put(self, todo_id):
        args = parser.parse_args()
        task = {'task': args['task']}
        TODOS[todo_id] = task
        return task, 201


# TodoList
# shows a list of all todos, and lets you POST to add new tasks
class TodoList(Resource):
    def get(self):
        return TODOS

    def post(self):
        args = parser.parse_args()
        todo_id = int(max(TODOS.keys()).lstrip('todo')) + 1
        todo_id = 'todo%i' % todo_id
        TODOS[todo_id] = {'task': args['task']}
        return TODOS[todo_id], 201

##
## Actually setup the Api resource routing here
##
api.add_resource(TodoList, '/todos')
api.add_resource(Todo, '/todos/<todo_id>')


if __name__ == '__main__':
    app.run(debug=True)
$ python api.py 
* Running on http://127.0.0.1:5000/ * Restarting with reloader
GET the list
$ curl http://localhost:5000/todos 
GET a single task
$ curl http://localhost:5000/todos/todo3
DELETE a task
$ curl http://localhost:5000/todos/todo2 -X DELETE -v
Add a new task
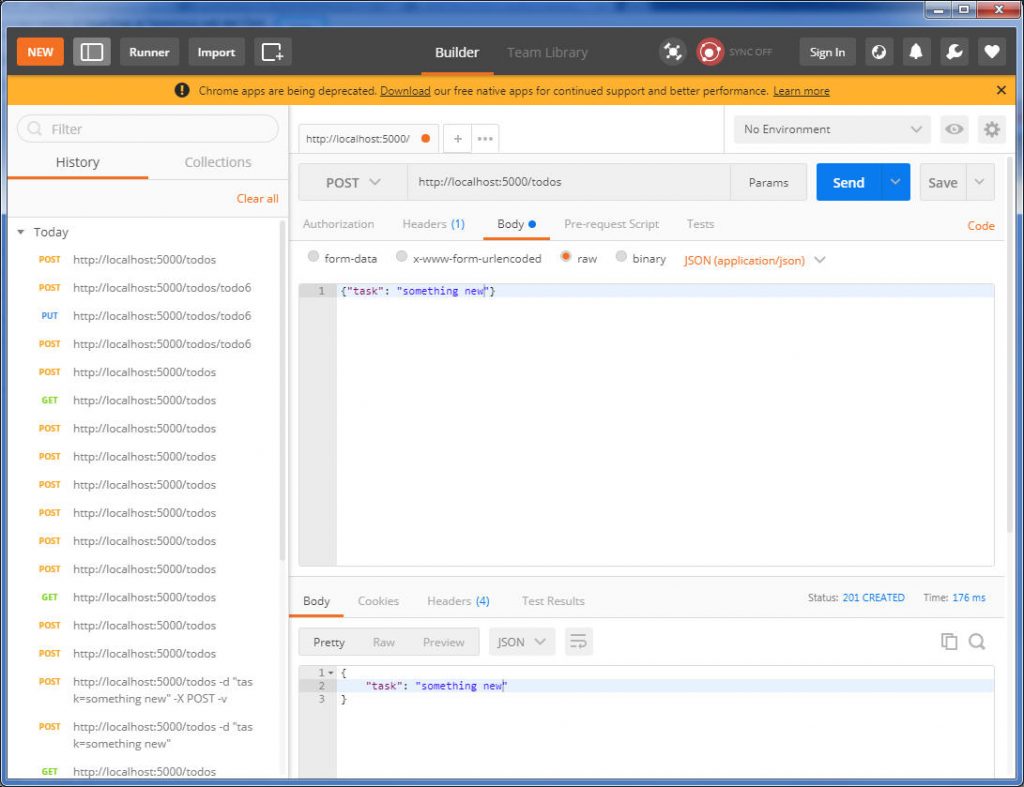
$ curl http://localhost:5000/todos -d "task=something new" -X POST -v
Update a task
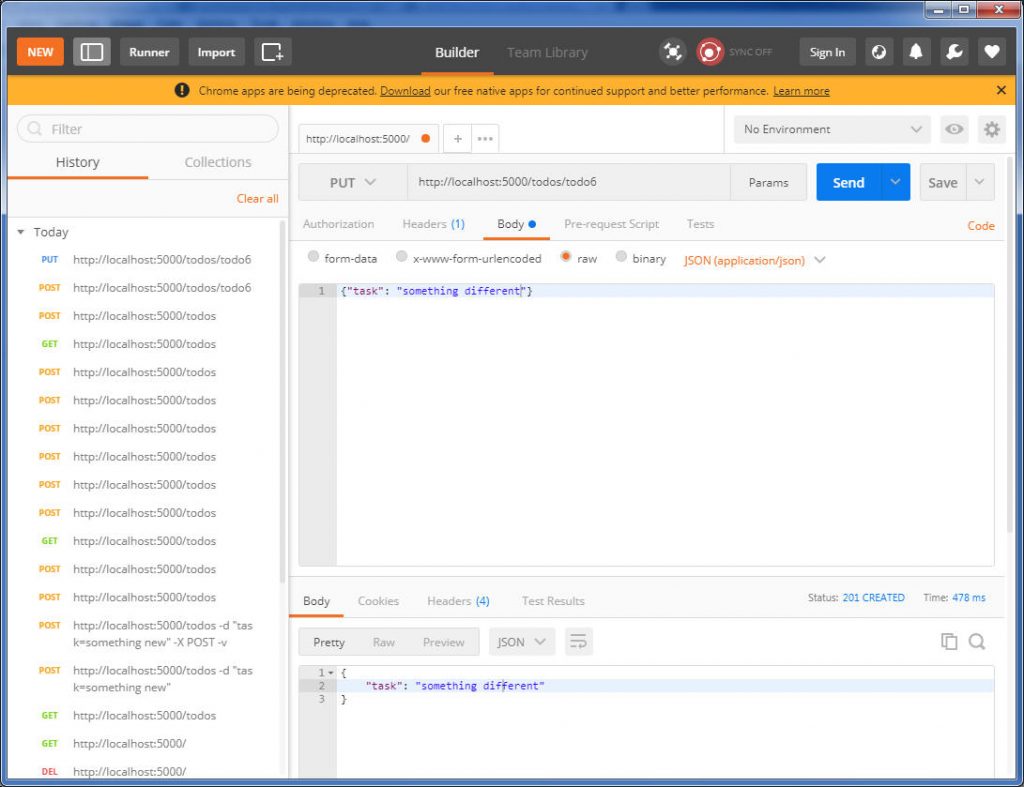
$ curl http://localhost:5000/todos/todo3 -d "task=something different" -X PUT -v
Or you can do same thing in Postman, POST to add new task and PUT to update a task.