install OpenLDAP Server and LDAP Account Manager on Ubuntu 20.04

Step 1: install OpenLDAP Server
sudo apt update
sudo apt -y install slapd ldap-utils
During the installation, you’ll be prompted to set LDAP admin password.
You can confirm that your installation was successful using the commandslapcat to output SLAPD database contents:

root@ubunu2004:~# slapcat
dn: dc=linuxvmimagrs,dc=local
objectClass: top
objectClass: dcObject
objectClass: organization
o: linuxvmimagrs.local
dc: linuxvmimagrs
structuralObjectClass: organization
entryUUID: a95871c2-5a53-103a-961d-11b344dacd95
creatorsName: cn=admin,dc=linuxvmimagrs,dc=local
createTimestamp: 20200714192629Z
entryCSN: 20200714192629.414835Z#000000#000#000000
modifiersName: cn=admin,dc=linuxvmimagrs,dc=local
modifyTimestamp: 20200714192629Z
dn: cn=admin,dc=linuxvmimagrs,dc=local
objectClass: simpleSecurityObject
objectClass: organizationalRole
cn: admin
description: LDAP administrator

Step 2: Add base dn for Users and Groups
Create a file named basedn.ldif with below contents:

dn: ou=people,dc=linuxvmimagrs,dc=local
objectClass: organizationalUnit
ou: people

dn: ou=groups,dc=linuxvmimagrs,dc=local
objectClass: organizationalUnit
ou: groups

Now add the file by running the command:
ldapadd -x -D cn=admin,dc=linuxvmimagrs,dc=local -W -f basedn.ldif
Step 3: Add User Accounts and Groups

root@ubunu2004:~# slappasswd
New password:
Re-enter new password:
{SSHA}QCjJfk3CTNWJayd0UJrN7Hf+A/rpwquD

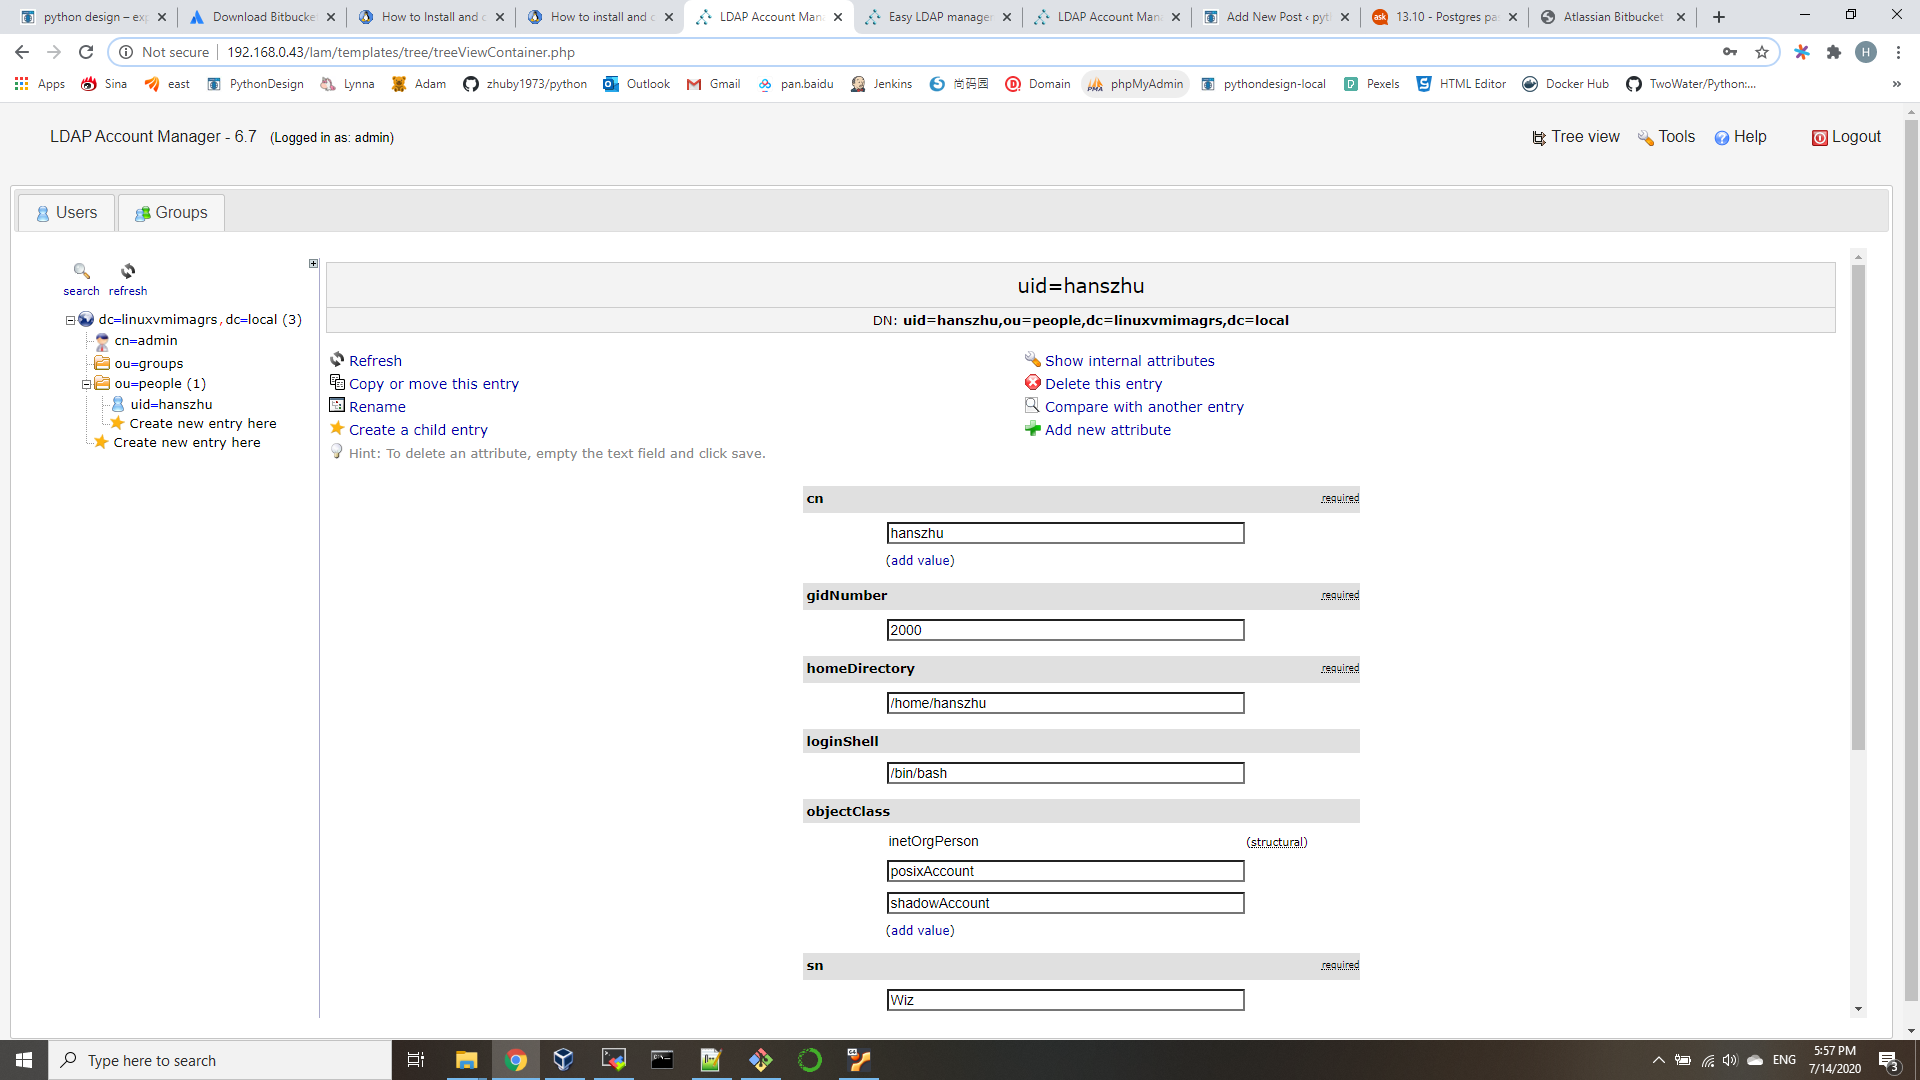
Create user.ldif file for adding users:

dn: uid=hanszhu,ou=people,dc=linuxvmimagrs,dc=local
objectClass: inetOrgPerson
objectClass: posixAccount
objectClass: shadowAccount
cn: hanszhu
sn: Wiz
userPassword: {SSHA}QCjJfk3CTNWJayd0UJrN7Hf+A/rpwquD
loginShell: /bin/bash
uidNumber: 2000
gidNumber: 2000
homeDirectory: /home/hanszhu

add account by running:
ldapadd -x -D cn=admin,dc=linuxvmimagrs,dc=local -W -f user.ldif
Step 4: Install LDAP Account Manager
we need PHP and Apache web server for LDAP Account Manager.
sudo apt -y install ldap-account-manager
review /etc/apache2/conf-enabled/ldap-account-manager.conf
sudo systemctl restart apache2
Step 5: Configure LDAP Account Manager
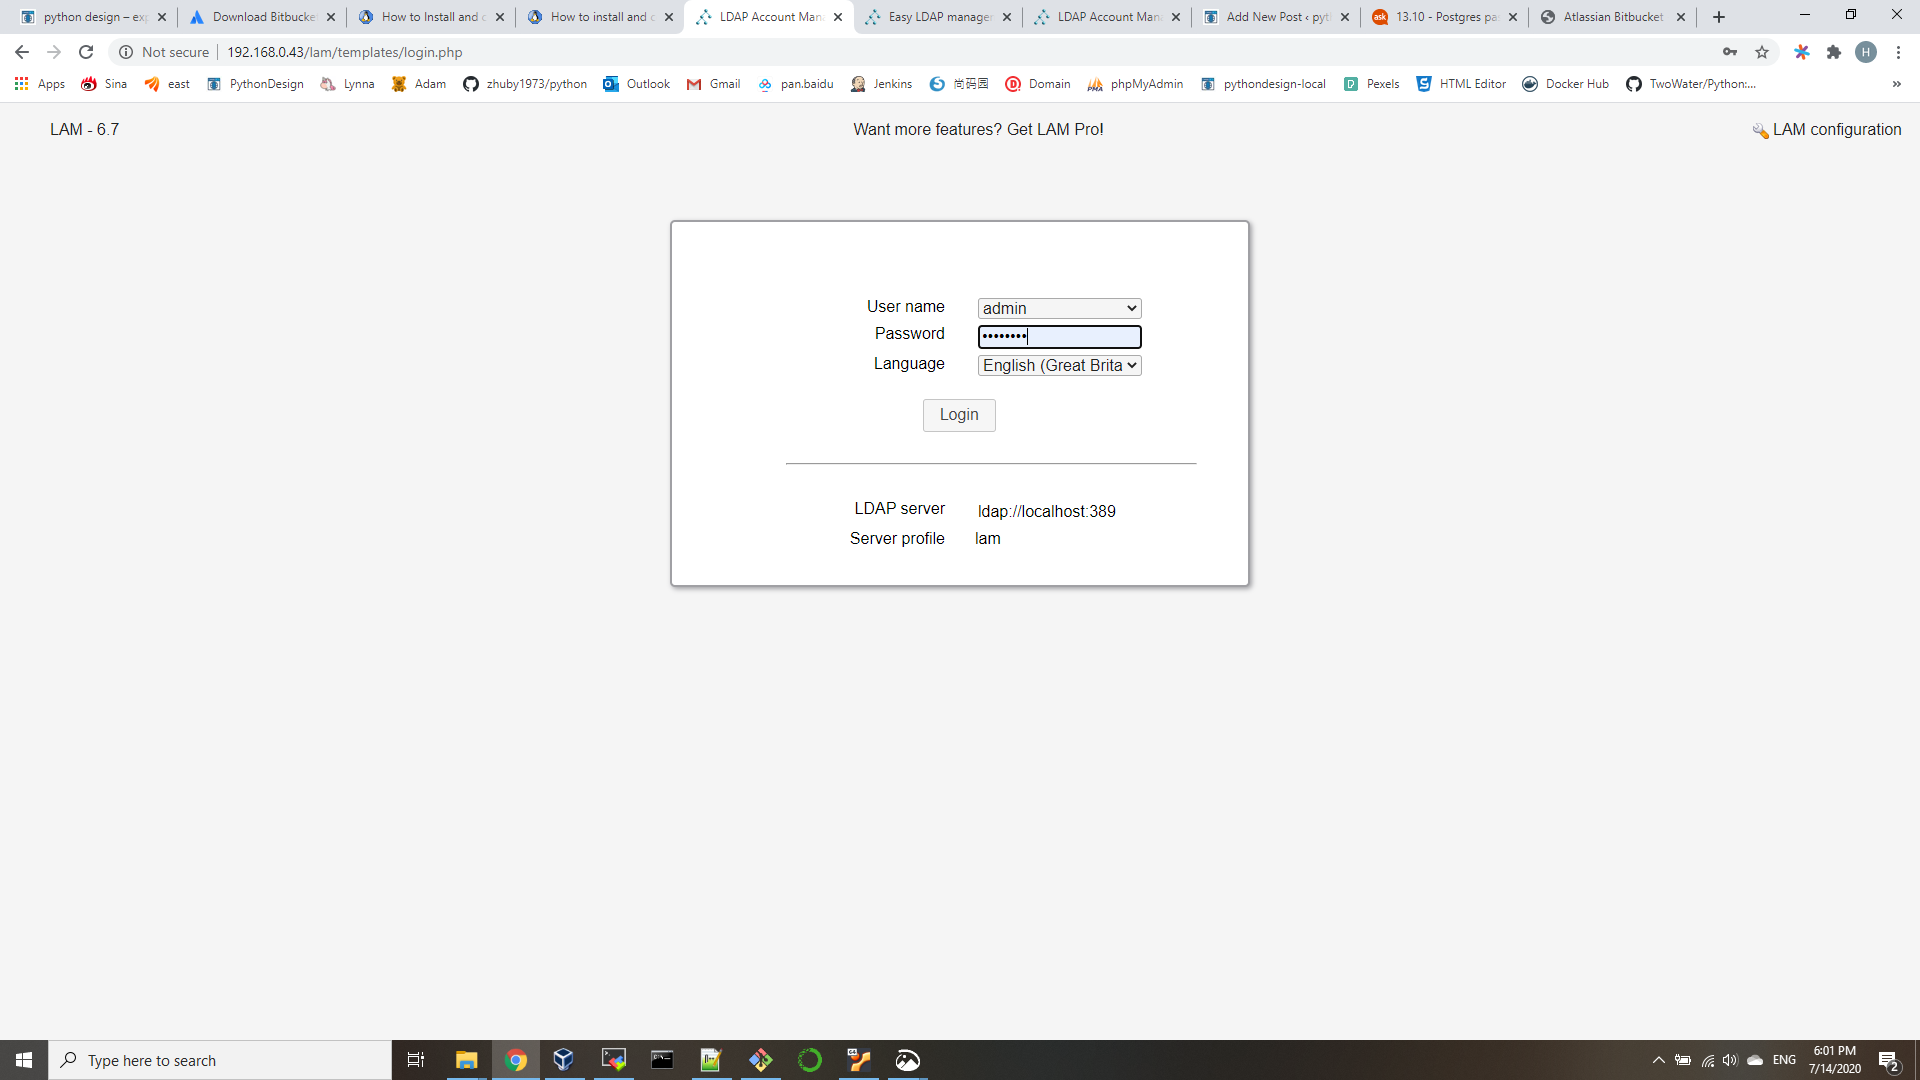
open http://192.168.0.43/lam
We need to set our LDAP server profile by clicking on[LAM configuration] at the upper right corner. default password is lam.

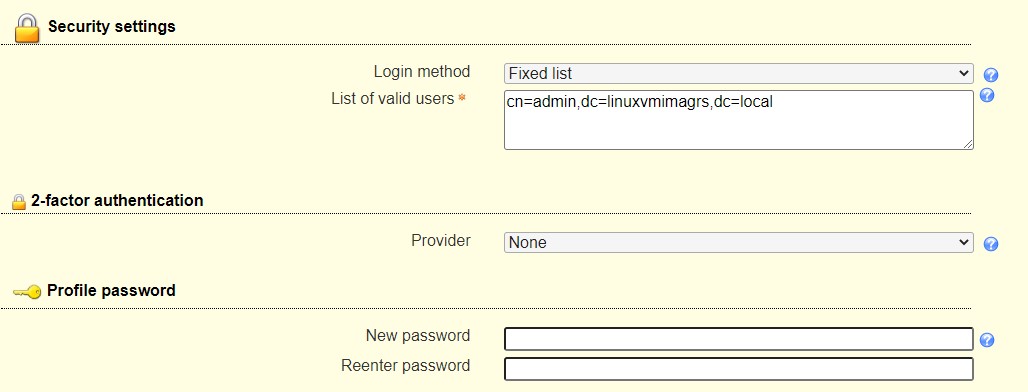
then you can save and logon lam with your LDAP admin ID:

Bitbucket 7.4.0 – Installation on Ubuntu 20.04

  1. java 11 installation
    sudo apt-get install openjdk-11-jre
  2. download Bitbucket 7.4.0 tar.gz file and install
    download atlassian-bitbucket-7.4.0.tar.gz from https://www.atlassian.com/software/bitbucket/download
    tar -zxvf atlassian-bitbucket-7.4.0.tar.gz -C /opt
    ln -s /opt/atlassian-bitbucket-7.4.0 /opt/bitbucket
    mkdir /opt/bitbucket-home
    export JAVA_HOME=/usr/lib/jvm/java-11-openjdk-amd64
    (or edit /opt/bitbucket/bin/set-jre-home.sh)
    export BITBUCKET_HOME=/opt/bitbucket-home
    (or edit /opt/bitbucket/bin/set-bitbucket-home.sh )
  3. start Bitbucket
    root@ubunu2004:/opt/bitbucket/bin# ./start-bitbucket.sh –no-search
    Starting Atlassian Bitbucket as the current user
    Sarting Bitbucket webapp at http://localhost:7990
    The Bitbucket webapp has been started.
    root@ubunu2004:/opt/bitbucket/bin# netstat -an|grep 7990
    tcp6 0 0 :::7990 :::* LISTEN
    now you can open http://192.168.0.43:7990/ continue setup:


    then we can create project ITS and repository python:
    test it with git clone command:
    $ git clone http://192.168.0.43:7990/scm/its/python.git

We can integrate with LDAP and Web server later.
Connect Bitbucket Server to a user directory:
https://confluence.atlassian.com/bitbucketserver/external-user-directories-776640394.html
Proxy and secure Bitbucket Server:
https://confluence.atlassian.com/bitbucketserver/bitbucket-server-home-directory-776640890.html

Jira – Installation on Ubuntu 20.04

  1. Java Installation
    find java home directory:
    update-alternatives –config java
    export JAVA_HOME=/usr/lib/jvm/java-11-openjdk-amd64
  2. Postgresql Installation on Ubuntu
    http://pythondesign.ca/2020/07/14/install-postgresql-on-ubuntu-20-04/
  3. Downlaod and install JIRA 8.5
    wget https://product-downloads.atlassian.com/software/jira/downloads/atlassian-jira-core-8.5.0.tar.gz
    tar -zxvf atlassian-jira-core-8.5.0.tar.gz -C /opt
    ln -s /opt/atlassian-jira-core-8.5.0-standalone /opt/jira
    mkdir /opt/jira-home
    chmod 700 /opt/jira -R
    chmod 700 /opt/jira-home -R
    export JIRA_HOME=/opt/jira-home
  4. Start the Jira server and setup
    /opt/jira/bin/start-jira.sh
    open http://192.168.0.43:8080 to start JIRA setup
    choose "I’ll set it up myself" on first page, then input Postgresql DB info:


    click default for other pages, then you will get WelcomeToJIRA:

install PostgreSQL on Ubuntu 20.04

Step 1 — Installing PostgreSQL
sudo apt update
sudo apt install postgresql postgresql-contrib
Step 2 — Create PostgreSQL Roles and Databases
we will create OS user jiradb, postgresql role jiradb and database jiradb!
A. with root add OS user: adduser jiradb
B. add postgresql role:
root@ubunu2004:/opt/jira/lib# sudo -i -u postgres
postgres@ubunu2004:~$ createuser –interactive
Enter name of role to add: jiradb
Shall the new role be a superuser? (y/n) y
C. create db:
postgres@ubunu2004:~$ createdb -E UNICODE -l C -T template0 jiradb
postgres@ubunu2004:~$ psql
postgres=# GRANT ALL PRIVILEGES ON DATABASE jiradb TO jiradb
postgres-# \q
Step 3 — Test the connection
postgres@ubunu2004:~$ psql -U jiradb -h localhost -W
Password:
psql (12.2 (Ubuntu 12.2-4))
SSL connection (protocol: TLSv1.3, cipher: TLS_AES_256_GCM_SHA384, bits: 256, compression: off)
Type "help" for help.
jiradb=# \z

NOTE:
You can now start the database server using:
pg_ctlcluster 12 main start
Data directory: /var/lib/postgresql/12/main
Log file: /var/log/postgresql/postgresql-12-main.log
Port: 5432

MapReduce Tutorial with sample code WordCount.java

  1. git pull https://github.com/zhuby1973/python/blob/master/WordCount.java to hadoop VM
  2. add environment variables:
    export PATH=${JAVA_HOME}/bin:${PATH}
    export HADOOP_CLASSPATH=${JAVA_HOME}/lib/tools.jar
  3. compile
    $ hadoop com.sun.tools.javac.Main WordCount.java
    $ jar cf wc.jar WordCount*.class
  4. create input directory in HDFS
    hdfs dfs -mkdir /wordcount
    hdfs dfs -mkdir /wordcount/input
    echo "Hello World Bye World" > file01
    echo "Hello Hadoop Goodbye Hadoop" > file02
    hadoop fs -put file0* /wordcount/input
    hadoop fs -ls /wordcount/input
    hadoop fs -cat /wordcount/input/file01
  5. edit "~/hadoop-3.1.3/etc/hadoop/yarn-site.xml" as below:
<configuration>
  <property>
   <name>mapreduceyarn.nodemanager.aux-services</name>
   <value>mapreduce_shuffle</value>
  </property>
  <property>
    <name>yarn.nodemanager.aux-services</name>
    <value>mapreduce_shuffle</value>
  </property>
  <property>
    <name>yarn.nodemanager.aux-services.mapreduce_shuffle.class</name>
    <value>org.apache.hadoop.mapred.ShuffleHandler</value>
  </property>
  <property>
    <name>yarn.nodemanager.vmem-check-enabled</name>
    <value>false</value>
  </property>
</configuration>
  1. edit ~/hadoop-3.1.3/etc/hadoop/mapred-site.xml as below:
<configuration>
 <property>
   <name>mapreduce.framework.name</name>
   <value>yarn</value>
 </property>
 <property>
   <name>yarn.app.mapreduce.am.env</name>
   <value>HADOOP_MAPRED_HOME=${HADOOP_HOME}</value>
 </property>
 <property>
   <name>mapreduce.map.env</name>
   <value>HADOOP_MAPRED_HOME=${HADOOP_HOME}</value>
 </property>
 <property>
   <name>mapreduce.reduce.env</name>
   <value>HADOOP_MAPRED_HOME=${HADOOP_HOME}</value>
 </property>
 <property>
   <name>yarn.app.mapreduce.am.env</name>
   <value>HADOOP_MAPRED_HOME=${HADOOP_HOME}</value>
 </property>
 <property>
   <name>mapreduce.map.env</name>
   <value>HADOOP_MAPRED_HOME=${HADOOP_HOME}</value>
 </property>
 <property>
   <name>mapreduce.reduce.env</name>
   <value>HADOOP_MAPRED_HOME=${HADOOP_HOME}</value>
 </property>
</configuration>

you need stop-all.sh and start-all.sh to restart hadoop after changes.

  1. Run the application:
    $ hadoop jar wc.jar WordCount /wordcount/input /wordcount/output
    verify the output:
    hadoop@ubunu2004:~$ hadoop fs -ls /wordcount/output
    Found 2 items
    -rw-r–r– 1 hadoop supergroup 0 2020-07-13 13:34 /wordcount/output/_SUCCESS
    -rw-r–r– 1 hadoop supergroup 41 2020-07-13 13:34 /wordcount/output/part-r-00000
    you need delete /wordcount/output if you need run it again:
    hadoop fs -rm -r -f /wordcount/output

Ubuntu 20.04 Hadoop

  1. Create user for Hadoop environment
    $ sudo adduser hadoop
  2. Install the Java prerequisite
    $ sudo apt update
    $ sudo apt install openjdk-8-jdk openjdk-8-jre
  3. Configure passwordless SSH
    $ sudo apt install openssh-server openssh-client
    $ su hadoop
    $ ssh-keygen -t rsa
    $ cat ~/.ssh/id_rsa.pub >> ~/.ssh/authorized_keys
    You can make sure that the configuration was successful by SSHing into localhost. If you are able to do it without being prompted for a password, you’re good to go.
  4. Install Hadoop and configure related XML files
    Head over to Apache’s website to download Hadoop.
    $ wget https://downloads.apache.org/hadoop/common/hadoop-3.1.3/hadoop-3.1.3.tar.gz
    $ tar -xzvf hadoop-3.1.3.tar.gz -C /home/hadoop
    4.1. Setting up the environment variable
    add below lines into ~/.bashrc
    export HADOOP_HOME=/home/hadoop/hadoop-3.1.3
    export HADOOP_INSTALL=$HADOOP_HOME
    export HADOOP_MAPRED_HOME=$HADOOP_HOME
    export HADOOP_COMMON_HOME=$HADOOP_HOME
    export HADOOP_HDFS_HOME=$HADOOP_HOME
    export YARN_HOME=$HADOOP_HOME
    export HADOOP_COMMON_LIB_NATIVE_DIR=$HADOOP_HOME/lib/native
    export PATH=$PATH:$HADOOP_HOME/sbin:$HADOOP_HOME/bin
    export HADOOP_OPTS="-Djava.library.path=$HADOOP_HOME/lib/native"
    Source the .bashrc file in current login session:
    $ source ~/.bashrc
    vi ~/hadoop-3.1.3/etc/hadoop/hadoop-env.sh
    add below to the end:
    export JAVA_HOME=/usr/lib/jvm/java-8-openjdk-amd64
    4.2. Configuration changes in core-site.xml file
    mkdir ~/hadooptmpdata
    vi ~/hadoop-3.1.3/etc/hadoop/core-site.xml
<configuration>
 <property>
   <name>fs.defaultFS</name>
   <value>hdfs://localhost:9000</value>
 </property>
 <property>
   <name>hadoop.tmp.dir</name>
   <value>/home/hadoop/hadooptmpdata</value>
 </property>
</configuration>

4.3. Configuration changes in hdfs-site.xml file
$ mkdir -p ~/hdfs/namenode ~/hdfs/datanode
vi ~/hadoop-3.1.3/etc/hadoop/hdfs-site.xml

<configuration>
 <property>
   <name>dfs.replication</name>
   <value>1</value>
 </property>
 <property>
   <name>dfs.name.dir</name>
   <value>file:///home/hadoop/hdfs/namenode</value>
 </property>
 <property>
   <name>dfs.data.dir</name>
   <value>file:///home/hadoop/hdfs/datanode</value>
 </property>
</configuration>

4.4. Configuration changes in mapred-site.xml file
vi ~/hadoop-3.1.3/etc/hadoop/mapred-site.xml

<configuration>
 <property>
   <name>mapreduce.framework.name</name>
   <value>yarn</value>
 </property>
</configuration>

4.5. Configuration changes in yarn-site.xml file
vi ~/hadoop-3.1.3/etc/hadoop/yarn-site.xml

<configuration>
 <property>
   <name>mapreduceyarn.nodemanager.aux-services</name>
   <value>mapreduce_shuffle</value>
 </property>
</configuration>
  1. Starting the Hadoop cluster
    Before using the cluster for the first time, we need to format the namenode. You can do that with the following command:
    $ hdfs namenode -format
    Next, start the HDFS by using the start-dfs.sh script:
    $ start-dfs.sh
    Now, start the YARN services via the start-yarn.sh script:
    $ start-yarn.sh
    To verify all the Hadoop services/daemons are started successfully you can use the jps command.
    hadoop@ubunu2004:~$ jps
    10898 NodeManager
    12850 Jps
    10342 DataNode
    10761 ResourceManager
    10525 SecondaryNameNode
    10223 NameNode
    hadoop@ubunu2004:~$ hadoop version
    Hadoop 3.1.3
  2. HDFS Command Line Interface
    $ hdfs dfs -mkdir /test
    $ hdfs dfs -mkdir /hadooponubuntu
    $ hdfs dfs -ls /
  3. Access the Namenode and YARN from browser
    http://192.168.0.43:9870/

http://192.168.0.43:8088/

  1. Conclusion
    In this article, we saw how to install Hadoop on a single node cluster in Ubuntu 20.04 Focal Fossa. Hadoop provides us a wieldy solution to dealing with big data, enabling us to utilize clusters for storage and processing of our data. It makes our life easier when working with large sets of data with its flexible configuration and convenient web interface.

create a new repository on github and push files on the command line

  1. create a new repository on github first, like https://github.com/zhuby1973/play.git
  2. remove old git info on local:
    sudo rm -rf .git
  3. init and push files:
    git init
    git add .
    git commit -m "first commit"
    git remote add origin https://github.com/zhuby1973/play.git
    git push -u origin master
  4. some commands might help to check and verify:
    git remote -v
    git remote rm origin
    git remote set-url origin https://github.com/zhuby1973/play.git

push docker-compose images to Docker Hub

root@ubunu2004:~# docker-compose build
website uses an image, skipping
Building product-service
Step 1/3 : FROM python:3-onbuild
Executing 3 build triggers
—> Using cache
—> Using cache
—> b54600ebce6f
Step 2/3 : COPY . /usr/src/app
—> e49923648a44
Step 3/3 : CMD ["python", "api.py"]
—> Running in 3314ea5a2d0c
Removing intermediate container 3314ea5a2d0c
—> fc3e3c31fadc
Successfully built fc3e3c31fadc
Successfully tagged root_product-service:latest

root@ubunu2004:~# docker images
REPOSITORY TAG IMAGE ID CREATED SIZE
root_product-service latest fc3e3c31fadc 31 seconds ago 701MB
root@ubunu2004:~# docker tag root_product-service:latest zhuby1973/product-service:1
root@ubunu2004:~# docker push zhuby1973/product-service:1

Docker compose tutorial

  1. install docker-compose
    apt install docker-compose
  2. create two dir: Product and website and files as below:
    root@ubunu2004:~/tmp# tree
    .
    ├── docker-compose.yml
    ├── Product
    │   ├── api.py
    │   ├── Dockerfile
    │   └── requirements.txt
    └── website
    └── index.php

    root@ubunu2004:~/Product# cat api.py
    from flask import Flask
    from flask_restful import Resource, Api
    app = Flask(__name__)
    api = Api(app)
    class Product(Resource):
    def get(self):
        return {
            'products': ['Ice cream',
                        'Chocolate',
                        'Eggs',
                        'Fruit']
        }
    api.add_resource(Product, '/')
    if __name__ == '__main__':
    app.run(host='0.0.0.0', port=80, debug=True)
    root@ubunu2004:~/Product# cat requirements.txt
    Flask==0.12
    flask-restful==0.3.5
    root@ubunu2004:~/Product# cat Dockerfile
    FROM python:3-onbuild
    COPY . /usr/src/app
    CMD ["python", "api.py"]
    root@ubunu2004:~/tmp/website# cat index.php
    <html>
    <head>
        <title>My Shop</title>
    </head>
    
    <body>
        <h1>Welcome to my shop</h1>
        <ul>
            <?php
                $json = file_get_contents('http://product-service');
                $obj = json_decode($json);
                $products = $obj->products;
                foreach ($products as $product) {
                    echo "<li>$product</li>";
                }
            ?>
        </ul>
    </body>
    </html>

    create docker-compose.yml:

    version: '3'
    services:
    product-service:
    build: ./Product
    volumes:
      - ./Product:/usr/src/app
    ports:
      - 5001:80
    website:
    image: php:apache
    volumes:
      - ./website:/var/www/html
    ports:
      - 5000:80
    depends_on:
      - product-service

then we can start it:
docker-compose up
or start/stop as daemon:
root@ubunu2004:~# docker-compose up -d
Starting root_product-service_1 … done
Starting root_website_1 … done
root@ubunu2004:~# docker-compose stop
Stopping root_website_1 … done
Stopping root_product-service_1 … done

verify the app on http://192.168.0.43:5000/

Docker images and container cleanup

Stop and remove all containers:
docker stop $(docker ps -a -q)
docker rm $(docker ps -a -q)
Remove containers according to a pattern:
docker ps -a | grep "pattern" | awk ‘{print $3}’ | xargs docker rmi
Remove one or more specific images:
docker rmi Image Image
Purging All Unused or Dangling Images, Containers, Volumes, and Networks
docker system prune -a
REF:
https://www.digitalocean.com/community/tutorials/how-to-remove-docker-images-containers-and-volumes

pull and start an image:
docker pull zhuby1973/php:1
docker run -p 82:80 zhuby1973/php:1
you can run it as daemon with -d option:
docker run -d -p 82:80 zhuby1973/php:1