install SaltStack on Ubuntu20

On Salt Master Server

  1. Run the following command to import the SaltStack repository key:
    wget -O – https://repo.saltstack.com/py3/ubuntu/20.04/amd64/latest/SALTSTACK-GPG-KEY.pub | sudo apt-key add –
  2. edit /etc/apt/sources.list.d/saltstack.list:
    deb [arch=amd64] http://repo.saltstack.com/py3/ubuntu/20.04/amd64/latest focal main
  3. Run sudo apt-get update
  4. Install the salt-master and other Salt components:
    apt -y install salt-api salt-cloud salt-master salt-ssh salt-syndic
  5. vi /etc/salt/master
    interface: 192.168.0.43 (Salt Master Server IP)
  6. systemctl restart salt-master.service
  7. root@ubunu2004:~# salt-key -F master
    Local Keys:
    master.pem: 12:0f:ba:d1:d3:cd:5c:e5:52:62:34:cd:ee:b6:51:d7:f1:30:59:79:57:fe:3f:9b:b7:79:f4:1a:42:f8:3b:bc
    master.pub: a8:87:3f:ea:f3:cd:b8:4d:6b:b9:45:d7:b2:7f:77:94:bc:a1:81:66:8e:06:46:38:77:82:65:7d:58:f6:cb:97
  8. open the FireWall
    ufw allow proto tcp from any to any port 4505,4506

on Salt Minion server

  1. do same step1-3 as master server
  2. apt -y install salt-minion
  3. edit /etc/hosts:
    192.168.0.43 saltmaster salt
  4. edit /etc/salt/minion to add master_finger(same as we generated master.pub):
    master_finger: ‘a8:87:3f:ea:f3:cd:b8:4d:6b:b9:45:d7:b2:7f:77:94:bc:a1:81:66:8e:06:46:38:77:82:65:7d:58:f6:cb:97’
  5. systemctl restart salt-minion
  6. you can run below commands to debug if there is any issues:
    salt-minion -l debug
    salt-call -l debug state.apply

    List and accept key on master server

    using the following command:
    root@ubunu2004:/etc/salt# salt-key -L
    Accepted Keys:
    Denied Keys:
    Unaccepted Keys:
    ubuntumac-minion01
    Rejected Keys:
    root@ubunu2004:/etc/salt# salt-key -A
    The following keys are going to be accepted:
    Unaccepted Keys:
    ubuntumac-minion01
    Proceed? [n/Y] y
    Key for minion ubuntumac-minion01 accepted.

    Verify the Salt commands

    root@ubunu2004:/etc/salt# salt ubuntumac-minion01 test.ping
    ubuntumac-minion01:
    True
    root@ubunu2004:/etc/salt# salt ‘‘ test.version
    ubuntumac-minion01:
    3001
    root@ubunu2004:/etc/salt# salt ‘
    ‘ disk.usage
    root@ubunu2004:/etc/salt# salt ‘*’ cmd.run ‘ls -l /etc’
    root@ubunu2004:/etc/salt# mkdir -p /srv/salt/nginx/
    root@ubunu2004:/etc/salt# touch /srv/salt/vimrc
    we have file_roots defined in /etc/salt/master:

    file_roots:
    base:
    - /srv/salt

    root@ubunu2004:/etc/salt# vi /srv/salt/nginx/init.sls

    
    nginx:
    pkg.installed: []
    service.running:
    - require:
      - pkg: nginx
root@ubunu2004:/srv/salt# salt '*' state.apply nginx

verify on ubuntumac-minion01:
root@ubuntumac:/etc/salt# which nginx
/usr/sbin/nginx

another example to distribute a shell script:
```bash
install-cleanup-script:
 file:
 - managed
 - source: salt://cleanup-directories.sh
 - name: /usr/local/bin/cleanup-directories.sh
 - user: root
 - group: root
 - mode: 754

/var/www/vhost/production.website.com:
 file.directory:
   - user: root
   - group: root
   - mode: 755
   - makedirs: true

A more detailed example showing how to create a series of databases and users to access them using variables and "for" loops:

{% set DATABASE_PASS = 'our-db-password' %}
{% for DB in ['keystone','nova','cinder','glance','heat','neutron'] %}
{{ DB }}:
mysql_database:
 - present
 mysql_grants.present:
 - grant: all privileges
 - database: {{ DB }}.*
 - user: {{ DB }}
 - host: localhost
 mysql_user.present:
 - host: localhost
 - password: {{ DATABASE_PASS }}
 - connection_charset: utf8
{% endfor %}

https://repo.saltstack.com/#ubuntu
https://docs.saltstack.com/en/master/topics/tutorials/walkthrough.html
https://docs.saltstack.com/en/latest/topics/troubleshooting/minion.html

3 methods create a new database using SQLAlchemy

1. create_db.py

import sqlalchemy
from urllib import parse
engine = sqlalchemy.create_engine('mysql://zhuby:%s@192.168.0.43' % parse.unquote_plus('somIUpass#98'))
engine.execute("CREATE DATABASE TESTDB") #create db
engine.execute("USE TESTDB") # select new db

2. create_db2.py

import sqlalchemy
from urllib import parse
from sqlalchemy_utils import database_exists, create_database

engine = sqlalchemy.create_engine('mysql://zhuby:%s@192.168.0.43/EmployeeDB3' % parse.unquote_plus('somIUpass#98'))

if not database_exists(engine.url):
    create_database(engine.url)

print(database_exists(engine.url))

3. create_db3.py

from sqlalchemy import create_engine
user = 'zhuby'
password = 'somIUpass#98'
host = '192.168.0.43'
port = '3306'
db = 'NEWDB2'
# This engine just used to query for list of databases
mysql_engine = create_engine('mysql://{0}:{1}@{2}:{3}'.format(user, password, host, port))
# Query for existing databases
mysql_engine.execute("CREATE DATABASE IF NOT EXISTS {0} ".format(db))
# Go ahead and use this engine
db_engine = create_engine('mysql://{0}:{1}@{2}:{3}/{4}'.format(user, password, host, port, db))

python connect to MQServer

  1. we need install mqsdk and mqclient before install pymqi
    sudo apt install ./ibmmq-sdk_9.1.5.0_amd64.deb
    sudo apt install ./ibmmq-client_9.1.5.0_amd64.deb
    pip install pymqi
    export LD_LIBRARY_PATH=/opt/mqm/lib64:$LD_LIBRARY_PATH

  2. create qmgr, channel and LISTENER on MQ server
    https://www.ibm.com/support/knowledgecenter/SSFKSJ_7.5.0/com.ibm.mq.ins.doc/q009310_.htm
    https://dsuch.github.io/pymqi/examples.html
    create a user ID on the server that is not in the mqm group.
    useradd testid
    passwd testid
    su – mqm

    mqm@ubunu2004:~$ crtmqm QUEUE.MANAGER.1
    mqm@ubunu2004:~$ strmqm QUEUE.MANAGER.1
    mqm@ubunu2004:~$ runmqsc QUEUE.MANAGER.1
    5724-H72 (C) Copyright IBM Corp. 1994, 2020.
    Starting MQSC for queue manager QUEUE.MANAGER.1.
    AMQ8521I: Command completion and history unavailable.
    DEFINE QLOCAL (QUEUE1)
     1 : DEFINE QLOCAL (QUEUE1)
    AMQ8006I: IBM MQ queue created.
    SET AUTHREC PROFILE(QUEUE1) OBJTYPE(QUEUE) PRINCIPAL('testid') AUTHADD(PUT,GET)
     2 : SET AUTHREC PROFILE(QUEUE1) OBJTYPE(QUEUE) PRINCIPAL('testid') AUTHADD(PUT,GET)
    AMQ8862I: IBM MQ authority record set.
    SET AUTHREC OBJTYPE(QMGR) PRINCIPAL('testid') AUTHADD(CONNECT)
     3 : SET AUTHREC OBJTYPE(QMGR) PRINCIPAL('testid') AUTHADD(CONNECT)
    AMQ8862I: IBM MQ authority record set.
    DEFINE CHANNEL (CHANNEL1) CHLTYPE (SVRCONN) TRPTYPE (TCP)
     4 : DEFINE CHANNEL (CHANNEL1) CHLTYPE (SVRCONN) TRPTYPE (TCP)
    AMQ8014I: IBM MQ channel created.
    SET CHLAUTH(CHANNEL1) TYPE(ADDRESSMAP) ADDRESS('192.168.0.43') MCAUSER('testid')
     5 : SET CHLAUTH(CHANNEL1) TYPE(ADDRESSMAP) ADDRESS('192.168.0.43') MCAUSER('testid')
    AMQ8877I: IBM MQ channel authentication record set.
    DEFINE LISTENER (LISTENER1) TRPTYPE (TCP) CONTROL (QMGR) PORT (1415)
     6 : DEFINE LISTENER (LISTENER1) TRPTYPE (TCP) CONTROL (QMGR) PORT (1415)
    AMQ8626I: IBM MQ listener created.
    START LISTENER (LISTENER1)
     7 : START LISTENER (LISTENER1)
    AMQ8021I: Request to start IBM MQ listener accepted.
  3. test_mq.py

    import pymqi
    queue_manager = "QUEUE.MANAGER.1"
    channel = "CHANNEL1"
    host = "192.168.0.43"
    port = "1415"
    queue_name = 'QUEUE1'
    message = 'Hello from Python!'
    conn_info = "%s(%s)" % (host, port)
    user = 'testid'
    password = 'password'
    qmgr = pymqi.connect(queue_manager, channel, conn_info, user, password)
    queue = pymqi.Queue(qmgr, queue_name)
    queue.put(message)
    queue.close()
    qmgr.disconnect()

    (base) ubuntu@ubunu2004:~$ python test_mq.py
    then you can verify it with amqsget:

    mqm@ubunu2004:/opt/mqm/samp/bin$ ./amqsget QUEUE1 QUEUE.MANAGER.1
    Sample AMQSGET0 start
    message <Hello from Python!>
    no more messages
    Sample AMQSGET0 end

install IBM MQ 9.1 on Ubuntu

  1. download IBM_MQ_9.1.5_UBUNTU_X86-64.tar.gz from IBM site and unzip it to /tmp
  2. create mqm user and group on Ubuntu:
    root@ubunu2004:/usr/lib# useradd mqm -m -s /bin/bash
    root@ubunu2004:/usr/lib# id mqm
    uid=1001(mqm) gid=1001(mqm) groups=1001(mqm)
  3. create filesystem/dir for MQ
    mkdir /var/mqm
    mkdir -p /var/mqm/errors
    mkdir -p /var/mqm/trace
    mkdir -p /var/mqm/qmgrs
    mkdir -p /var/mqm/log
    chown -R mqm:mqm /var/mqm
  4. make sure Linux already installed libgcc_s.so and libstdc++.so.6
  5. update threads-max and nofile setting for system and users
    echo 32768 > /proc/sys/kernel/threads-max
    ulimit -n 10240
    or add below lines into /etc/security/limits.conf for nofile limit:

    * soft     nproc          65535
    * hard     nproc          65535
    * soft     nofile         65535
    * hard     nofile         65535
    root soft     nproc          65535
    root hard     nproc          65535
    root soft     nofile         65535
    root hard     nofile         65535
  6. start installation with root:
    cd /tmp/MQServer/
    ./mqlicense.sh -text_only
    apt install ./ibmmq-runtime_9.1.5.0_amd64.deb
    apt install ./ibmmq-gskit_9.1.5.0_amd64.deb
    apt install ./ibmmq-server_9.1.5.0_amd64.deb

    apt install ./ibmmq-jre_9.1.5.0_amd64.deb
    apt install ./ibmmq-java_9.1.5.0_amd64.deb
    apt install ./ibmmq-explorer_9.1.5.0_amd64.deb
    apt install ./ibmmq-samples_9.1.5.0_amd64.deb
    …..
    you can install other packages if you want, but we need at least runtime, gskit and server for a MQ env.
  7. create and start qmgr with mqm ID
    su – mqm
    cd /opt/mqm/bin
    ./crtmqm -q -d MY.DEFAULT.XMIT.QUEUE -u SYSTEM.DEAD.LETTER.QUEUE SATURN.QUEUE.MANAGER
    ./strmqm SATURN.QUEUE.MANAGER
    ./endmqm SATURN.QUEUE.MANAGER
    ./dspmq -m SATURN.QUEUE.MANAGER
    mqm@ubunu2004:/opt/mqm/bin$ ./dspmq -m SATURN.QUEUE.MANAGER
    QMNAME(SATURN.QUEUE.MANAGER) STATUS(Running)
    mqm@ubunu2004:/opt/mqm/bin$ ./dltmqm qmgr1
    IBM MQ queue manager ‘qmgr1’ deleted.
  8. verify the installation with command
    you can setup your default mqm env first:
    mqm@ubunu2004:/opt/mqm/bin$ source /opt/mqm/bin/setmqenv -s
    then create a new qmgr and putmsg/getmsg:
    crtmqm QMA
    strmqm QMA
    mqm@ubunu2004:~$ runmqsc QMA
    5724-H72 (C) Copyright IBM Corp. 1994, 2020.
    Starting MQSC for queue manager QMA.
    AMQ8521I: Command completion and history unavailable.

DEFINE QLOCAL (QUEUE1)
1 : DEFINE QLOCAL (QUEUE1)
AMQ8006I: IBM MQ queue created.
DEFINE CHANNEL(channel_test) CHLTYPE(CLNTCONN) CONNAME(192.168.0.43)
3 : DEFINE CHANNEL(channel_test) CHLTYPE(CLNTCONN) CONNAME(192.168.0.43)
AMQ8014I: IBM MQ channel created.
DEFINE LISTENER(LISTENER.1414.TCP) TRPTYPE(TCP) PORT(1414)
4 : DEFINE LISTENER(LISTENER.1414.TCP) TRPTYPE(TCP) PORT(1414)
AMQ8626I: IBM MQ listener created.
START LISTENER(LISTENER.1414.TCP)
5 : START LISTENER(LISTENER.1414.TCP)
AMQ8021I: Request to start IBM MQ listener accepted.

end
2 : end
One MQSC command read.
No commands have a syntax error.
All valid MQSC commands were processed.

mqm@ubunu2004:~$ cd /opt/mqm/samp/bin

mqm@ubunu2004:/opt/mqm/samp/bin$ ./amqsput QUEUE1 QMA
Sample AMQSPUT0 start
target queue is QUEUE1
this is my test msg.
hi

Sample AMQSPUT0 end
mqm@ubunu2004:/opt/mqm/samp/bin$ ./amqsget QUEUE1 QMA
Sample AMQSGET0 start
message <this is my test msg.>
message <hi>

no more messages
Sample AMQSGET0 end

Using Flask-Script

from flask import Flask
from flask_sqlalchemy import SQLAlchemy
from flask_script import Manager
from flask_migrate import Migrate, MigrateCommand
from urllib import parse
app = Flask(__name__)
app.config['SQLALCHEMY_DATABASE_URI'] = 'mysql+pymysql://zhuby:%s@192.168.0.43/EmployeeDB' % parse.unquote_plus('somIUpass#98')

db = SQLAlchemy(app)
migrate = Migrate(app, db)

manager = Manager(app)
manager.add_command('db', MigrateCommand)

class User(db.Model):
    id = db.Column(db.Integer, primary_key=True)
    name = db.Column(db.String(128))

if __name__ == '__main__':
    manager.run()

Assuming the above script is stored in a file named manage.py, all the database migration commands can be accessed by running the script:

$ python manage.py db init
$ python manage.py db migrate
$ python manage.py db upgrade
$ python manage.py db --help

SQLAlchemy connect to MySQL when password contains special characters

When DB user password contains special characters, we can make the connection string as:
from urllib import parse
from sqlalchemy.engine import create_engine
engine = create_engine(‘postgres://user:%s@host/database’ % parse.unquote_plus(‘badpass’))
Here is an example hello.py:

import os
from flask import Flask, render_template, session, redirect, url_for, flash
from flask_bootstrap import Bootstrap
from flask_moment import Moment
from flask_wtf import FlaskForm
from wtforms import StringField, SubmitField
from wtforms.validators import DataRequired
from flask_sqlalchemy import SQLAlchemy
from urllib import parse
basedir = os.path.abspath(os.path.dirname(__file__))

app = Flask(__name__)

app.config['SQLALCHEMY_DATABASE_URI'] = 'mysql+pymysql://zhuby:%s@192.168.0.43/EmployeeDB' % parse.unquote_plus('somIUpass#98')
app.config['SQLALCHEMY_TRACK_MODIFICATIONS'] = False


bootstrap = Bootstrap(app)
moment = Moment(app)
db = SQLAlchemy(app)


class Role(db.Model):
    __tablename__ = 'roles'
    id = db.Column(db.Integer, primary_key=True)
    name = db.Column(db.String(64), unique=True)
    users = db.relationship('User', backref='role')

    def __repr__(self):
        return '<Role %r>' % self.name


class User(db.Model):
    __tablename__ = 'users'
    id = db.Column(db.Integer, primary_key=True)
    username = db.Column(db.String(64), unique=True, index=True)
    role_id = db.Column(db.Integer, db.ForeignKey('roles.id'))

    def __repr__(self):
        return '<User %r>' % self.username


class NameForm(FlaskForm):
    name = StringField('What is your name?', validators=[DataRequired()])
    submit = SubmitField('Submit')


@app.errorhandler(404)
def page_not_found(e):
    return render_template('404.html'), 404


@app.errorhandler(500)
def internal_server_error(e):
    return render_template('500.html'), 500


@app.route('/', methods=['GET', 'POST'])
def index():
    form = NameForm()
    if form.validate_on_submit():
        old_name = session.get('name')
        if old_name is not None and old_name != form.name.data:
            flash('Looks like you have changed your name!')
        session['name'] = form.name.data
        return redirect(url_for('index'))
    return render_template('index.html', form=form, name=session.get('name'))
verify the code with python commands:
(venv) C:\Users\zhuby\flasky>python
Python 3.8.3 (tags/v3.8.3:6f8c832, May 13 2020, 22:37:02) [MSC v.1924 64 bit (AMD64)] on win32
Type "help", "copyright", "credits" or "license" for more information.
>>> from hello import db
>>> db.create_all()
C:\Users\zhuby\python\flask_db_api\venv\lib\site-packages\pymysql\cursors.py:170: Warning: (3719, "'utf8' is currently an alias for the character set UTF8MB3, but will be an alias for UTF8MB4 in a future release. Please consider using UTF8MB4 in order to be unambiguous.")
  result = self._query(query)
>>> from hello import Role, User
>>> admin_role = Role(name='Admin')
>>> mod_role = Role(name='Moderator')
>>> user_role = Role(name='User')
>>> user_john = User(username='john', role=admin_role)
>>> user_susan = User(username='susan', role=user_role)
>>> db.session.add(admin_role)
>>> db.session.add(mod_role)
>>> db.session.add(user_role)
>>> db.session.add(user_john)
>>> db.session.add(user_susan)
>>> db.session.commit()
>>> print(admin_role.id)
1
>>> print(user_role.id)
3
>>> Role.query.all()
[<Role 'Admin'>, <Role 'Moderator'>, <Role 'User'>]
>>> User.query.all()
[<User 'john'>, <User 'susan'>]
>>> User.query.filter_by(role=user_role).all()
[<User 'susan'>]

Create a CRUD Restful Service API using Flask + MySQL

  1. SETTING UP ENVIRONMENT on Ubuntu20:
    (base) ubuntu@ubunu2004:~$ mkdir flaskdbexample
    (base) ubuntu@ubunu2004:~$ cd flaskdbexample
    (base) ubuntu@ubunu2004:~/flaskdbexample$ sudo apt install python3-virtualenv
    (base) ubuntu@ubunu2004:~/flaskdbexample$ virtualenv venv
    created virtual environment CPython3.8.2.final.0-64 in 805ms

(base) ubuntu@ubunu2004:~/flaskdbexample/venv/bin$ source ./activate
(venv) (base) ubuntu@ubunu2004:~$ cd flaskdbexample/
(venv) (base) ubuntu@ubunu2004:~/flaskdbexample$ pip install flask flask-sqlalchemy
(venv) (base) ubuntu@ubunu2004:~/flaskdbexample$ pip install pymysql
(venv) (base) ubuntu@ubunu2004:~/flaskdbexample$ pip install marshmallow_sqlalchemy

  1. Complete Code
    (venv) (base) ubuntu@ubunu2004:~/flaskdbexample$ vi app.py
from flask import Flask, request, jsonify, make_response
from flask_sqlalchemy import SQLAlchemy
from marshmallow_sqlalchemy import ModelSchema
from marshmallow import fields
app = Flask(__name__)

app.config['SQLALCHEMY_DATABASE_URI'] = 'mysql+pymysql://monty:password@192.168.0.43/EmployeeDB'
db = SQLAlchemy(app)

###Models####
class Product(db.Model):
    __tablename__ = "products"
    id = db.Column(db.Integer, primary_key=True)
    title = db.Column(db.String(20))
    productDescription = db.Column(db.String(100))
    productBrand = db.Column(db.String(20))
    price = db.Column(db.Integer)

    def create(self):
      db.session.add(self)
      db.session.commit()
      return self
    def __init__(self,title,productDescription,productBrand,price):
        self.title = title
        self.productDescription = productDescription
        self.productBrand = productBrand
        self.price = price
    def __repr__(self):
        return '' % self.id
db.create_all()
class ProductSchema(ModelSchema):
    class Meta(ModelSchema.Meta):
        model = Product
        sqla_session = db.session
    id = fields.Number(dump_only=True)
    title = fields.String(required=True)
    productDescription = fields.String(required=True)
    productBrand = fields.String(required=True)
    price = fields.Number(required=True)

@app.route('/products', methods = ['GET'])
def index():
    get_products = Product.query.all()
    product_schema = ProductSchema(many=True)
    products = product_schema.dump(get_products)
    return make_response(jsonify({"product": products}))
@app.route('/products/<id>', methods = ['GET'])
def get_product_by_id(id):
    get_product = Product.query.get(id)
    product_schema = ProductSchema()
    product = product_schema.dump(get_product)
    return make_response(jsonify({"product": product}))
@app.route('/products/<id>', methods = ['PUT'])
def update_product_by_id(id):
    data = request.get_json()
    get_product = Product.query.get(id)
    if data.get('title'):
        get_product.title = data['title']
    if data.get('productDescription'):
        get_product.productDescription = data['productDescription']
    if data.get('productBrand'):
        get_product.productBrand = data['productBrand']
    if data.get('price'):
        get_product.price= data['price']    
    db.session.add(get_product)
    db.session.commit()
    product_schema = ProductSchema(only=['id', 'title', 'productDescription','productBrand','price'])
    product = product_schema.dump(get_product)
    return make_response(jsonify({"product": product}))
@app.route('/products/<id>', methods = ['DELETE'])
def delete_product_by_id(id):
    get_product = Product.query.get(id)
    db.session.delete(get_product)
    db.session.commit()
    return make_response("",204)
@app.route('/products', methods = ['POST'])
def create_product():
    data = request.get_json()
    product_schema = ProductSchema()
    product = product_schema.load(data)
    result = product_schema.dump(product.create())
    return make_response(jsonify({"product": result}),200)
if __name__ == "__main__":
    app.run(debug=True)

3. testing the API
(venv) (base) ubuntu@ubunu2004:~/flaskdbexample$ flask run –host=0.0.0.0
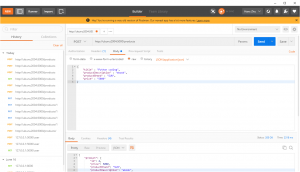
A. POST data to http://ubunu2004:5000/products
{
“title” : “Python coding”,
“productDescription” : “ebook”,
“productBrand” : “SUN”,
“price” : “5000”
}

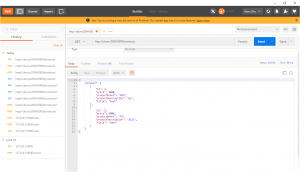
B. GET data

simple flask web app to INSERT record into MySQL

1. install flask and flask-mysqldb
pip install flask
pip install flask_mysqldb
2. mkdir flask_mysql and subfolder templates
we only need two files:
app.py and templates/index.html
3. make app works without DB:
index.html

<HTML>
<BODY bgcolor="cyan">
<form method="POST" action="">
    <center>
    <H1>Enter your details </H1> <br>
    First Name <input type = "text" name= "fname" /> <br>
    Last Name <input type = "text" name = "lname" /> <br>
    <input type = "submit">
    </center>
</form>
</BODY>
</HTML>

app.py

from flask import Flask, render_template
app = Flask(__name__)
@app.route('/', methods=['GET', 'POST'])
def index():
    return render_template('index.html')
if __name__ == '__main__':
    app.run()

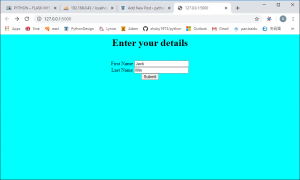
4. test app.py, you will get the web page as below:

5. then we can create table in MySQL:
CREATE TABLE MyUsers ( firstname VARCHAR(30) NOT NULL, lastname VARCHAR(30) NOT NULL);
update app.py:

from flask import Flask, render_template, request
from flask_mysqldb import MySQL
app = Flask(__name__)
app.config['MYSQL_HOST'] = '192.168.0.43'
app.config['MYSQL_USER'] = 'monty'
app.config['MYSQL_PASSWORD'] = 'somIUpass#98'
app.config['MYSQL_DB'] = 'EmployeeDB'
mysql = MySQL(app)
@app.route('/', methods=['GET', 'POST'])
def index():
    if request.method == "POST":
        details = request.form
        firstName = details['fname']
        lastName = details['lname']
        cur = mysql.connection.cursor()
        cur.execute("INSERT INTO MyUsers(firstName, lastName) VALUES (%s, %s)", (firstName, lastName))
        mysql.connection.commit()
        cur.close()
        return 'success'
    return render_template('index.html')
if __name__ == '__main__':
    app.run()

6. run it again, you can submit info into DB on http://127.0.0.1:5000/

python code debug

  1. python pdb debug
    we have sample code read_redis.py:
    import json
    import redis
    client = redis.Redis()
    data = client.lpop(‘info’)
    run it with command: python -i read_redis.py.
    once you got "exception occurred", start pdb debuggin as below:
>>> import pdb
>>> pdb.pm()
> c:\python\lib\site-packages\redis\connection.py(563)connect()
-> raise ConnectionError(self._error_message(e))
(Pdb) data
*** NameError: name 'data' is not defined
  1. VS CODE debug
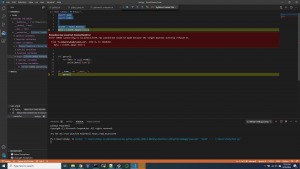
    you can press F5 to start debugging python in VS CODE as below:

Bash String Manipulation

1. Identify String Length inside Bash Shell Script
${#string}
2. Extract a Substring from a Variable inside Bash Shell Script
${string:position:length}
3. Shortest Substring Match
Following syntax deletes the shortest match of $substring from front of $string
${string#substring}
Following syntax deletes the shortest match of $substring from back of $string
${string%substring}
Following sample shell script explains the above two shortest substring match concepts.
$ cat shortest.sh
filename="bash.string.txt"
echo ${filename#.}
echo ${filename%.
}
$ ./shortest.sh
After deletion of shortest match from front: string.txt
After deletion of shortest match from back: bash.string
4. Longest Substring Match
Following syntax deletes the longest match of $substring from front of $string
${string##substring}
Following syntax deletes the longest match of $substring from back of $string
${string%%substring}
Following sample shell script explains the above two longest substring match concepts.
$ cat longest.sh
filename="bash.string.txt"
echo "After deletion of longest match from front:" ${filename##.}
echo "After deletion of longest match from back:" ${filename%%.
}
$ ./longest.sh
After deletion of longest match from front: txt
After deletion of longest match from back: bash
5. Find and Replace String Values inside Bash Shell Script
Replace only first match
${string/pattern/replacement}
It matches the pattern in the variable $string, and replace only the first match of the pattern with the replacement.
$ cat firstmatch.sh
filename="bash.string.txt"
echo "After Replacement:" ${filename/str./operations.}
$ ./firstmatch.sh
After Replacement: bash.operations.txt
Replace all the matches
${string//pattern/replacement}
It replaces all the matches of pattern with replacement.
$ cat allmatch.sh
filename="Path of the bash is /bin/bash"
echo "After Replacement:" ${filename//bash/sh}
$ ./allmatch.sh
After Replacement: Path of the sh is /bin/sh
Replace beginning and end
${string/#pattern/replacement}
Following syntax replaces with the replacement string, only when the pattern matches beginning of the $string.
${string/%pattern/replacement}
Following syntax replaces with the replacement string, only when the pattern matches at the end of the given $string.
$ cat posmatch.sh
filename="/root/admin/monitoring/process.sh"
echo "Replaced at the beginning:" ${filename/#\/root/\/tmp}
echo "Replaced at the end": ${filename/%.
/.ksh}
$ ./posmatch.sh
Replaced at the beginning: /tmp/admin/monitoring/process.sh
Replaced at the end: /root/admin/monitoring/process.ksh
6. Check if Two Strings are Equal
VAR1="Linuxize"
VAR2="Linuxize"
if [ "$VAR1" = "$VAR2" ]; then
echo "Strings are equal."
else
echo "Strings are not equal."
fi
7. Check if a String Contains a Substring
VAR=’GNU/Linux is an operating system’
if [[ $VAR == "Linux" ]]; then
echo "It’s there."
fi
Copy
8. Check if a String is Empty
VAR=”
if [[ -z $VAR ]]; then
echo "String is empty."
fi