How To Serve Flask Applications with Gunicorn and Nginx

Step 1 — Installing the Components
sudo apt install nginx python3-pip python3-dev build-essential libssl-dev libffi-dev python3-setuptools

Step 2 — Creating a Python Virtual Environment
sudo apt install python3-venv
mkdir ~/myproject
cd ~/myproject
python3 -m venv myprojectenv
source myprojectenv/bin/activate

Step 3 — Setting Up a Flask Application
pip install gunicorn flask
nano ~/myproject/myproject.py

from flask import Flask
app = Flask(__name__)

@app.route("/")
def hello():
    return "<h1 style='color:blue'>Hello There!</h1>"

if __name__ == "__main__":
    app.run(host='0.0.0.0')

Step 4 — Creating the WSGI Entry Point and Configuring Gunicorn
nano ~/myproject/wsgi.py

from myproject import app

if __name__ == "__main__":
    app.run()

cd ~/myproject
gunicorn –bind 0.0.0.0:5000 wsgi:app
then you should be able to open http://your_server_ip:5000

When you have confirmed that it’s functioning properly, press CTRL-C in your terminal window. We’re now done with our virtual environment, so we can deactivate it:
deactivate

Step 5 — Setup Gunicorn service
sudo nano /etc/systemd/system/myproject.service

[Unit]
Description=Gunicorn instance to serve myproject
After=network.target

[Service]
User=ubuntu
Group=ubuntu
WorkingDirectory=/home/ubuntu/myproject
Environment="PATH=/home/ubuntu/myproject/myprojectenv/bin"
ExecStart=/home/ubuntu/myproject/myprojectenv/bin/gunicorn --workers 3 --bind 127.0.0.1:5000 wsgi:app

[Install]
WantedBy=multi-user.target

you can start/enable it and check its status:
sudo systemctl start myproject
sudo systemctl enable myproject
sudo systemctl status myproject

Step 6 — Configuring Nginx to Proxy Requests
sudo nano /etc/nginx/sites-available/myproject

server {
    listen 80;
    server_name ubuntu2020 www.ubuntu2020.ht.home;

    location / {
        include proxy_params;
        proxy_pass http://127.0.0.1:5000;
    }
}

sudo ln -s /etc/nginx/sites-available/myproject /etc/nginx/sites-enabled
sudo nginx -t
sudo systemctl restart nginx
sudo ufw allow ‘Nginx Full’

Step 7 — Securing the Application
 Certbot provides a variety of ways to obtain SSL certificates through plugins. The Nginx plugin will take care of reconfiguring Nginx and reloading the config whenever necessary.
sudo add-apt-repository ppa:certbot/certbot
sudo apt install python-certbot-nginx
sudo certbot –nginx -d your_domain -d www.your_domain

then you can open you site with SSL https://your_domain

Inspired by:
1. How to Create a Self-signed SSL Certificate for Nginx on Ubuntu
2. How to use Flask with gevent WSGI and Gunicorn

How to find top 10 hot python projects on github

import requests

def get_data():
    base_url = 'https://api.github.com/search/repositories?q=language:python+created:%3E2019-12-31&sort=stars&order=desc&per_page=10'
    response = requests.get(base_url)
    result = response.json()
    data = {}
    for item in result['items']:
        #data[item['name']] = [item['html_url'], item['stargazers_count'], item['watchers_count'], item['forks']]
        data[item['name']] = [item['html_url']]
    return data
print(get_data())
PS C:\Users\zhuby> & python c:/Hans/hot_python_githuh.py
{'Depix': ['https://github.com/beurtschipper/Depix'], 'diagrams': ['https://github.com/mingrammer/diagrams'], 'EasyOCR': ['https://github.com/JaidedAI/EasyOCR'], 'avatarify': ['https://github.com/alievk/avatarify'], 'GHunt': 
['https://github.com/mxrch/GHunt'], 'PaddleOCR': ['https://github.com/PaddlePaddle/PaddleOCR'], 'eat_tensorflow2_in_30_days': ['https://github.com/lyhue1991/eat_tensorflow2_in_30_days'], 'yolov5': ['https://github.com/ultralytics/yolov5'], 'Bringing-Old-Photos-Back-to-Life': ['https://github.com/microsoft/Bringing-Old-Photos-Back-to-Life'], 'practical-python': ['https://github.com/dabeaz-course/practical-python']}

Convert PDF file to Speech with Text to Speech (TTS) library pyttsx3

  1. install library on Ubuntu
    sudo apt install libespeak1
    sudo apt-get install ffmpeg
    pip3 install pdfplumber
    pip3 install pyttsx3
  2. prepare the PDF file test.pdf (one page only)
WHAT language is thine, O sea?
   The language of eternal question.
What language is thy answer, O sky?
   The language of eternal silence.

3. write the python3 code read_pdf.py

import pdfplumber
pdf = pdfplumber.open("/home/ubuntu/test.pdf")
print("total pages:",len(pdf.pages))
print("-----------------------------------------")
first_page = pdf.pages[0]
print("current page:",first_page.page_number+1)
print("-----------------------------------------")

text = first_page.extract_text()
print(text)

import pyttsx3
engine = pyttsx3.init()
text = text.replace('\n','')
engine.say(text)
engine.runAndWait()

# save speech as mp3
engine.save_to_file(text, 'test.mp3')
engine.runAndWait()

4. execute the read_pdf.py, get test.mp3

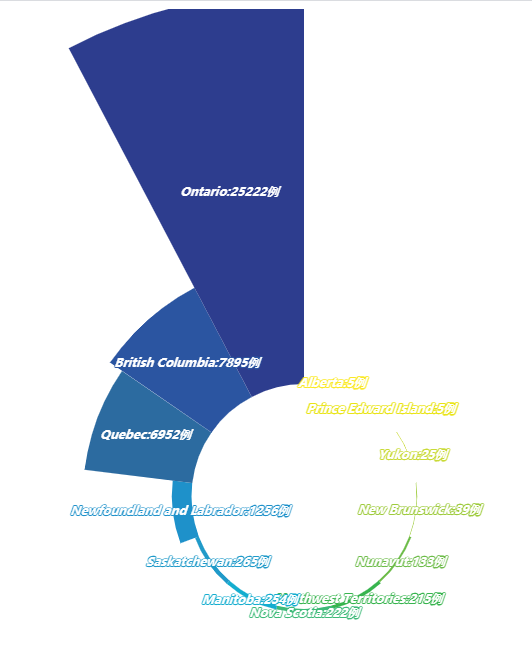
create Nightingale Rose Chart with pyecharts

  1. install python library
    pip3 install pyecharts
    pip3 install xlrd
  2. download excel data ca.xls from https://github.com/zhuby1973/geopandas
  3. write the code
import pandas as pd
from pyecharts.charts import Pie
from pyecharts import options as opts
# load data
df = pd.read_excel("ca.xls")
v = df['Province'].values.tolist()
d = df['cases'].values.tolist()
# set color
color_series = ['#FAE927','#E9E416','#C9DA36','#9ECB3C','#6DBC49',
                '#37B44E','#3DBA78','#14ADCF','#209AC9','#1E91CA',
                '#2C6BA0','#2B55A1','#2D3D8E','#44388E','#6A368B'
                '#7D3990','#A63F98','#C31C88','#D52178','#D5225B',
                '#D02C2A','#D44C2D','#F57A34','#FA8F2F','#D99D21',
                '#CF7B25','#CF7B25','#CF7B25']

pie1 = Pie(init_opts=opts.InitOpts(width='1350px', height='750px'))
pie1.set_colors(color_series)

pie1.add("", [list(z) for z in zip(v, d)],
        radius=["30%", "135%"],
        center=["50%", "65%"],
        rosetype="area"
        )
pie1.set_global_opts(title_opts=opts.TitleOpts(title='rose'),
                     legend_opts=opts.LegendOpts(is_show=False),
                     toolbox_opts=opts.ToolboxOpts())
pie1.set_series_opts(label_opts=opts.LabelOpts(is_show=True, position="inside", font_size=12,
                                               formatter="{b}:{c}例", font_style="italic",
                                               font_weight="bold", font_family="Microsoft YaHei"
                                               ),
                     )
# generate html file
pie1.render("rose.html")

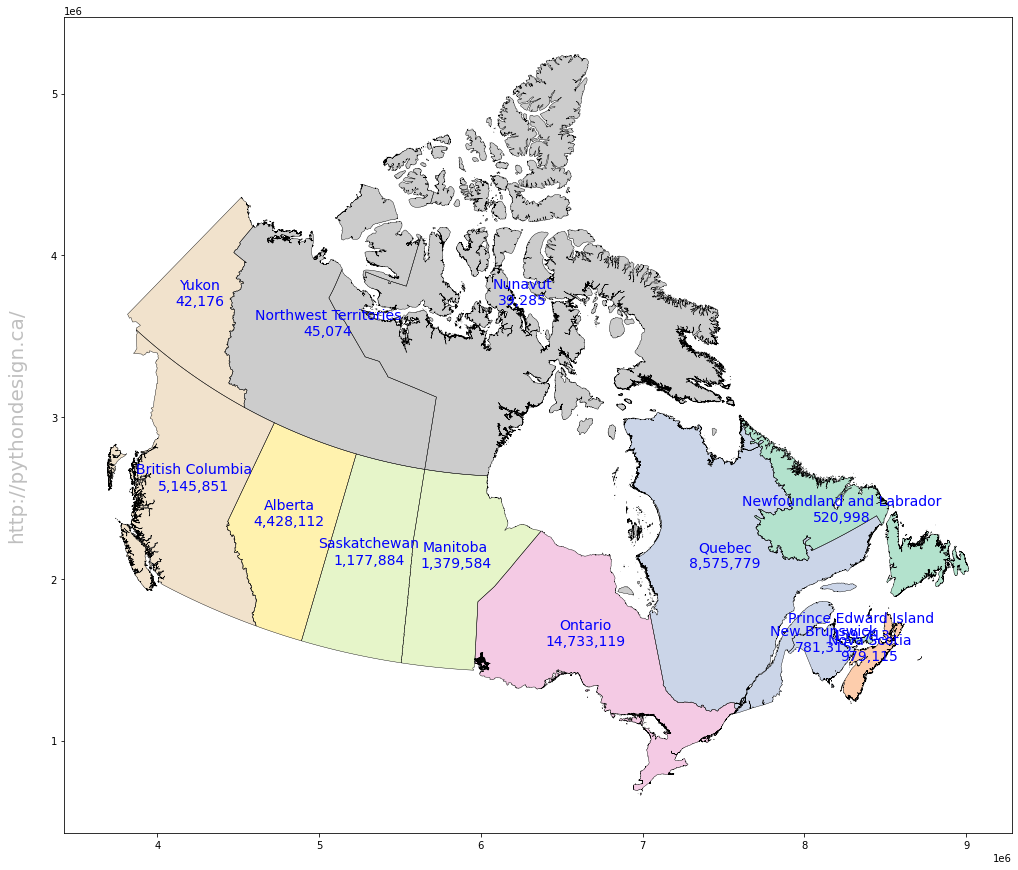
Create a Canada population map in Python using GeoPandas and Matplotlib

Step 1: Install required Python libraries

pip install descartes
pip install geopandas
pip install matplotlib
pip install numpy
pip install pandas

Step 2: Download Canada population and shapefile
you can search and Download Canada shapefile from Statistics Canada or pull it from Github(https://github.com/zhuby1973/geopandas.git)

the shapefile include 3 files, we need save it in same folder:
lpr_000b16a_e.dbf
lpr_000b16a_e.shp
lpr_000b16a_e.shx

Step 3: Begin to code

import pandas as pd
import numpy as np
import geopandas as gpd
import matplotlib.pyplot as plt

#load Canada shapefile
fp = "lpr_000b16a_e.shp"
map_df = gpd.read_file(fp)

#load Canada population csv file
province = pd.read_csv("1710000901-eng.csv", sep=",")

# join the geodataframe with the csv dataframe
merged = map_df.merge(province, how='left', left_on="PRENAME", right_on="Geography")
merged=merged.rename(index=str, columns={"PRENAME":"PRENAME", "geometry":"geometry", "Q4 2020":"population"})

# add province name and populations on map
fig = plt.figure(1, figsize=(25,15)) 
ax = fig.add_subplot()
merged.apply(lambda x: ax.annotate(text=x.PRENAME + "\n" + str(x.population), xy=x.geometry.centroid.coords[0], ha='center', fontsize=14, color='blue'), axis=1);
merged.boundary.plot(ax=ax, color='Black', linewidth=.4)
merged.plot(ax=ax, cmap='Pastel2', figsize=(12, 12))
ax.text(-0.05, 0.5, 'http://pythondesign.ca/', transform=ax.transAxes,
        fontsize=20, color='gray', alpha=0.5,
        ha='center', va='center', rotation='90')

Step 4: Execute the code to generate the map

Inspired by:
1. https://health-infobase.canada.ca/covid-19/dashboard/
2. https://jcutrer.com/python/learn-geopandas-plotting-usmaps

need fix the overlapping annotations later.

generate artistic or animated QR-Code with python MyQR

  1. pip install myqr
  2. generate common qr-code
from MyQR import myqr
myqr.run(
    words='https://www.ibm.com',
)

3. generate colorized artistic qr-code with your own png picture

from MyQR import myqr
myqr.run(
words='https://www.ibm.com',
picture='C:\Users\zhuby\panda.png',
colorized=True,
)

4. generate animated qr-code

from MyQR import myqr
myqr.run(
    words='https://www.ibm.com',
    version=5,  
    level='H', 
    picture='C:\\Users\\zhuby\\cat.gif',  
    colorized=True, 
    contrast=1.0, 
    brightness=1.0, 
    save_name='cat_qrcode.gif', #format could be .jpg .png .bmp .gif
    save_dir='C:\\Users\\zhuby',
)

asynchronous execute python app with ThreadPoolExecutor

we can launch parallel tasks with python concurrent.futures to double the speed.
here is the original code with one thread one_thread.py:

import flask
import json
import time

app = flask.Flask(__name__)

def read_file():
	time.sleep(0.1)
	return "file result"
	
def read_db():
	time.sleep(0.2)
	return "db result"
	
def read_api():
	time.sleep(0.3)
	return "api result"
	
@app.route("/")
def index():
	result_file = read_file()
	result_db = read_db()
	result_api = read_api()
	
	return json.dumps({
		"result_file": result_file,
		"result_db": result_db,
		"result_api": result_api,
	})
	
if __name__ == "__main__":
	app.run(host='0.0.0.0')

and another one multiple_threads.py

import flask
import json
import time
from concurrent.futures import ThreadPoolExecutor

app = flask.Flask(__name__)
pool = ThreadPoolExecutor()

def read_file():
	time.sleep(0.1)
	return "file result"
	
def read_db():
	time.sleep(0.2)
	return "db result"
	
def read_api():
	time.sleep(0.3)
	return "api result"
	
@app.route("/")
def index():
	result_file = pool.submit(read_file)
	result_db = pool.submit(read_db)
	result_api = pool.submit(read_api)
	
	return json.dumps({
		"result_file": result_file.result(),
		"result_db": result_db.result(),
		"result_api": result_api.result(),
	})
	
if __name__ == "__main__":
	app.run(host='0.0.0.0')

run curl command to compare the real time spend:

output from one_thread.py:
ubuntu@ubuntu2020:~$ time curl http://192.168.0.171:5000
{"result_file": "file result", "result_db": "db result", "result_api": "api result"}
real    0m0.629s
user    0m0.009s
sys     0m0.013s

output from multiple_threads.py:
ubuntu@ubuntu2020:~$ time curl http://192.168.0.171:5000
{"result_file": "file result", "result_db": "db result", "result_api": "api result"}
real    0m0.328s
user    0m0.014s
sys     0m0.010s

the real time is dropped from 629ms to 328ms with multiple threads!


generate python API testing code with postman

  1. Register on https://www.zipcodeapi.com/API to get your Application Key: 8bq9sfKQBKuI5mWg3JKFKsDdGOLaqoWXZQ6MayM3ApbQSKJ6AjmRjhxiNuRzSgki

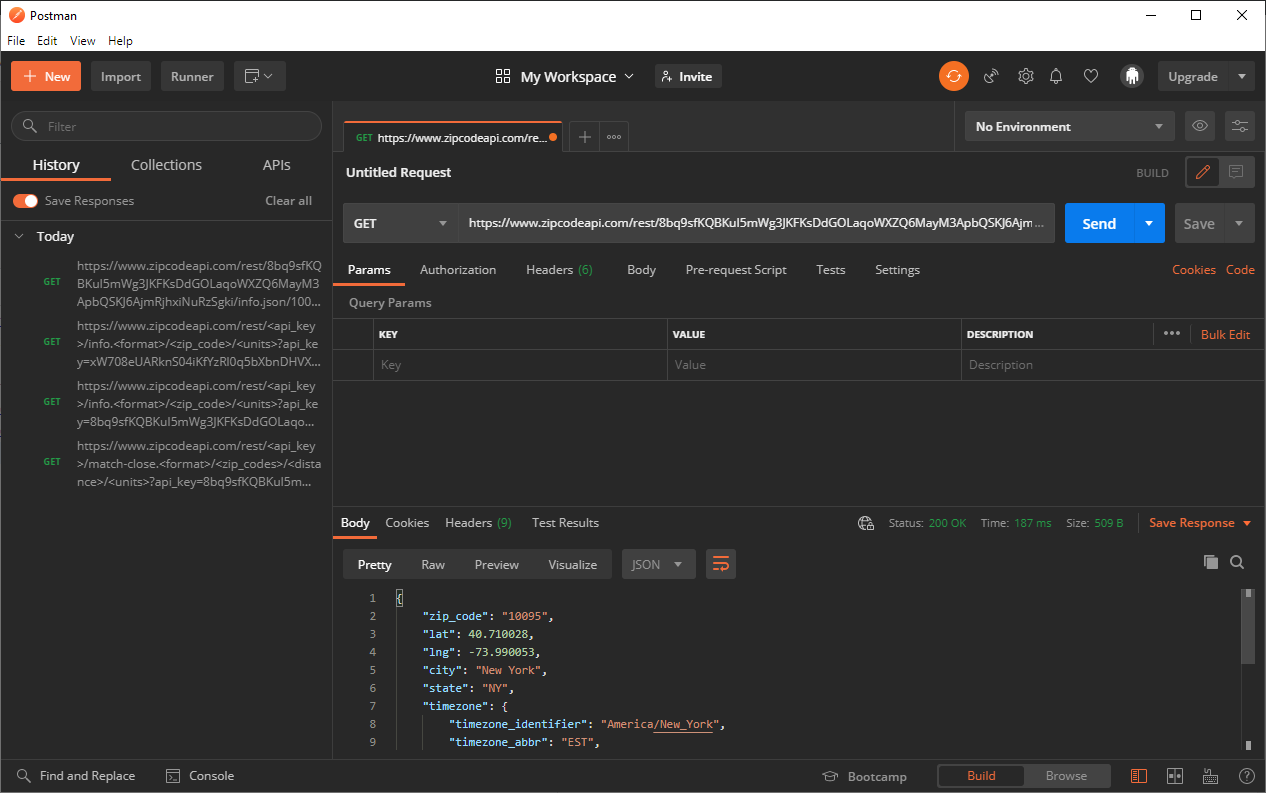
  2. run GET on postman
    https://www.zipcodeapi.com/rest/8bq9sfKQBKuI5mWg3JKFKsDdGOLaqoWXZQ6MayM3ApbQSKJ6AjmRjhxiNuRzSgki/info.json/10095/degrees

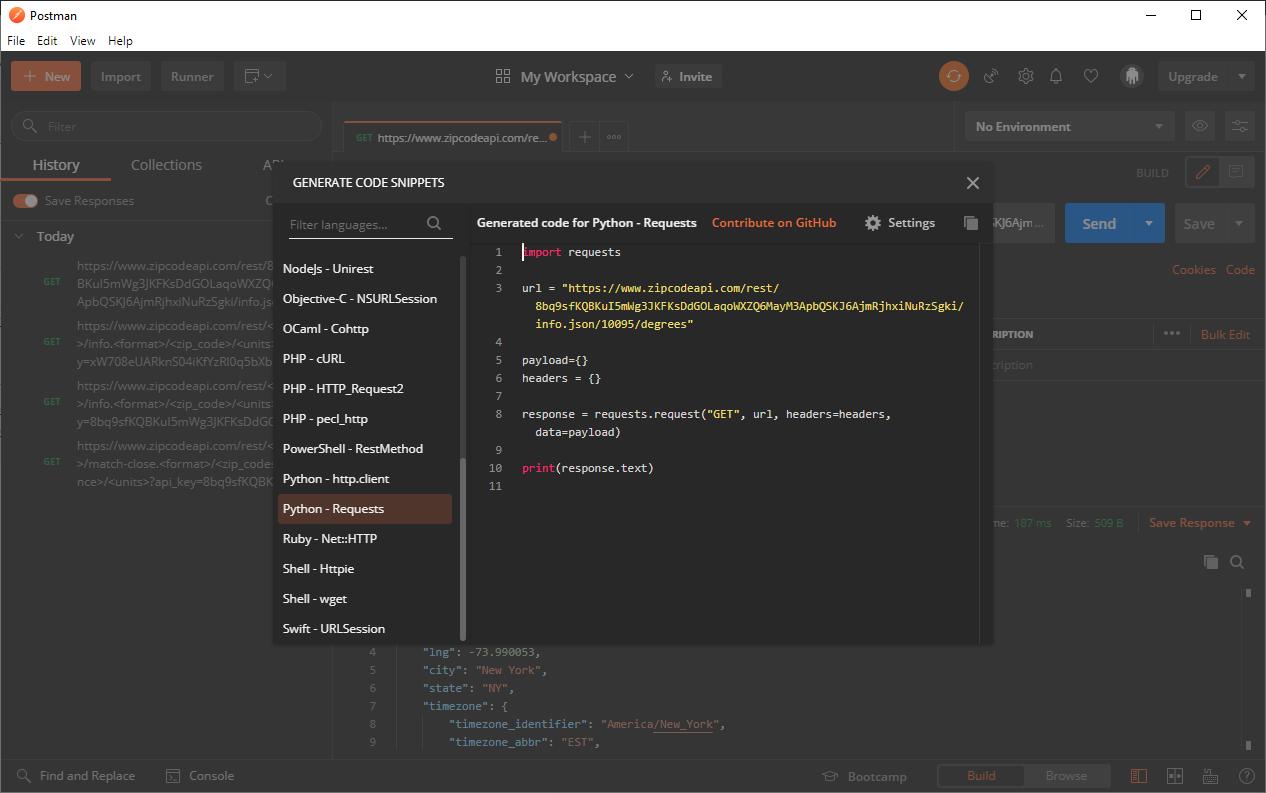
    then click code and select python, you will get python code with requests:

  3. copy the python code into postman_api.py

    import requests
    url = "https://www.zipcodeapi.com/rest/8bq9sfKQBKuI5mWg3JKFKsDdGOLaqoWXZQ6MayM3ApbQSKJ6AjmRjhxiNuRzSgki/info.json/10095/degrees"
    payload={}
    headers = {}
    response = requests.request("GET", url, headers=headers, data=payload)
    print(response.text)
  4. run postman_api.py to verify

    C:\Users\zhuby>postman_api.py
    {"zip_code":"10095","lat":40.710028,"lng":-73.990053,"city":"New York","state":"NY","timezone":{"timezone_identifier":"America\/New_York","timezone_abbr":"EST","utc_offset_sec":-18000,"is_dst":"F"},"acceptable_city_names":[],"area_codes":[212,646,917]}

use MS playwright-python for testing automation

https://github.com/microsoft/playwright-python

  1. install playwright-python
    pip3 install playwright

  2. install webkit
    python -m playwright install

  3. generate code
    python -m playwright codegen –target python -o mytest.py -b webkit https://portal.azure.com/#home
    Login Azure and do some operations in the WebKit window, then close it, you will get mytest.py generated in same directory, uploaded mine to github:
    https://github.com/zhuby1973/azure/blob/main/mytest.py

  4. python mytest.py

Create one executable file for a Flask app with PyInstaller

  1. pip3 install pyinstaller

  2. we have a sample flask app server.py

    from flask import Flask
    server = Flask(__name__)
    @server.route("/")
    def hello():
        return "Hello World!"
    if __name__ == "__main__":
    server.run(host='0.0.0.0')
  3. pyinstaller -F server.py
    it will create a executable file server in ./dist

  4. verify the executable file

    root@labvm:~/python_docker/src/dist# ./server
    * Serving Flask app "server" (lazy loading)
    * Environment: production
    WARNING: This is a development server. Do not use it in a production deployment.
    Use a production WSGI server instead.
    * Debug mode: off
    * Running on http://0.0.0.0:5000/ (Press CTRL+C to quit)

if you have static and templates folder and other py files, you can run command like:
pyinstaller -F -i BreezePython.ico --add-data="HttpServer\static;HttpServer\static" --add-data="HttpServer\templates;Httpserver\templates" --add-data="settings.py;." manage.py