Create a Canada population map in Python using GeoPandas and Matplotlib

Step 1: Install required Python libraries

pip install descartes
pip install geopandas
pip install matplotlib
pip install numpy
pip install pandas

Step 2: Download Canada population and shapefile
you can search and Download Canada shapefile from Statistics Canada or pull it from Github(https://github.com/zhuby1973/geopandas.git)

the shapefile include 3 files, we need save it in same folder:
lpr_000b16a_e.dbf
lpr_000b16a_e.shp
lpr_000b16a_e.shx

Step 3: Begin to code

import pandas as pd
import numpy as np
import geopandas as gpd
import matplotlib.pyplot as plt

#load Canada shapefile
fp = "lpr_000b16a_e.shp"
map_df = gpd.read_file(fp)

#load Canada population csv file
province = pd.read_csv("1710000901-eng.csv", sep=",")

# join the geodataframe with the csv dataframe
merged = map_df.merge(province, how='left', left_on="PRENAME", right_on="Geography")
merged=merged.rename(index=str, columns={"PRENAME":"PRENAME", "geometry":"geometry", "Q4 2020":"population"})

# add province name and populations on map
fig = plt.figure(1, figsize=(25,15)) 
ax = fig.add_subplot()
merged.apply(lambda x: ax.annotate(text=x.PRENAME + "\n" + str(x.population), xy=x.geometry.centroid.coords[0], ha='center', fontsize=14, color='blue'), axis=1);
merged.boundary.plot(ax=ax, color='Black', linewidth=.4)
merged.plot(ax=ax, cmap='Pastel2', figsize=(12, 12))
ax.text(-0.05, 0.5, 'http://pythondesign.ca/', transform=ax.transAxes,
        fontsize=20, color='gray', alpha=0.5,
        ha='center', va='center', rotation='90')

Step 4: Execute the code to generate the map

Inspired by:
1. https://health-infobase.canada.ca/covid-19/dashboard/
2. https://jcutrer.com/python/learn-geopandas-plotting-usmaps

need fix the overlapping annotations later.

generate artistic or animated QR-Code with python MyQR

  1. pip install myqr
  2. generate common qr-code
from MyQR import myqr
myqr.run(
    words='https://www.ibm.com',
)

3. generate colorized artistic qr-code with your own png picture

from MyQR import myqr
myqr.run(
words='https://www.ibm.com',
picture='C:\Users\zhuby\panda.png',
colorized=True,
)

4. generate animated qr-code

from MyQR import myqr
myqr.run(
    words='https://www.ibm.com',
    version=5,  
    level='H', 
    picture='C:\\Users\\zhuby\\cat.gif',  
    colorized=True, 
    contrast=1.0, 
    brightness=1.0, 
    save_name='cat_qrcode.gif', #format could be .jpg .png .bmp .gif
    save_dir='C:\\Users\\zhuby',
)

asynchronous execute python app with ThreadPoolExecutor

we can launch parallel tasks with python concurrent.futures to double the speed.
here is the original code with one thread one_thread.py:

import flask
import json
import time

app = flask.Flask(__name__)

def read_file():
	time.sleep(0.1)
	return "file result"
	
def read_db():
	time.sleep(0.2)
	return "db result"
	
def read_api():
	time.sleep(0.3)
	return "api result"
	
@app.route("/")
def index():
	result_file = read_file()
	result_db = read_db()
	result_api = read_api()
	
	return json.dumps({
		"result_file": result_file,
		"result_db": result_db,
		"result_api": result_api,
	})
	
if __name__ == "__main__":
	app.run(host='0.0.0.0')

and another one multiple_threads.py

import flask
import json
import time
from concurrent.futures import ThreadPoolExecutor

app = flask.Flask(__name__)
pool = ThreadPoolExecutor()

def read_file():
	time.sleep(0.1)
	return "file result"
	
def read_db():
	time.sleep(0.2)
	return "db result"
	
def read_api():
	time.sleep(0.3)
	return "api result"
	
@app.route("/")
def index():
	result_file = pool.submit(read_file)
	result_db = pool.submit(read_db)
	result_api = pool.submit(read_api)
	
	return json.dumps({
		"result_file": result_file.result(),
		"result_db": result_db.result(),
		"result_api": result_api.result(),
	})
	
if __name__ == "__main__":
	app.run(host='0.0.0.0')

run curl command to compare the real time spend:

output from one_thread.py:
ubuntu@ubuntu2020:~$ time curl http://192.168.0.171:5000
{"result_file": "file result", "result_db": "db result", "result_api": "api result"}
real    0m0.629s
user    0m0.009s
sys     0m0.013s

output from multiple_threads.py:
ubuntu@ubuntu2020:~$ time curl http://192.168.0.171:5000
{"result_file": "file result", "result_db": "db result", "result_api": "api result"}
real    0m0.328s
user    0m0.014s
sys     0m0.010s

the real time is dropped from 629ms to 328ms with multiple threads!


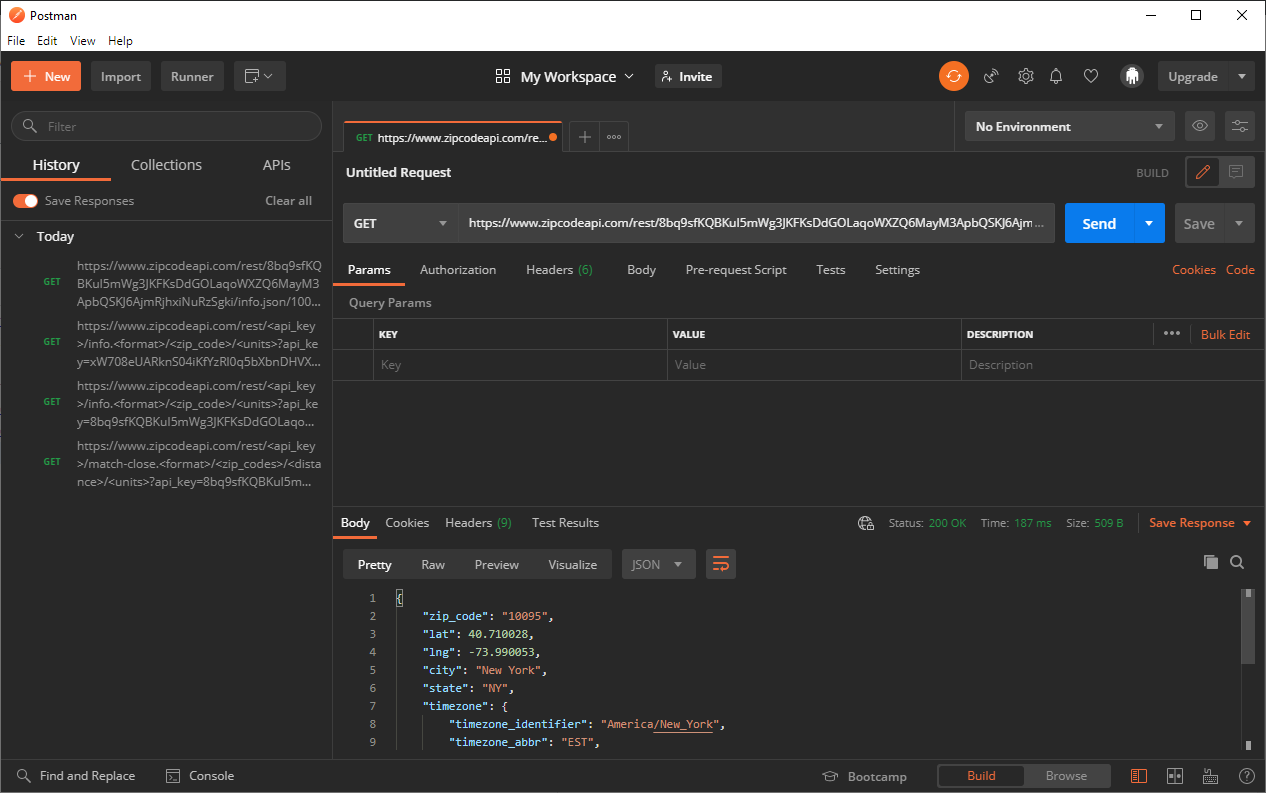
generate python API testing code with postman

  1. Register on https://www.zipcodeapi.com/API to get your Application Key: 8bq9sfKQBKuI5mWg3JKFKsDdGOLaqoWXZQ6MayM3ApbQSKJ6AjmRjhxiNuRzSgki

  2. run GET on postman
    https://www.zipcodeapi.com/rest/8bq9sfKQBKuI5mWg3JKFKsDdGOLaqoWXZQ6MayM3ApbQSKJ6AjmRjhxiNuRzSgki/info.json/10095/degrees

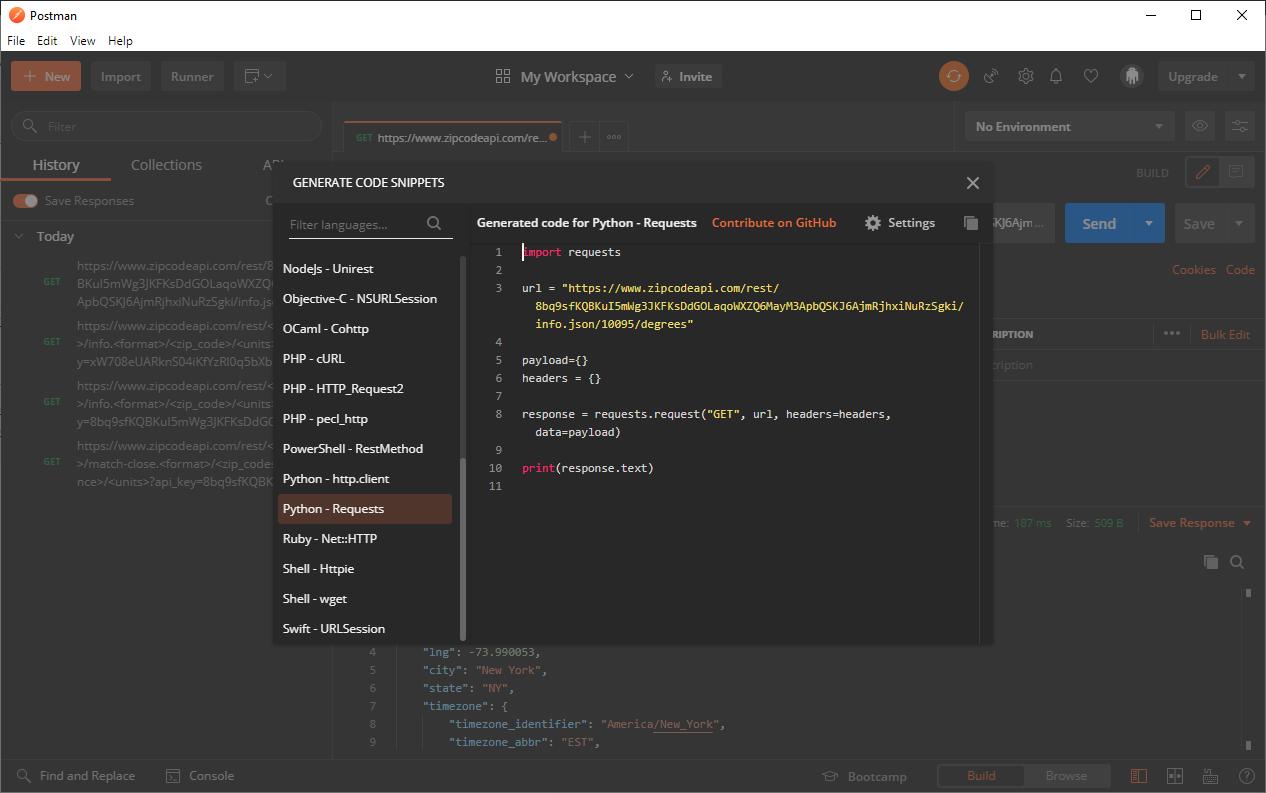
    then click code and select python, you will get python code with requests:

  3. copy the python code into postman_api.py

    import requests
    url = "https://www.zipcodeapi.com/rest/8bq9sfKQBKuI5mWg3JKFKsDdGOLaqoWXZQ6MayM3ApbQSKJ6AjmRjhxiNuRzSgki/info.json/10095/degrees"
    payload={}
    headers = {}
    response = requests.request("GET", url, headers=headers, data=payload)
    print(response.text)
  4. run postman_api.py to verify

    C:\Users\zhuby>postman_api.py
    {"zip_code":"10095","lat":40.710028,"lng":-73.990053,"city":"New York","state":"NY","timezone":{"timezone_identifier":"America\/New_York","timezone_abbr":"EST","utc_offset_sec":-18000,"is_dst":"F"},"acceptable_city_names":[],"area_codes":[212,646,917]}

use MS playwright-python for testing automation

https://github.com/microsoft/playwright-python

  1. install playwright-python
    pip3 install playwright

  2. install webkit
    python -m playwright install

  3. generate code
    python -m playwright codegen –target python -o mytest.py -b webkit https://portal.azure.com/#home
    Login Azure and do some operations in the WebKit window, then close it, you will get mytest.py generated in same directory, uploaded mine to github:
    https://github.com/zhuby1973/azure/blob/main/mytest.py

  4. python mytest.py

Create one executable file for a Flask app with PyInstaller

  1. pip3 install pyinstaller

  2. we have a sample flask app server.py

    from flask import Flask
    server = Flask(__name__)
    @server.route("/")
    def hello():
        return "Hello World!"
    if __name__ == "__main__":
    server.run(host='0.0.0.0')
  3. pyinstaller -F server.py
    it will create a executable file server in ./dist

  4. verify the executable file

    root@labvm:~/python_docker/src/dist# ./server
    * Serving Flask app "server" (lazy loading)
    * Environment: production
    WARNING: This is a development server. Do not use it in a production deployment.
    Use a production WSGI server instead.
    * Debug mode: off
    * Running on http://0.0.0.0:5000/ (Press CTRL+C to quit)

if you have static and templates folder and other py files, you can run command like:
pyinstaller -F -i BreezePython.ico --add-data="HttpServer\static;HttpServer\static" --add-data="HttpServer\templates;Httpserver\templates" --add-data="settings.py;." manage.py

create a interactive 3D global with pyecharts

  1. pip install pyecharts
  2. write earth.py as below:
import pyecharts.options as opts
from pyecharts.charts import MapGlobe
from pyecharts.faker import POPULATION
  
data = [x for _, x in POPULATION[1:]]
low, high = min(data), max(data)
c = (
MapGlobe(init_opts=opts.InitOpts(width='300px', height='300px',bg_color='#FFFAFA',))
.add_schema()
.add(
maptype="world",
series_name="World Population",
data_pair=POPULATION[1:],
is_map_symbol_show=True,
label_opts=opts.LabelOpts(is_show=True),
)
.set_global_opts(
title_opts=opts.TitleOpts(title="3D Global"),

visualmap_opts=opts.VisualMapOpts(
min_=low,
max_=high,
range_text=["max", "min"],
is_calculable=True,
range_color=["lightskyblue", "yellow", "orangered"],
)
)
.render("world_map_3d.html")
)

3. python earth.py, it will generate world_map_3d.html file, open it in browser:

Awesome-pyecharts

use python Faker to generate test data for any situation

  1. pip install Faker
  2. test Faker functions:
>>> from faker import Faker
>>> fake = Faker(locale='it_IT')
>>> fake.name()
'Romeo Lanfranchi'
>>> fake.address()
'Piazza Antonio 599 Appartamento 12\nSan Ludovica, 42403 Reggio Emilia (TR)'
>>> fake.ssn()
'YQGCOO12N17H487H'
>>> fake.company()
'Acerbi, Rossini e Viola s.r.l.'
>>> fake.ascii_email()
'campanellaguido@hotmail.it'

3. generate test data with name, password and address

import pymysql
from faker import Faker

conn = pymysql.connect(host="ubuntu2020", port=3306, user="monty", password="password", db="flask201",
                       charset="utf8")

cursor = conn.cursor()
sql1 = """drop table if exists faker_user"""
sql2 = """
create table faker_user(
pid int primary key auto_increment,
username varchar(40),
password varchar(20),
address varchar(100) 
)
"""
cursor.execute(sql1)
cursor.execute(sql2)
fake = Faker("en-US")
for i in range(20):
    sql = """insert into faker_user(username,password,address) 
    values('%s','%s','%s')""" % (fake.name(), fake.password(special_chars=False), fake.address())
    print('NAME:'+fake.name() + '|PASSWORD:'+fake.password(special_chars=False) + '|ADDR:'+fake.address())
    cursor.execute(sql)

conn.commit()
cursor.close()
conn.close()

4. generate a json of 10 students with name students.json that contains student name, address, location coordinates and student roll number

from faker import Faker 
import json            # To create a json file                 
from random import randint      # For student id 
fake = Faker() 
def input_data(x): 
  
    # dictionary 
    student_data ={} 
    for i in range(0, x): 
        student_data[i]={} 
        student_data[i]['id']= randint(1, 100) 
        student_data[i]['name']= fake.name() 
        student_data[i]['address']= fake.address() 
        student_data[i]['latitude']= str(fake.latitude()) 
        student_data[i]['longitude']= str(fake.longitude()) 
    print(student_data) 
  
    # dictionary dumped as json in a json file 
    with open('students.json', 'w') as fp: 
        json.dump(student_data, fp) 
      
def main():
      # Enter number of students 
    number_of_students = 10  
    input_data(number_of_students) 
main() 

C:\Users\zhuby>test_faker.py
{0: {'id': 57, 'name': 'Joshua Russell', 'address': '27726 Reed Bypass Apt. 649\nNelsonburgh, PA 87356', 'latitude': '-86.0037635', 'longitude': '-88.371746'}, 1: {'id': 88, 'name': 'Alexander Carpenter', 'address': '5124 Gonzales Center Apt. 087\nAngelamouth, RI 36493', 'latitude': '87.4800465', 'longitude': '-16.477034'}, 2: {'id': 40, 'name': 'Rachel Miller', 'address': '2878 Curtis Parkways Suite 338\nCarolburgh, OK 27880', 'latitude': '-87.890325', 'longitude': '-98.986404'}, 3: {'id': 72, 'name': 'Jon Graves', 'address': '087 Kelley Ports\nSusanmouth, MN 32402', 'latitude': '-50.9987975', 'longitude': '-145.366978'}, 4: {'id': 1, 'name': 'Joseph Rogers', 'address': '630 Sheryl Underpass\nEast Cheryl, IL 95386', 'latitude': '-62.0369605', 'longitude': '-167.059577'}, 5: {'id': 28, 'name': 'Cheryl Hill', 'address': '6863 Christopher Flats\nNew Angela, OK 10664', 'latitude': '59.4719505', 'longitude': '-73.419133'}, 6: {'id': 93, 'name': 'Sean Robinson', 'address': '911 Gardner Center\nEduardoshire, DC 78317', 'latitude': '7.7988015', 'longitude': '156.459505'}, 7: {'id': 6, 'name': 'Jason Myers', 'address': '9577 Shane Valleys Apt. 973\nNew Peggychester, MI 19213', 'latitude': '27.410656', 'longitude': '71.306510'}, 8: {'id': 100, 'name': 'Lindsay Johnson', 'address': '8592 Kathleen Forge Apt. 490\nBerryhaven, TX 84031', 'latitude': '58.841526', 'longitude': '79.355569'}, 9: {'id': 23, 'name': 'Sandra White', 'address': '93126 Schneider Center Suite 054\nAmandaberg, CA 31652', 'latitude': '25.893303', 'longitude': '113.012125'}}

use groovy for Jenkins job automation

  1. we can find latest Jenkins version from https://www.jenkins.io/download/, if we select Docker, to use the latest LTS: docker pull jenkins/jenkins:lts
  2. git clone https://github.com/zhuby1973/jenkins-docker-groovy.git
root@ubunu2004:~/jenkins-docker-groovy# ls
build.sh  config.xml  create-seed-job.groovy  Dockerfile  plugins.groovy  plugins.txt  README.md  security.groovy  seeddsl.groovy
root@ubunu2004:~/jenkins-docker-groovy# cat Dockerfile
FROM jenkins/jenkins:lts
ENV JAVA_OPTS="-Djenkins.install.runSetupWizard=false"
COPY security.groovy /usr/share/jenkins/ref/init.groovy.d/security.groovy
COPY seeddsl.groovy /usr/share/jenkins/seeddsl.groovy
COPY config.xml /usr/share/jenkins/seed-job-config.xml
COPY create-seed-job.groovy /usr/share/jenkins/ref/init.groovy.d/create-seed-job.groovy
COPY plugins.txt /usr/share/jenkins/ref/plugins.txt
RUN /usr/local/bin/install-plugins.sh < /usr/share/jenkins/ref/plugins.txt
root@ubunu2004:~/jenkins-docker-groovy# cat build.sh
#!/bin/bash
docker rm -f `docker ps -a -q`
docker build -t local/jenkins . && docker run --name jenkins -d -p 80:8080 -p 50000:50000 local/jenkins && docker logs -f `docker ps -a -q`

3. sh build.sh you will get Jenkins Docker image build and running on port 80, you can login with admin/admin (which we created from security.groovy

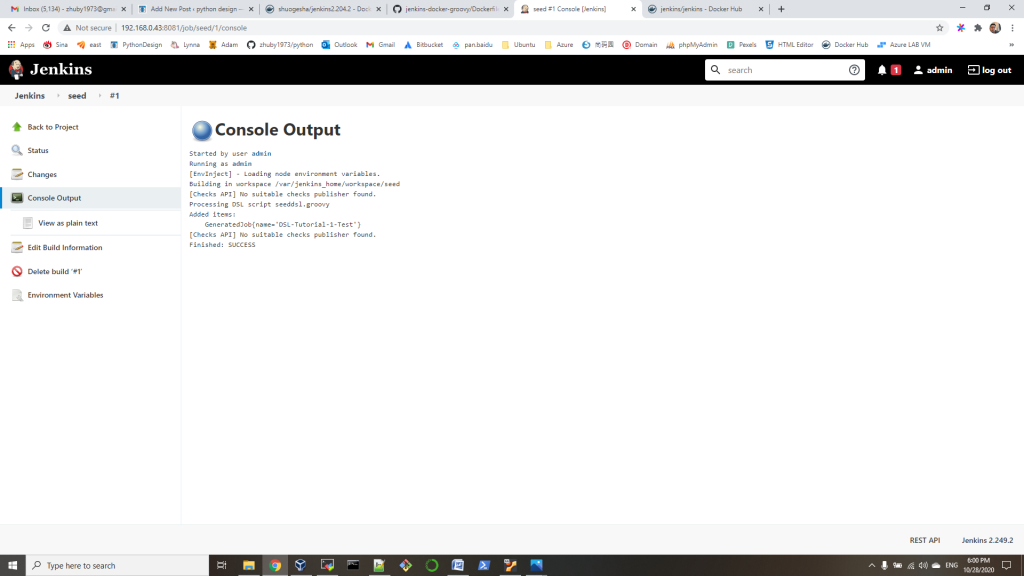
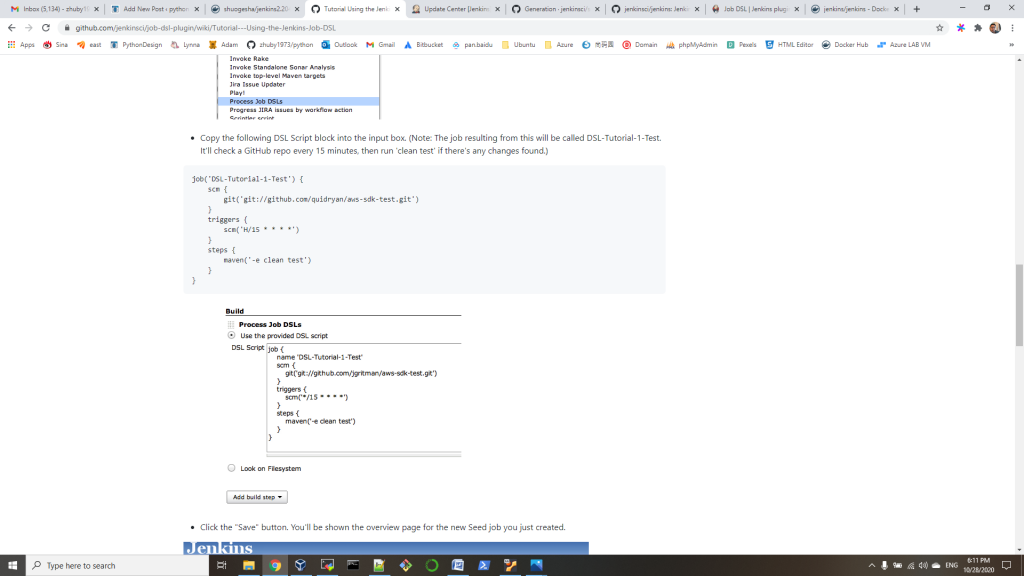
4. run “seed” job, you will find another job “DSL-Tutorial-1-Test” created successfully!

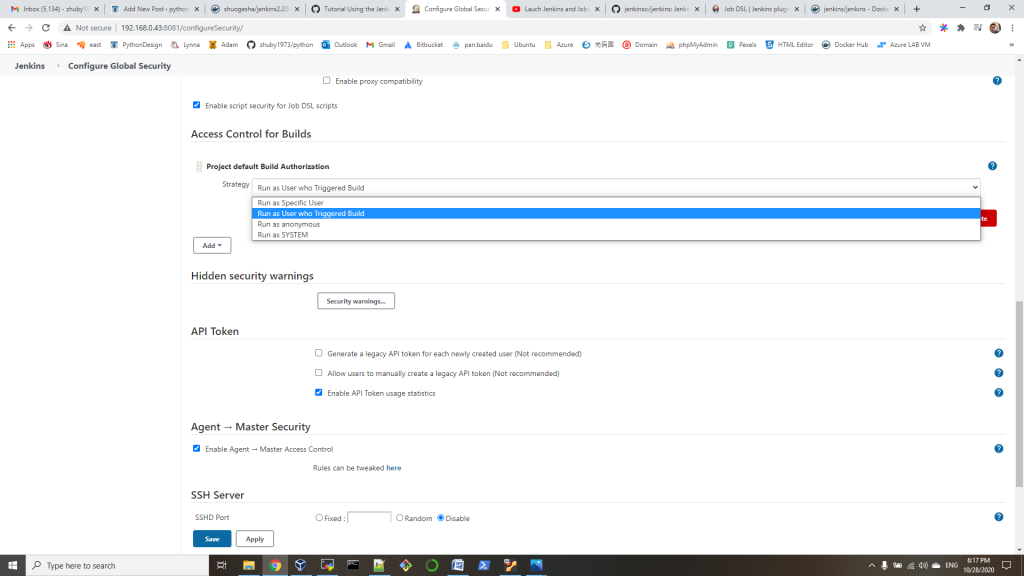
5. we installed two important plugins: Seed Jenkins plug-in and Authorize Project for this automation. you can manually approve groovy script in “In-process Script Approval”, or you can install Authorize Project, then update “Configure Global Security” => “Access Control for Builds” as below:

6. reference link:
https://plugins.jenkins.io/job-dsl/
https://github.com/jenkinsci/seed-plugin/wiki/Generation
https://github.com/jenkinsci/job-dsl-plugin/wiki/Tutorial—Using-the-Jenkins-Job-DSL

How to enable vault on WildFly

  • create vault keystore

root@ubunu2004:/opt/wildfly/bin# keytool -genseckey -alias busa -storetype jceks -keyalg AES -keysize 256 -storepass union1234 -keypass union1234 -keystore vault.store

  • setup vault
root@ubunu2004:/opt/wildfly/bin# ./vault.sh --keystore ./vault/vault.store  --keystore-password union1234 --alias busa --vault-block vb --attribute password --sec-attr something --enc-dir ./vault/ --iteration 50 --salt 1234abcd
=========================================================================

  JBoss Vault

  JBOSS_HOME: /opt/wildfly

  JAVA: java

=========================================================================

Oct 08, 2020 9:24:25 AM org.picketbox.plugins.vault.PicketBoxSecurityVault init
INFO: PBOX00361: Default Security Vault Implementation Initialized and Ready
WFLYSEC0047: Secured attribute value has been stored in Vault.
Please make note of the following:
********************************************
Vault Block:vb
Attribute Name:password
Configuration should be done as follows:
VAULT::vb::password::1
********************************************
WFLYSEC0048: Vault Configuration commands in WildFly for CLI:
********************************************
For standalone mode:
/core-service=vault:add(vault-options=[("KEYSTORE_URL" => "./vault/vault.store"),("KEYSTORE_PASSWORD" => "MASK-0FOV91/9idPaMgF3tkR9.V"),("KEYSTORE_ALIAS" => "busa"),("SALT" => "1234abcd"),("ITERATION_COUNT" => "50"),("ENC_FILE_DIR" => "./vault/")])
********************************************
For domain mode:
/host=the_host/core-service=vault:add(vault-options=[("KEYSTORE_URL" => "./vault/vault.store"),("KEYSTORE_PASSWORD" => "MASK-0FOV91/9idPaMgF3tkR9.V"),("KEYSTORE_ALIAS" => "busa"),("SALT" => "1234abcd"),("ITERATION_COUNT" => "50"),("ENC_FILE_DIR" => "./vault/")])
********************************************
  • run CLI command to add Vault Configuration
root@ubunu2004:/opt/wildfly# ./bin/jboss-cli.sh --connect controller=192.168.0.43:9990
[standalone@192.168.0.43:9990 /] /core-service=vault:add(vault-options=[("KEYSTORE_URL" => "/opt/wildfly/bin/vault/vault.store"),("KEYSTORE_PASSWORD" => "MASK-0FOV91/9idPaMgF3tkR9.V"),("KEYSTORE_ALIAS" => "busa"),("SALT" => "1234abcd"),("ITERATION_COUNT" => "50"),("ENC_FILE_DIR" => "/opt/wildfly/bin/vault/")])
{"outcome" => "success"}
  • verify the standalone.xml
    <vault>
        <vault-option name="KEYSTORE_URL" value="/opt/wildfly/bin/vault/vault.store"/>
        <vault-option name="KEYSTORE_PASSWORD" value="MASK-0FOV91/9idPaMgF3tkR9.V"/>
        <vault-option name="KEYSTORE_ALIAS" value="busa"/>
        <vault-option name="SALT" value="1234abcd"/>
        <vault-option name="ITERATION_COUNT" value="50"/>
        <vault-option name="ENC_FILE_DIR" value="/opt/wildfly/bin/vault/"/>
    </vault>